A self watering pot is not magic and it is not lazy — it is capillary action pulling water upward from a reservoir below, the same physics a plant's roots use in nature.
The reservoir sits underneath the soil, separated by a platform or wick. The plant draws moisture as it needs it instead of waiting for you to remember.
The options below cover the full range — from ceramic reservoirs and terracotta ollas to a five-minute conversion you can build from things already in your kitchen.
From ceramic reservoirs and terracotta ollas to wicking cord conversions — plus which plants fit, setup tips, and a five-minute DIY.
How a Self Watering Pot Actually Works
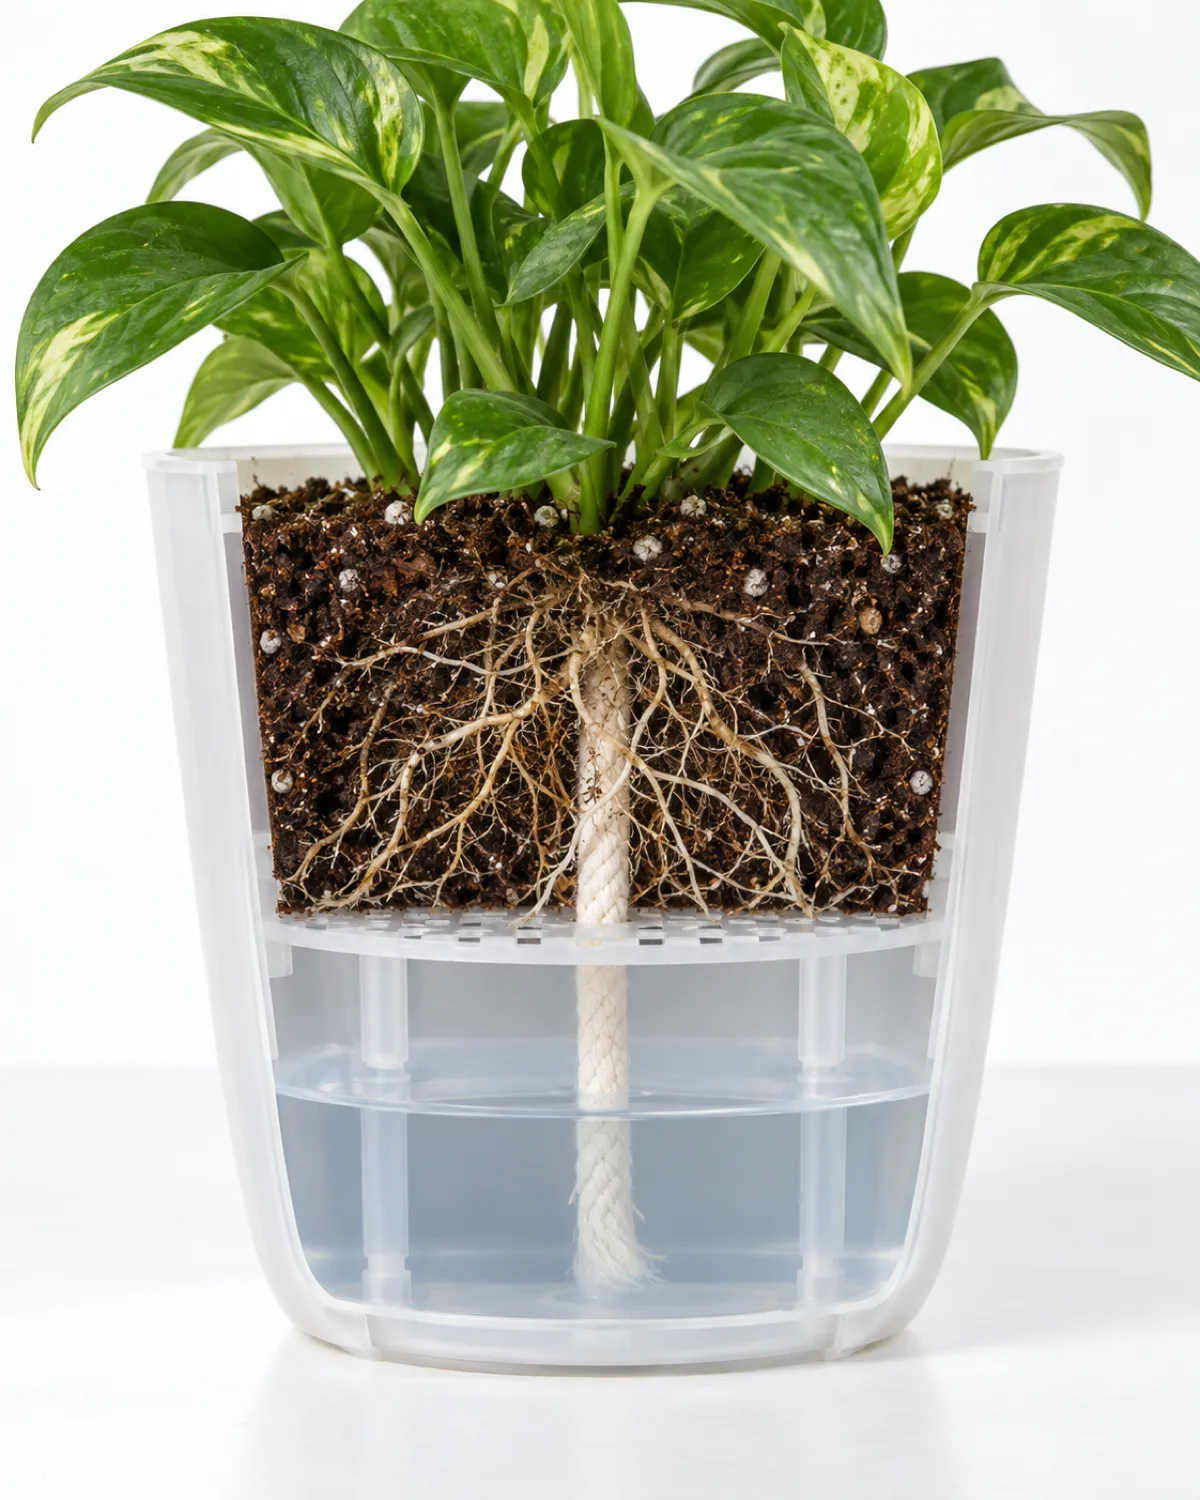
Every self watering pot uses the same physics: capillary action. Water moves upward from a reservoir into the soil through a wick or porous medium, pulled by the same intermolecular forces that let a paper towel soak up a spill from below.
The basic anatomy is three layers:
- Water reservoir at the bottom — a sealed chamber that holds anywhere from a cup to a gallon depending on pot size
- Platform or barrier separating the reservoir from the soil — perforated plastic, a mesh screen, or the pot wall itself
- Wick or contact point — cotton rope, felt strip, or soil touching the water through a hole in the platform
The plant's roots draw moisture from the soil as they normally would. As the soil dries, capillary tension pulls replacement moisture up from the reservoir. The cycle is self-regulating: a thirsty plant in warm bright light pulls water faster, a dormant plant in cool shade barely draws at all.
Most designs include an indicator rod or transparent section so you can see the water level without lifting anything. When the reservoir runs dry, you refill it — typically every one to three weeks depending on plant size, pot size, and season.
This is sub-irrigation, not top watering. The roots get moisture from below, which keeps the soil surface drier, reduces fungus gnat habitat, and delivers water directly to the root zone where it matters.
The Ceramic Reservoir Pot
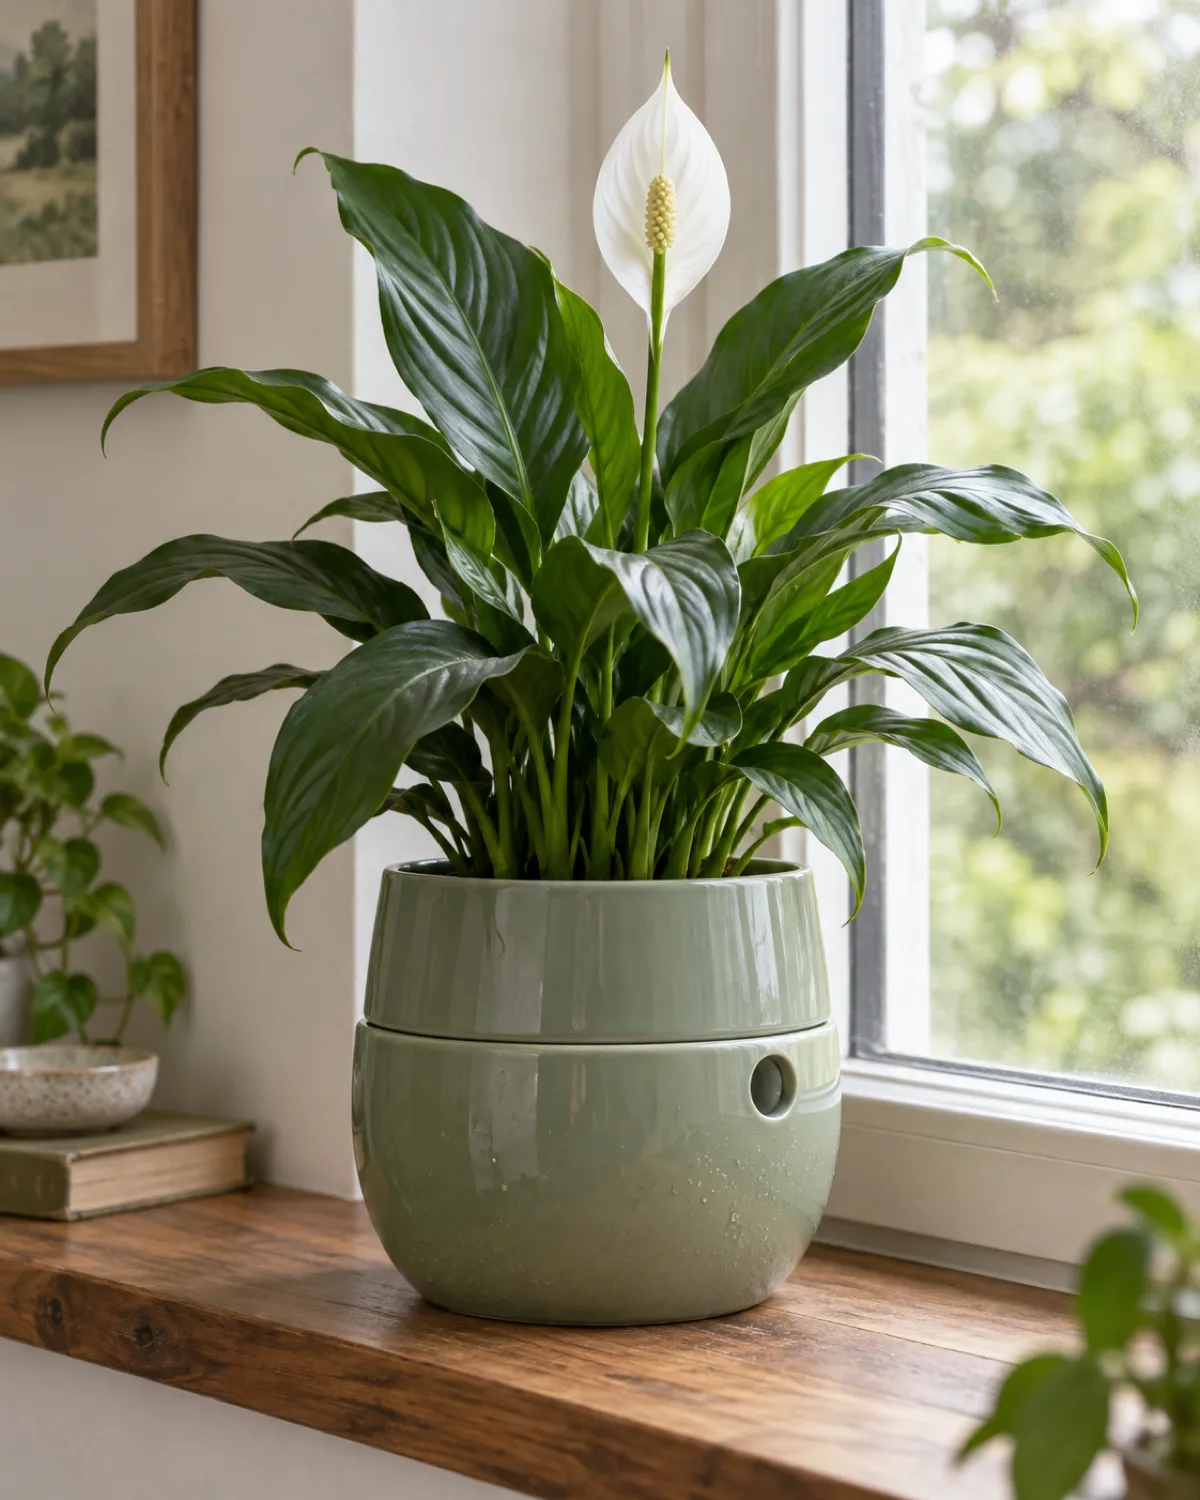
A ceramic reservoir pot looks like a regular planter from the outside. The reservoir is hidden inside the base, sealed by the glaze, with a fill hole on the side or back and sometimes a small drainage overflow.
The inner pot sits on a ledge above the water chamber. Soil contacts the reservoir through a wick or through a section of unglazed ceramic at the base that acts as a natural wicking surface.
What makes ceramic reservoir pots worth considering:
- They look like normal pots — no visible plastic, no indicator rods if you choose a minimalist design
- The weight of glazed ceramic provides stability for top-heavy plants
- Thermal mass buffers soil temperature swings, especially near windows
The trade-offs are real. Ceramic is heavy, especially when the reservoir is full. A 10-inch ceramic self watering pot with wet soil can weigh over 15 pounds. And because the reservoir is opaque, you are estimating water level by weight or by checking the fill hole — less convenient than a visible indicator.
These pots suit small to medium plants on windowsills, side tables, and shelves where appearance matters more than portability. Peace lilies, ferns, and spathiphyllum do particularly well because they prefer consistently moist soil and the ceramic aesthetic matches the plants people tend to keep in living spaces.
The Double-Wall Plastic Planter
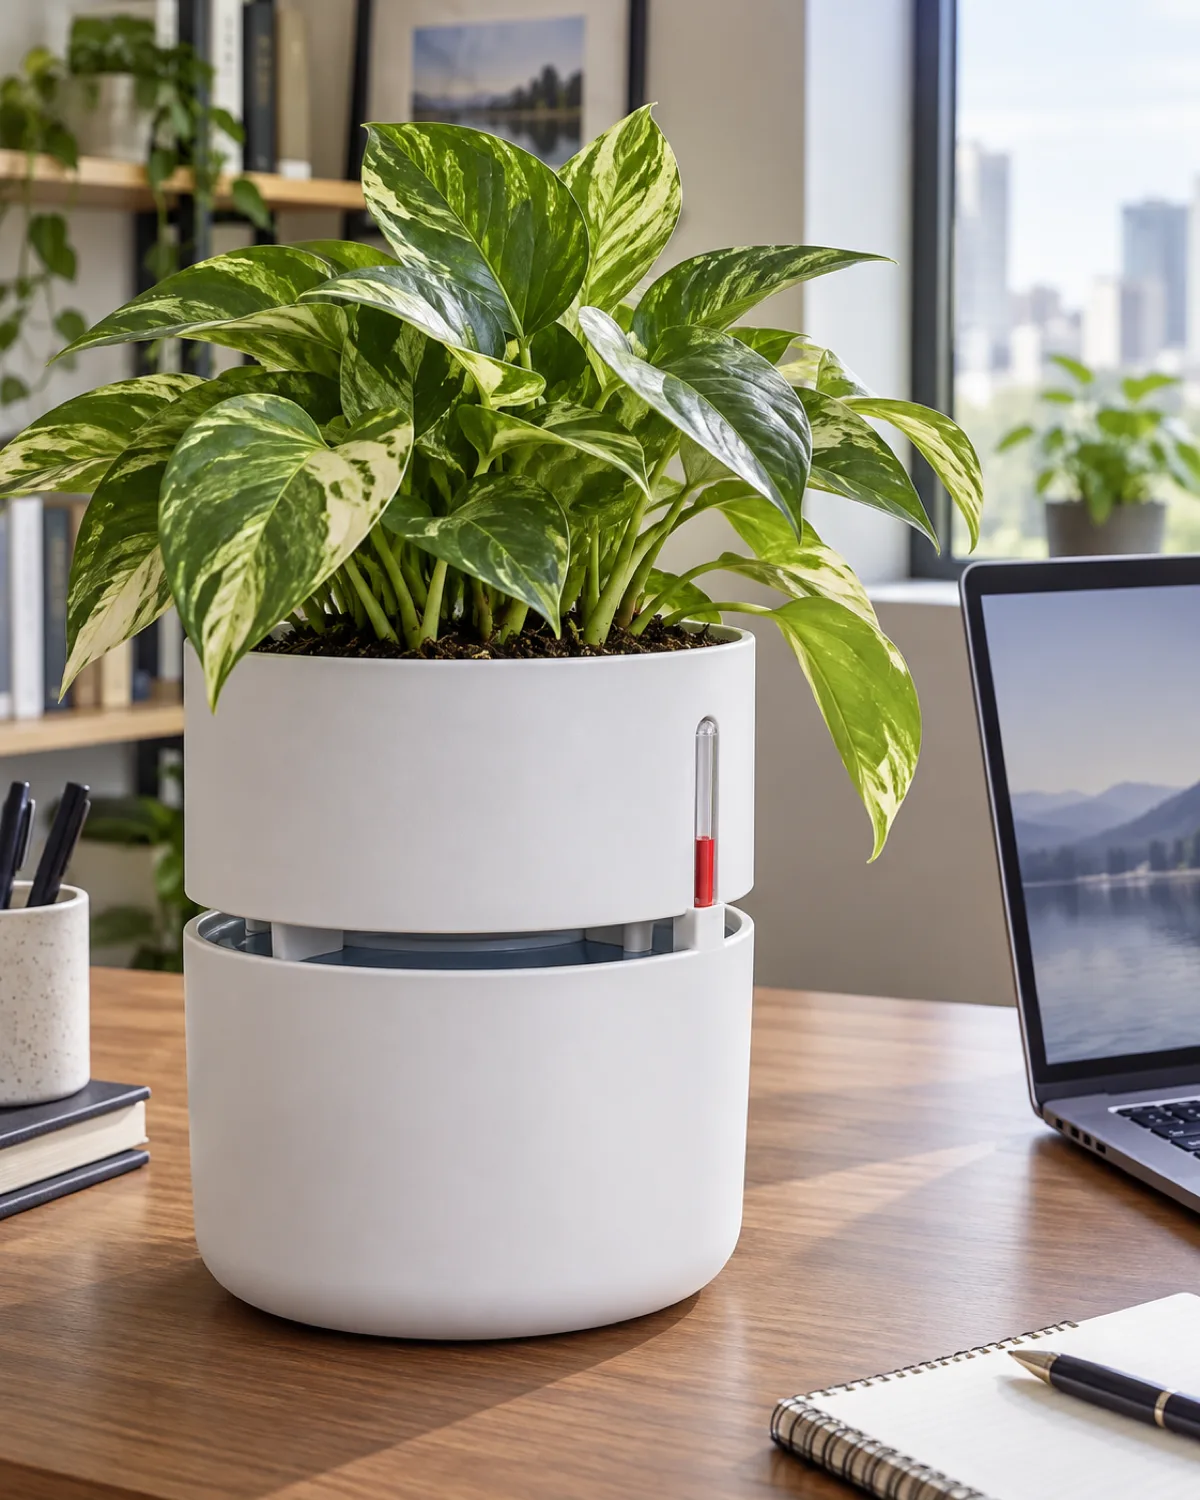
The double-wall plastic planter is the most common entry point into self watering. An inner pot nests inside an outer shell with a gap between them that serves as the reservoir. A water level indicator — usually a red or orange rod — rises and falls with the water level so you always know when to refill.
The inner pot lifts straight out, which is the single biggest practical advantage. You can inspect roots, check for rot, swap soil, or move the plant without disturbing the reservoir. No other self watering style gives you that kind of access.
Sizes range from 4 inches for herbs to 14 inches for floor plants. The Lechuza system is the best-known brand in this category, but dozens of manufacturers make compatible versions at lower price points.
What to look for when choosing one:
- Indicator rod — essential for knowing when to refill without lifting the pot
- Overflow drain — prevents waterlogging if you accidentally overfill
- Lift-out inner pot — makes root inspection and repotting dramatically easier
- Matte finish — modern matte plastics look far better than the glossy plastic of older self watering pots
The main trade-off is material. Even the best plastic planter looks like plastic. If that matters in your space, pair it with a decorative cachepot or basket that hides the outer shell. For consistent, reliable plant watering with minimal guesswork, this is the most practical self watering option available.
The Sub-Irrigated Window Box
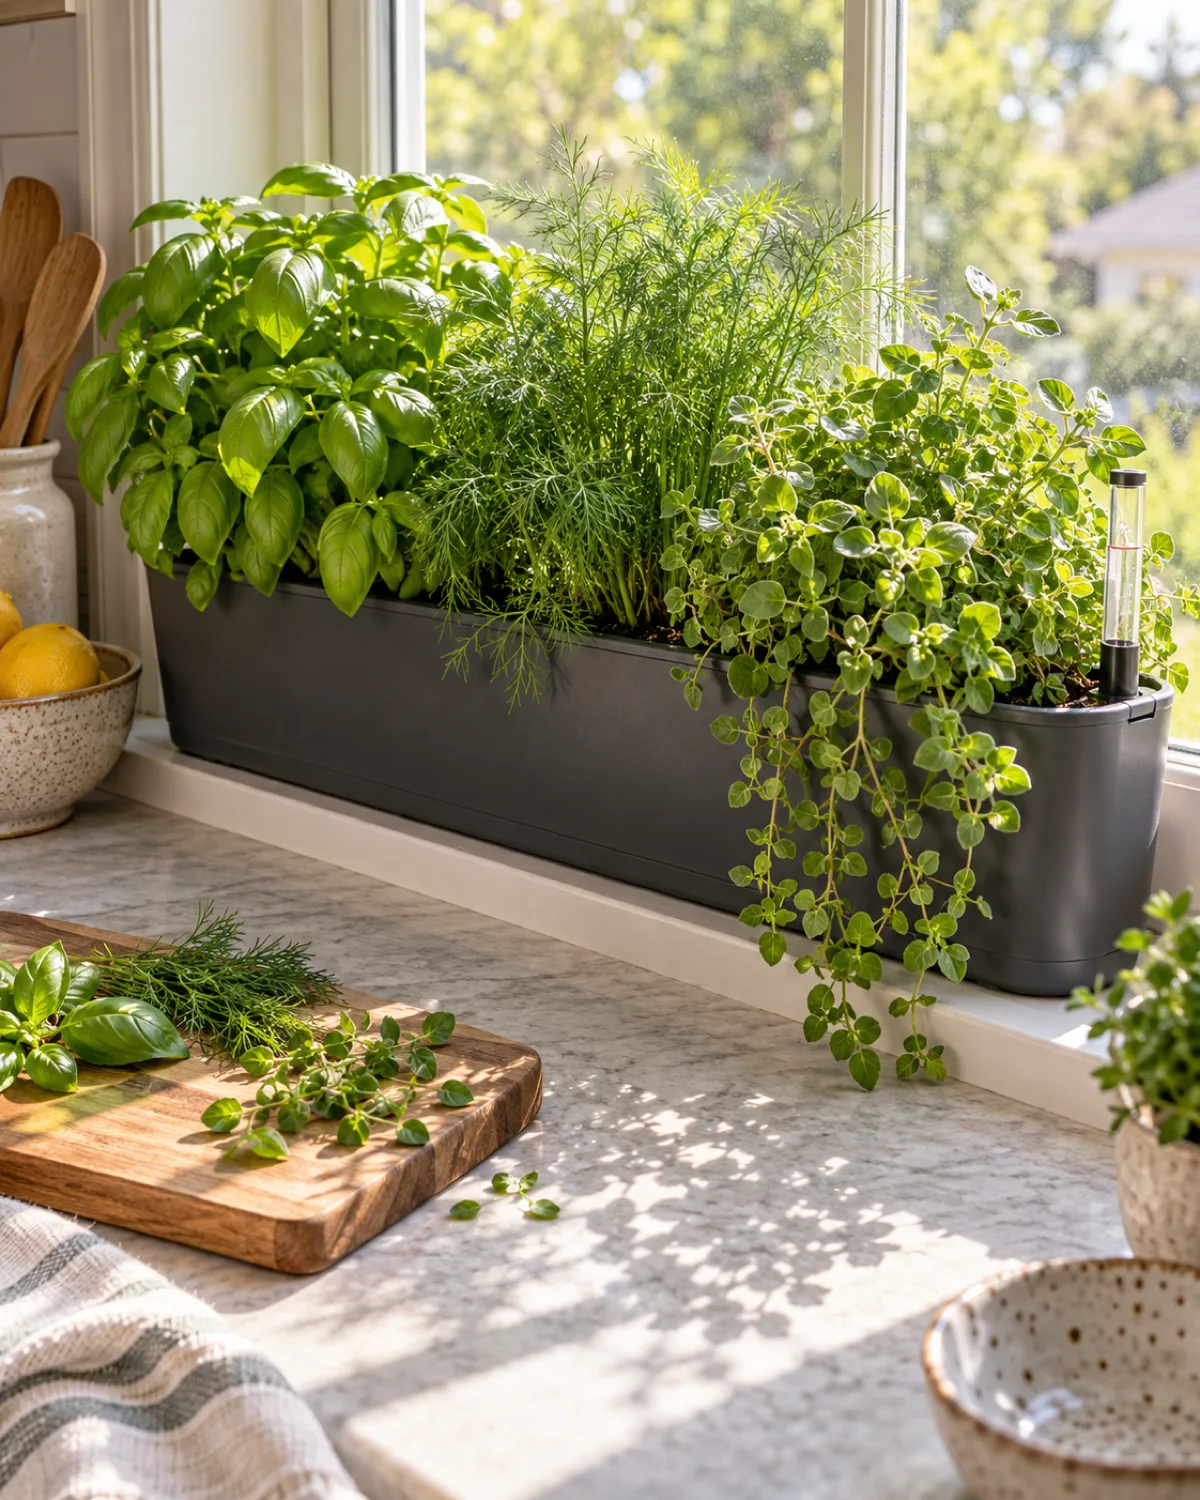
A sub-irrigated window box is a rectangular planter with a full-length reservoir running underneath. A fill tube at one end lets you add water without disturbing the plants, and the continuous trough delivers moisture evenly across the entire length.
This format excels at one thing: keeping thirsty, fast-growing plants consistently hydrated in a warm sunny spot where top-watered pots dry out within a day or two.
Plants that thrive in a window box:
- Kitchen herbs — basil, cilantro, mint, and parsley are notoriously thirsty and notoriously unforgiving when they dry out; a south or west kitchen window keeps them in constant moisture without daily watering
- Trailing plants — pothos, string of hearts, and creeping jenny spilling over the edge of a long window box create a living curtain effect that individual round pots cannot match
Practical considerations for window boxes:
- Mount with brackets rated for the full weight — a 24-inch box with wet soil and a full reservoir can exceed 20 pounds
- Check the fill tube weekly in summer, biweekly in winter
- Clean the reservoir once a season to prevent algae and mineral buildup
- Choose a box with an overflow hole to prevent waterlogging if you overfill
The limitation is shape. A window box fits a windowsill, a railing, or a shelf — it does not work as a standalone floor planter and it limits you to small plants that fit the shallow depth.
The Terracotta Olla Insert
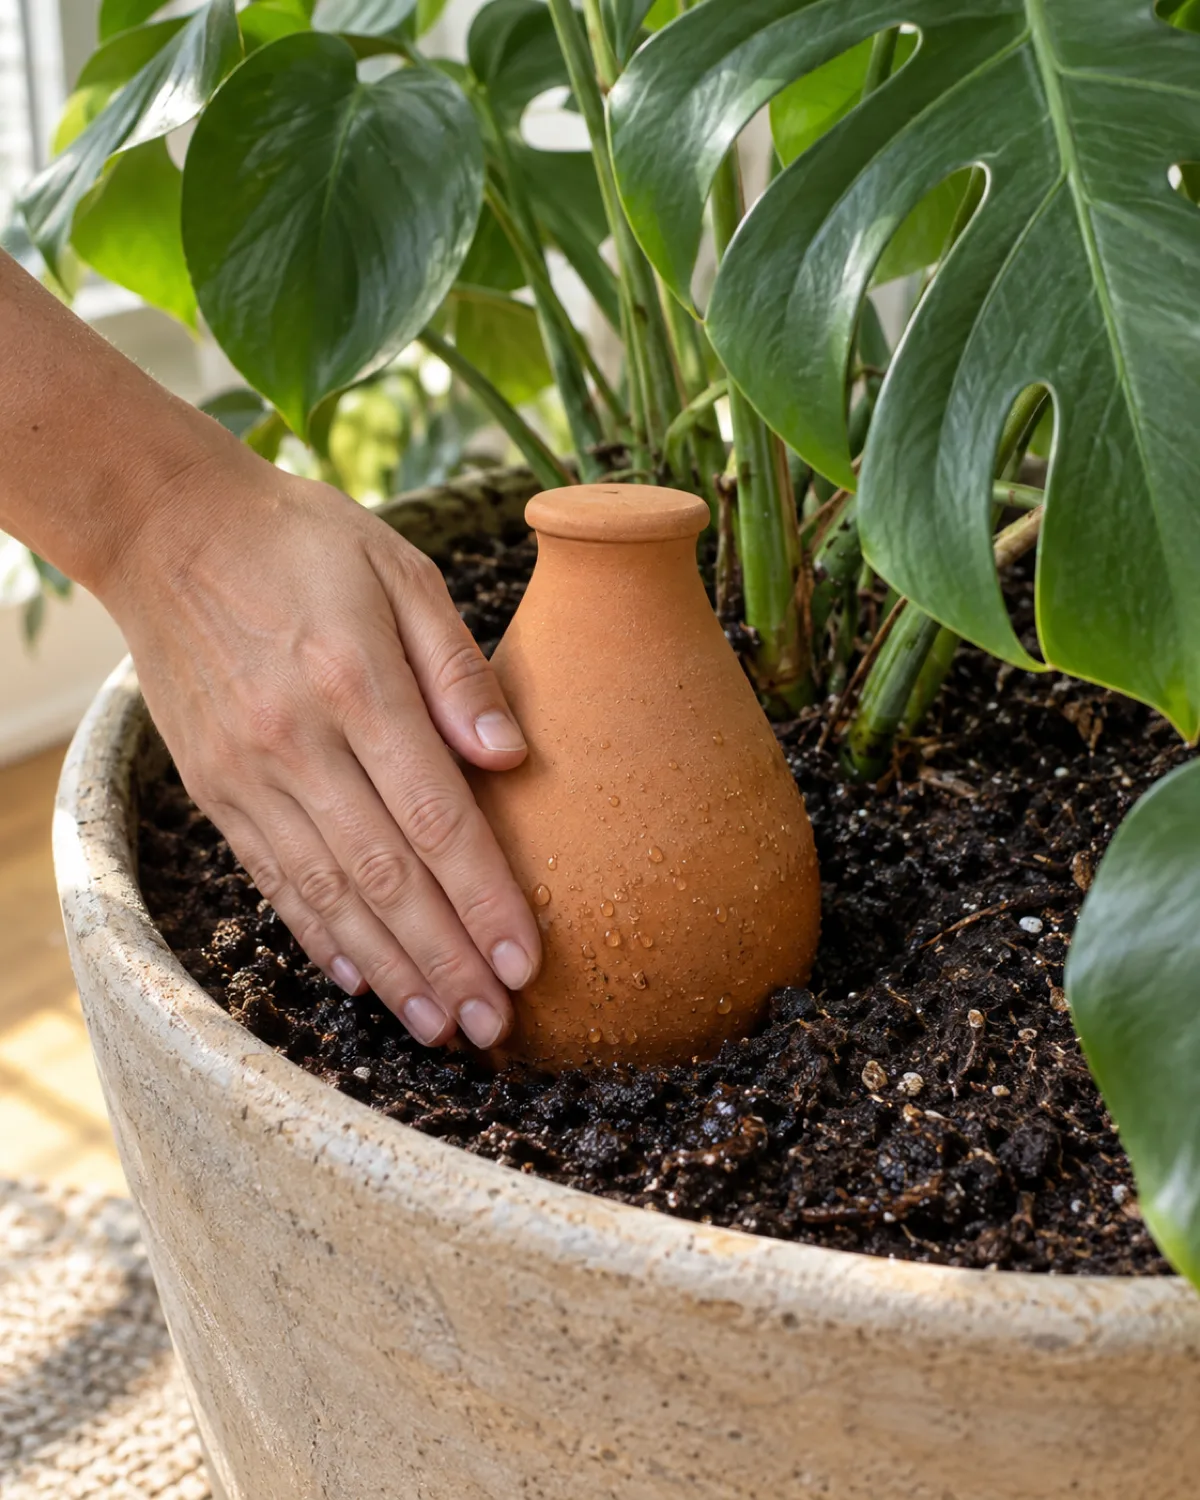
An olla is one of the oldest irrigation technologies still in use. The concept is simple: an unglazed terracotta vessel buried in soil slowly releases water through its porous walls. The surrounding soil draws moisture by capillary action at a rate that matches the drying rate — wetter soil draws less, drier soil draws more.
Modern indoor ollas come in two forms:
- Spike style — a tapered terracotta stake with a hollow reservoir inside, pushed into the soil with the opening at the top for refilling
- Globe style — a sealed terracotta sphere with a narrow fill neck, buried just below the soil surface
Both work on the same principle. The unglazed clay is the wick — water seeps through the ceramic wall at a rate controlled by the porosity of the clay and the moisture tension of the surrounding soil.
The appeal of ollas is that they work in any existing pot. You do not need a dedicated self watering planter. Drop an olla into the soil of your favorite ceramic pot, terracotta pot, or decorative planter and it becomes self watering without replacing anything.
Before first use, soak the olla in water for at least 30 minutes to saturate the clay. A dry olla releases water too quickly at first and then slows dramatically as it absorbs.
Ollas suit medium-thirst plants best — tropicals that want even moisture but not constant saturation. They are less effective for very thirsty plants that drain a small olla in two days, and they are too wet for succulents and cacti that need dry periods between drinks.
The Wicking Cord DIY Setup and Glass Bulb Waterer
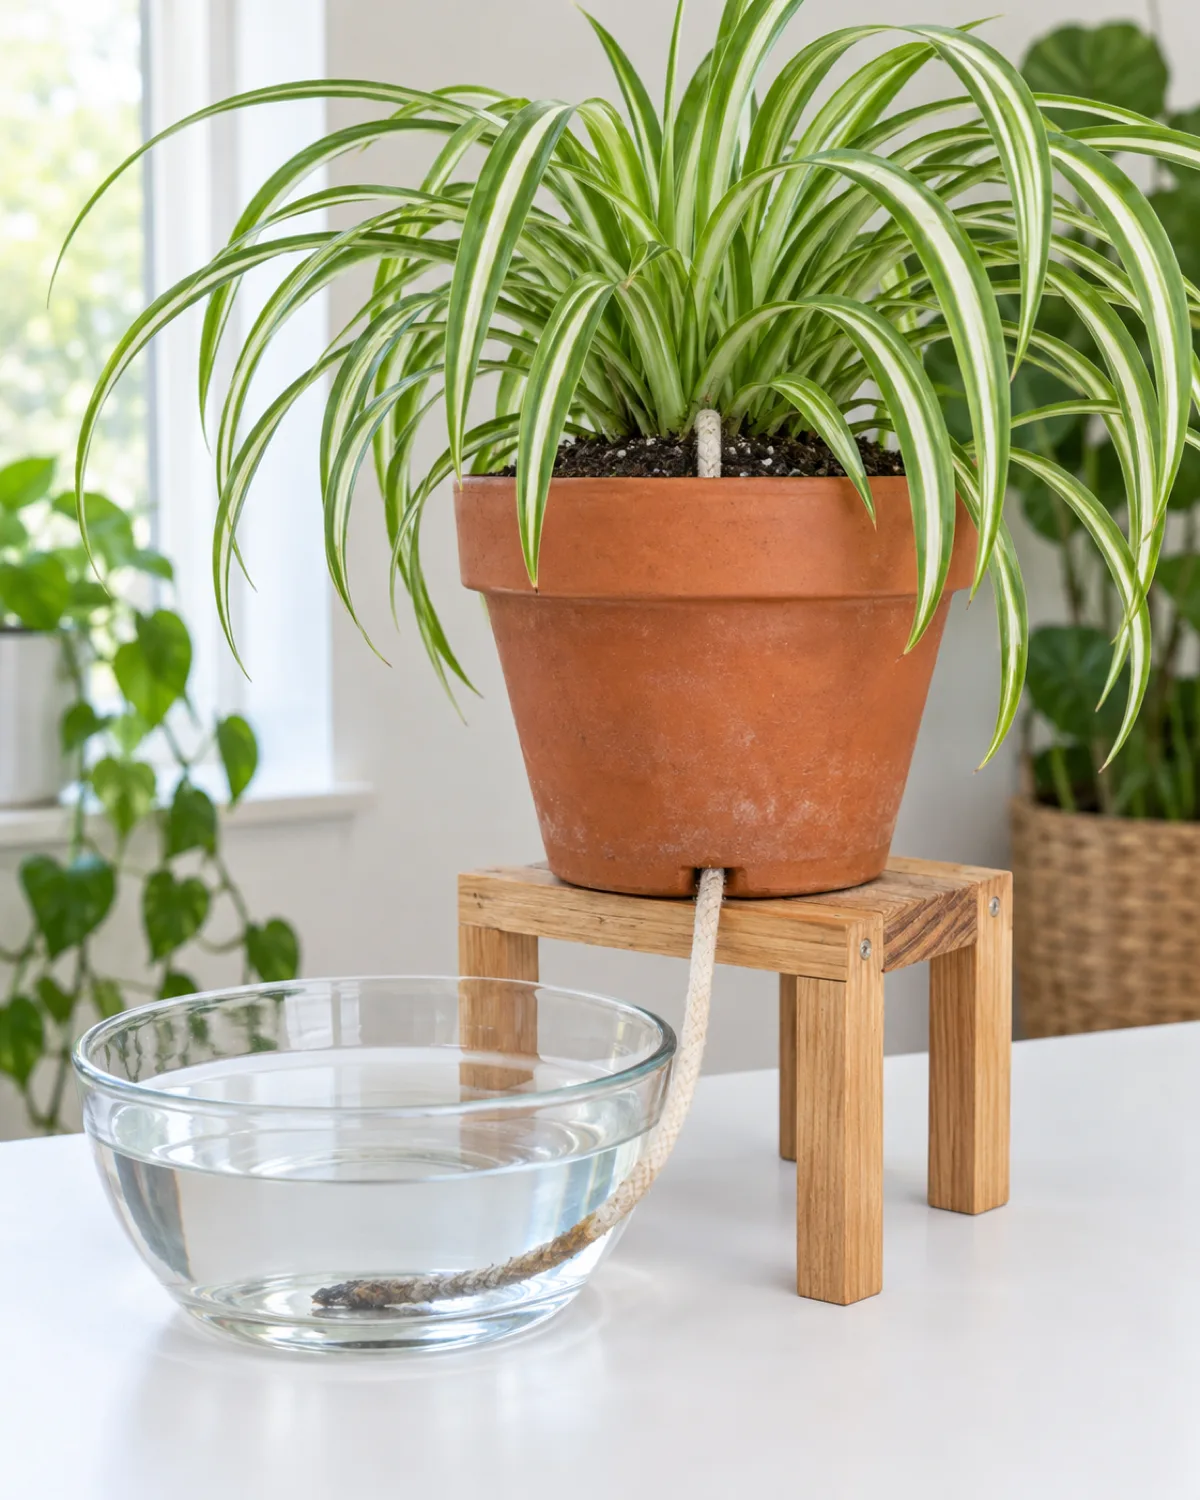
A wicking cord system is the simplest and cheapest way to convert any pot into a self watering setup. Thread a length of cotton, nylon, or polyester rope from a water container below, up through the pot's drainage hole, and into the soil. Capillary action pulls water up the cord and into the root zone.
The materials are almost certainly already in your house:
- A length of cotton clothesline, cotton mop head strands, or nylon paracord
- A container to hold water — a bowl, jar, or plastic food container
- Something to elevate the pot above the water — a small riser, inverted saucer, or a few stacked coasters
Thread the wick through the drainage hole before potting. Lay it in a loose coil across the bottom of the pot so it contacts as much soil as possible, then fill with your potting mix and plant as normal. The tail end hangs into the water container below.
Two variables control how well a wicking system performs:
- Wick thickness — a thin single strand delivers a slow trickle suited to small pots and drought-tolerant plants; a thick braided cord or multiple strands deliver more water for larger pots and thirsty tropicals
- Soil mix — peat-heavy or coir-heavy mixes wick well because the fine fibers maintain capillary continuity; chunky bark-and-perlite mixes have air gaps that break the capillary chain
If you are choosing soil for repotting, a standard peat-perlite mix in roughly equal parts works best with wicking systems. The only maintenance is refilling the water container and replacing the wick if it develops mineral crust or algae — typically every few months.
Glass bulb waterers: beautiful but unreliable
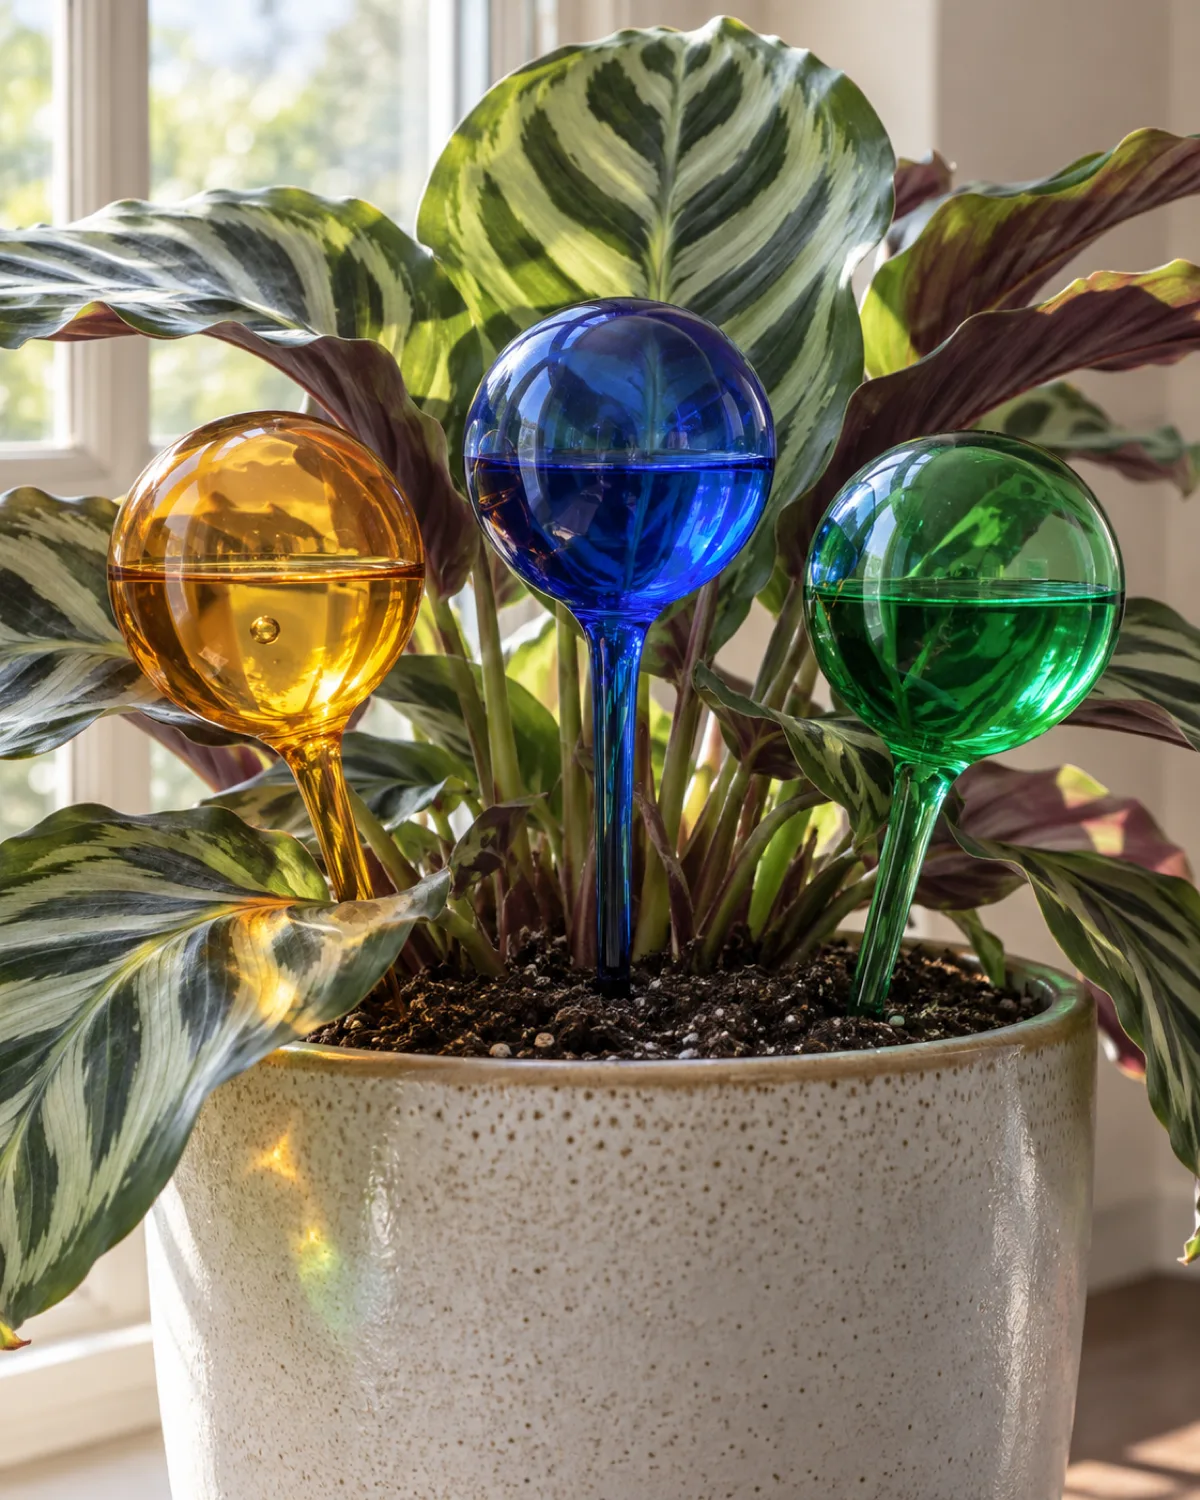
Glass watering bulbs use a similar principle in reverse — a hand-blown globe with a narrow stem is filled with water, inverted, and pushed into the soil. As the soil dries, air enters and a small amount of water releases.
The difference from a wicking cord is control. A cord delivers moisture at a rate set by physics and wick thickness. A glass bulb delivers at a rate set by how tightly the soil grips the glass, which changes as soil compacts. Some bulbs drain in two days, others last a week in the same pot.
Glass bulbs work as a supplement during vacations or busy weeks, and they add visual interest — the jewel-toned glass catches light and adds color. But they should not be your sole watering method:
- A standard bulb holds only 6 to 8 ounces, barely enough for a 6-inch pot in summer
- The flow rate is unpredictable and not adjustable
- They cannot keep up with large or thirsty plants the way a cord or reservoir can
If you want reliable unattended watering, use a wicking cord. If you want something pretty that buys you a couple of extra days, add a glass bulb.
The Fabric Pot with Reservoir Tray
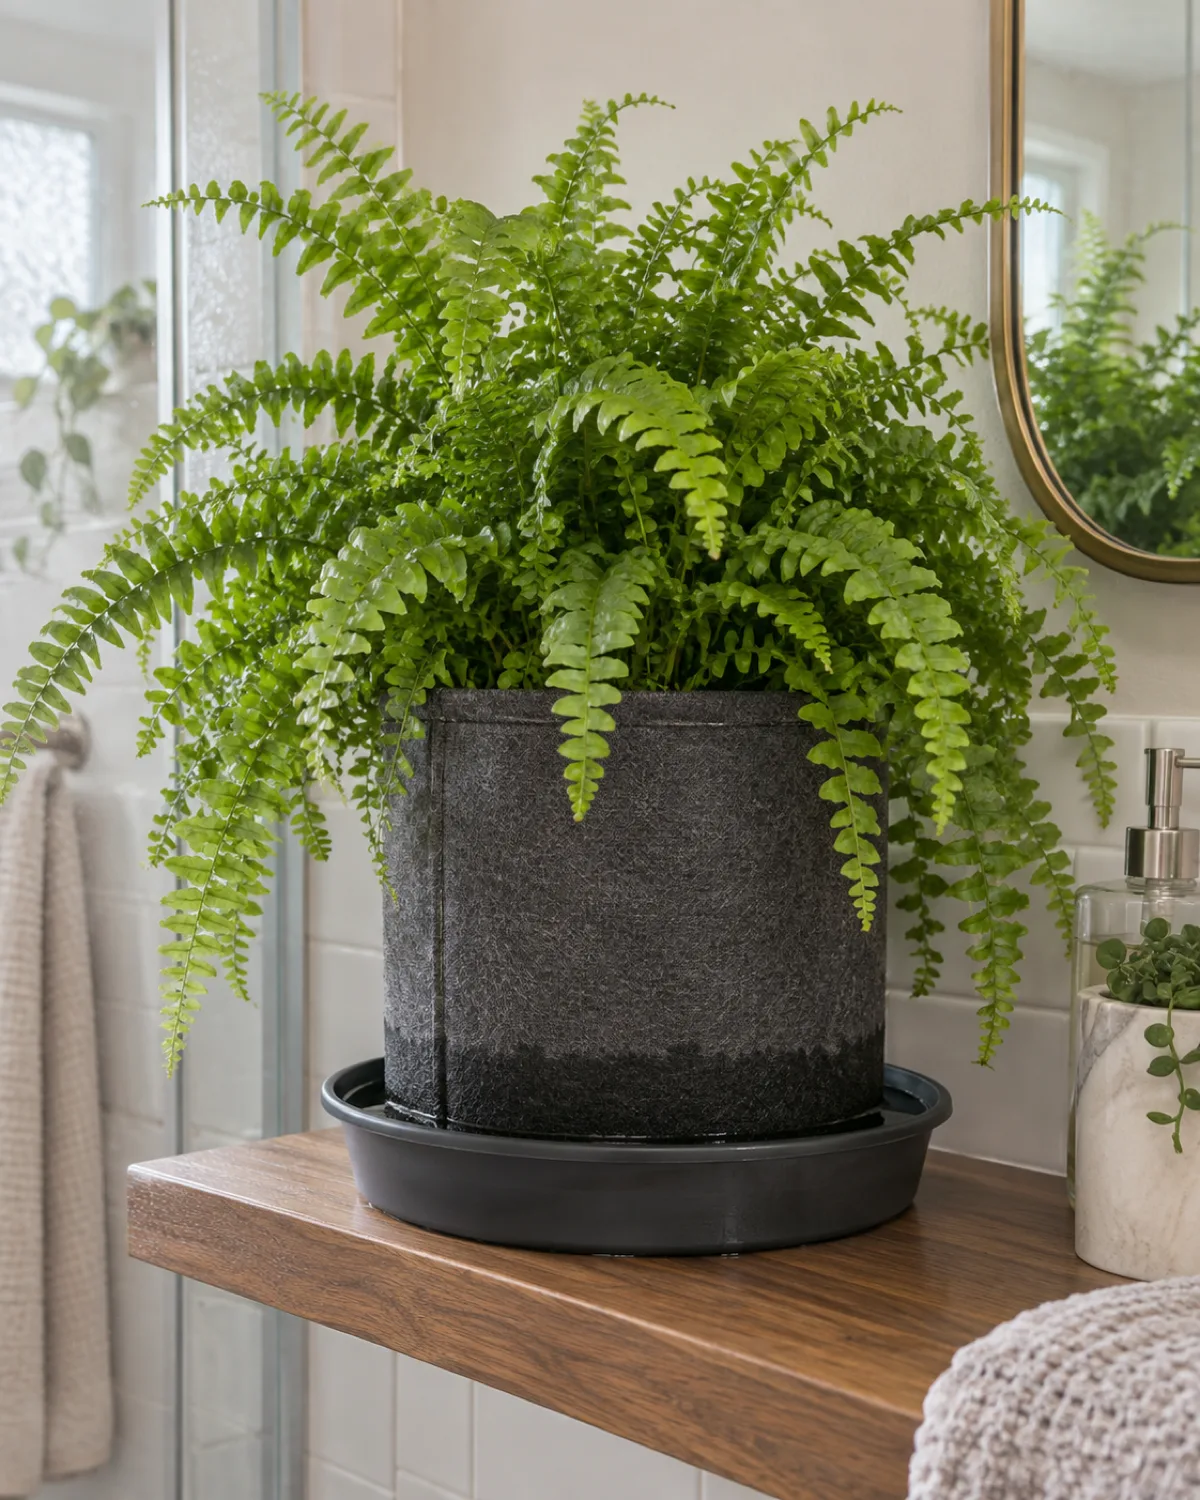
Fabric pots — grow bags made of breathable felt or non-woven polypropylene — are standard in outdoor and indoor growing. When you sit one in a shallow tray of water, you get a self watering system with a bonus that no other pot material offers: air pruning.
Air pruning happens when roots reach the breathable fabric wall and are exposed to air. The root tip desiccates and dies, which signals the plant to branch out laterally instead of circling. The result is a denser, more fibrous root system that absorbs water and nutrients more efficiently than the circling roots you get in a solid pot.
Combined with a reservoir tray, the plant gets bottom-up moisture through the permeable fabric base while the walls provide root-zone aeration. This combination suits tropical foliage plants that want both consistent moisture and oxygen at the roots — Boston ferns, calatheas, and alocasias in particular.
How to set it up:
- Choose a tray about 1 inch wider than the fabric pot's base on each side
- Fill the tray with about an inch of water
- Set the fabric pot directly in the tray — the fabric base will wick moisture upward
- Refill the tray when it goes dry, typically every 3 to 5 days in summer
The damp fabric at the base can harbor fungus gnats if you let it stay soggy without drying out occasionally. Allow the tray to dry completely between fills once a week to break the gnat breeding cycle. A thin layer of sand on the soil surface also deters egg-laying.
The aesthetic trade-off is obvious — fabric grow bags look utilitarian, not decorative. Slip the whole assembly into a decorative basket or cachepot if appearance matters.
Which Plants Love Self Watering Pots (and Which Hate Them)
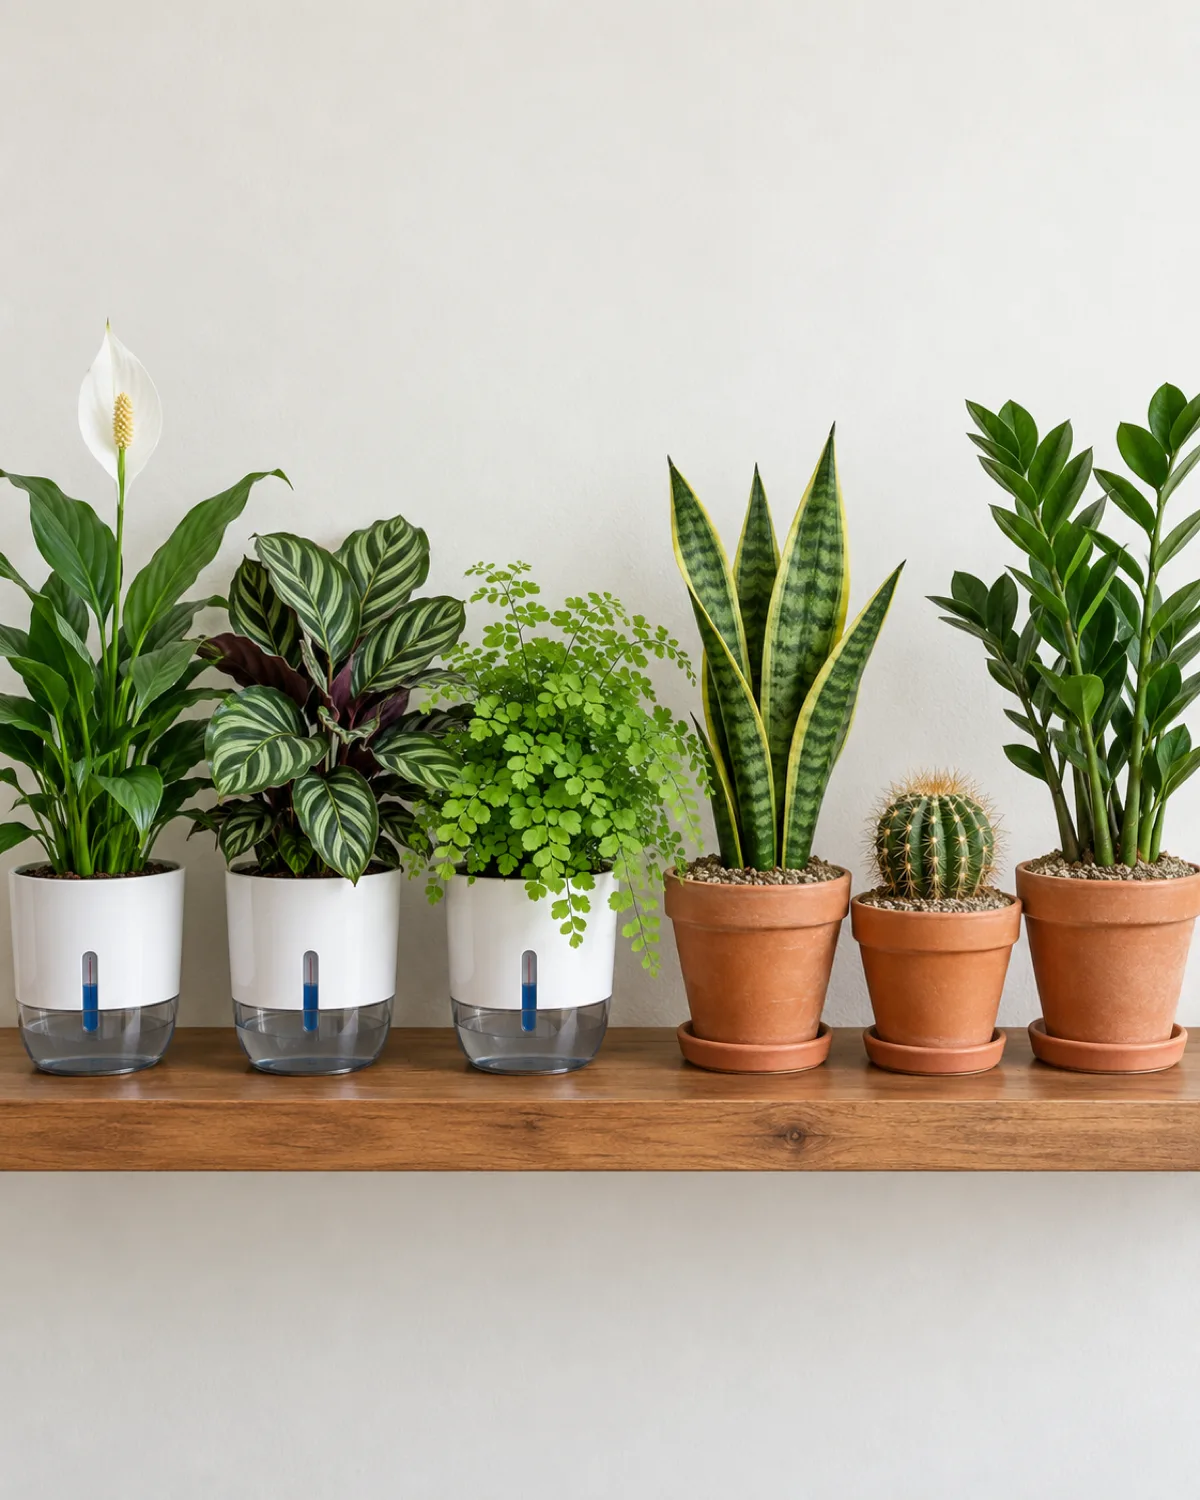
Self watering pots deliver steady, consistent moisture. That is perfect for plants that evolved in environments where the soil rarely dries out completely, and it is a slow death sentence for plants that need dry periods between waterings.
Plants that thrive in self watering pots:
- Peace lily — the classic fit, prefers consistently moist soil and tells you immediately when it dries out
- Calathea and maranta — humidity-loving tropicals that crisp at the edges the moment soil dries
- Maidenhair fern — famously difficult to keep alive because it needs uninterrupted moisture
- Alocasia — wants moist (not wet) soil and punishes you with yellowing leaves for inconsistency
- Kitchen herbs — basil, cilantro, parsley, and mint are shallow-rooted and fast-growing, both of which demand frequent water
Plants that should never go in self watering pots:
- Succulents — evolved to store water internally and need soil to dry completely between drinks; constant moisture rots their roots within weeks
- Cacti — the same issue as succulents, compounded by even lower water needs
- Snake plant — tolerates drought better than any other common houseplant and rots quickly in persistently moist soil
- ZZ plant — stores water in thick rhizomes underground and needs the soil to dry out between waterings
- Ponytail palm — stores water in its swollen caudex and rots if the soil never dries
The dividing line is straightforward. If a plant's care instructions say "let the soil dry out between waterings" or "water when the top two inches are dry," it does not belong in a self watering pot. If the instructions say "keep consistently moist" or "do not let the soil dry out," it is a strong candidate.
The plant's natural watering rhythm decides. Pick the row that matches your plant and follow the recommendation.
Setting Up Any Self Watering Pot the Right Way
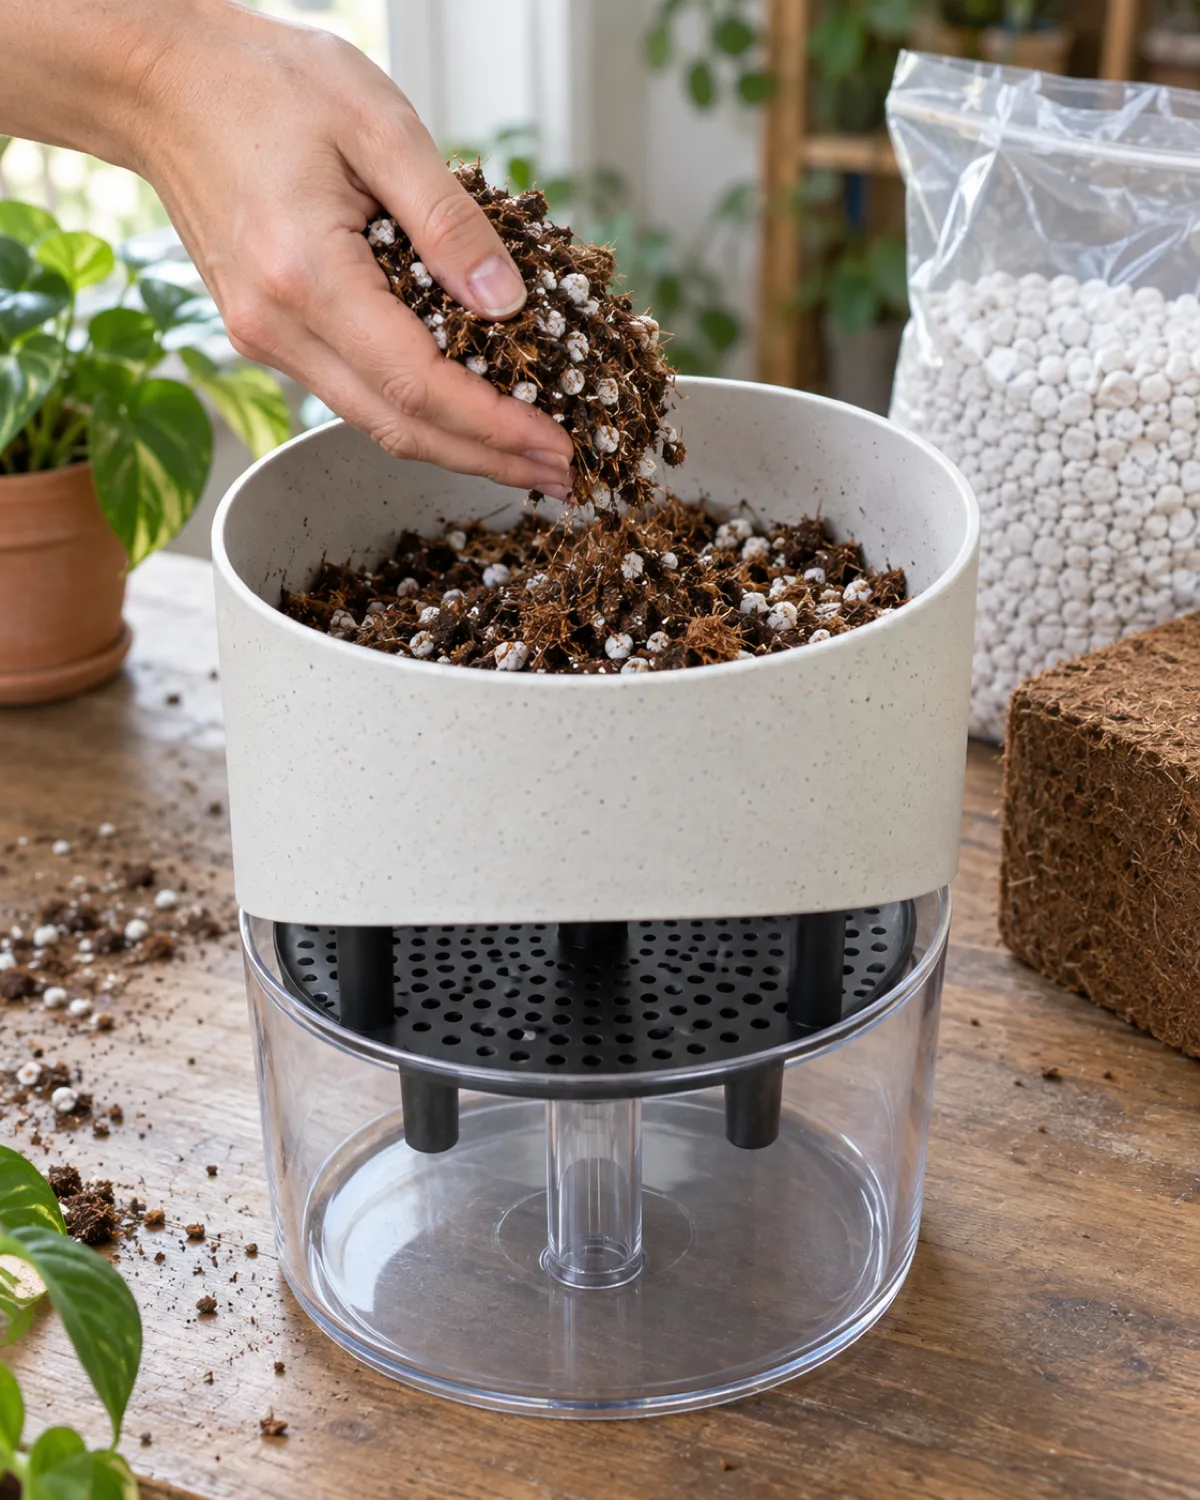
The pot itself is half the system. The other half is the soil mix, the initial watering approach, and the transition period for plants that are not used to bottom-up moisture delivery.
Start with the right soil mix. Self watering pots need a medium that wicks reliably without compacting into a waterlogged brick. The formula:
- 1 part peat moss or coco coir — the fine fibers maintain capillary continuity from reservoir to roots
- 1 part perlite — keeps the mix open and airy so roots get oxygen even with constant moisture
- Optional: a handful of vermiculite — absorbs and holds water at the particle level, boosting wicking in large pots
Do not use heavy garden soil, topsoil, or mixes with a lot of bark in a self watering pot. Bark chunks create air gaps that break the wicking chain, and dense soil compacts and suffocates roots when constantly moist.
The first-fill protocol matters:
- Fill the reservoir completely and let the soil wick from below for 24 hours
- Then top-water once to saturate the soil from above and establish the capillary bridge between soil and reservoir
- After that initial dual-watering, the system runs on reservoir fills only
Transitioning an existing plant into a self watering pot takes 1 to 2 weeks. The roots need to grow downward toward the moisture source. During this transition period, top-water lightly every few days while the reservoir also provides bottom-up moisture. Once you see the water level dropping steadily from the reservoir alone, the roots have found the water and you can stop top-watering.
The pot does the work, but only if the soil, the first fill, and the transition are set up correctly. These four steps apply to every self watering style.
Troubleshooting Self Watering Pots
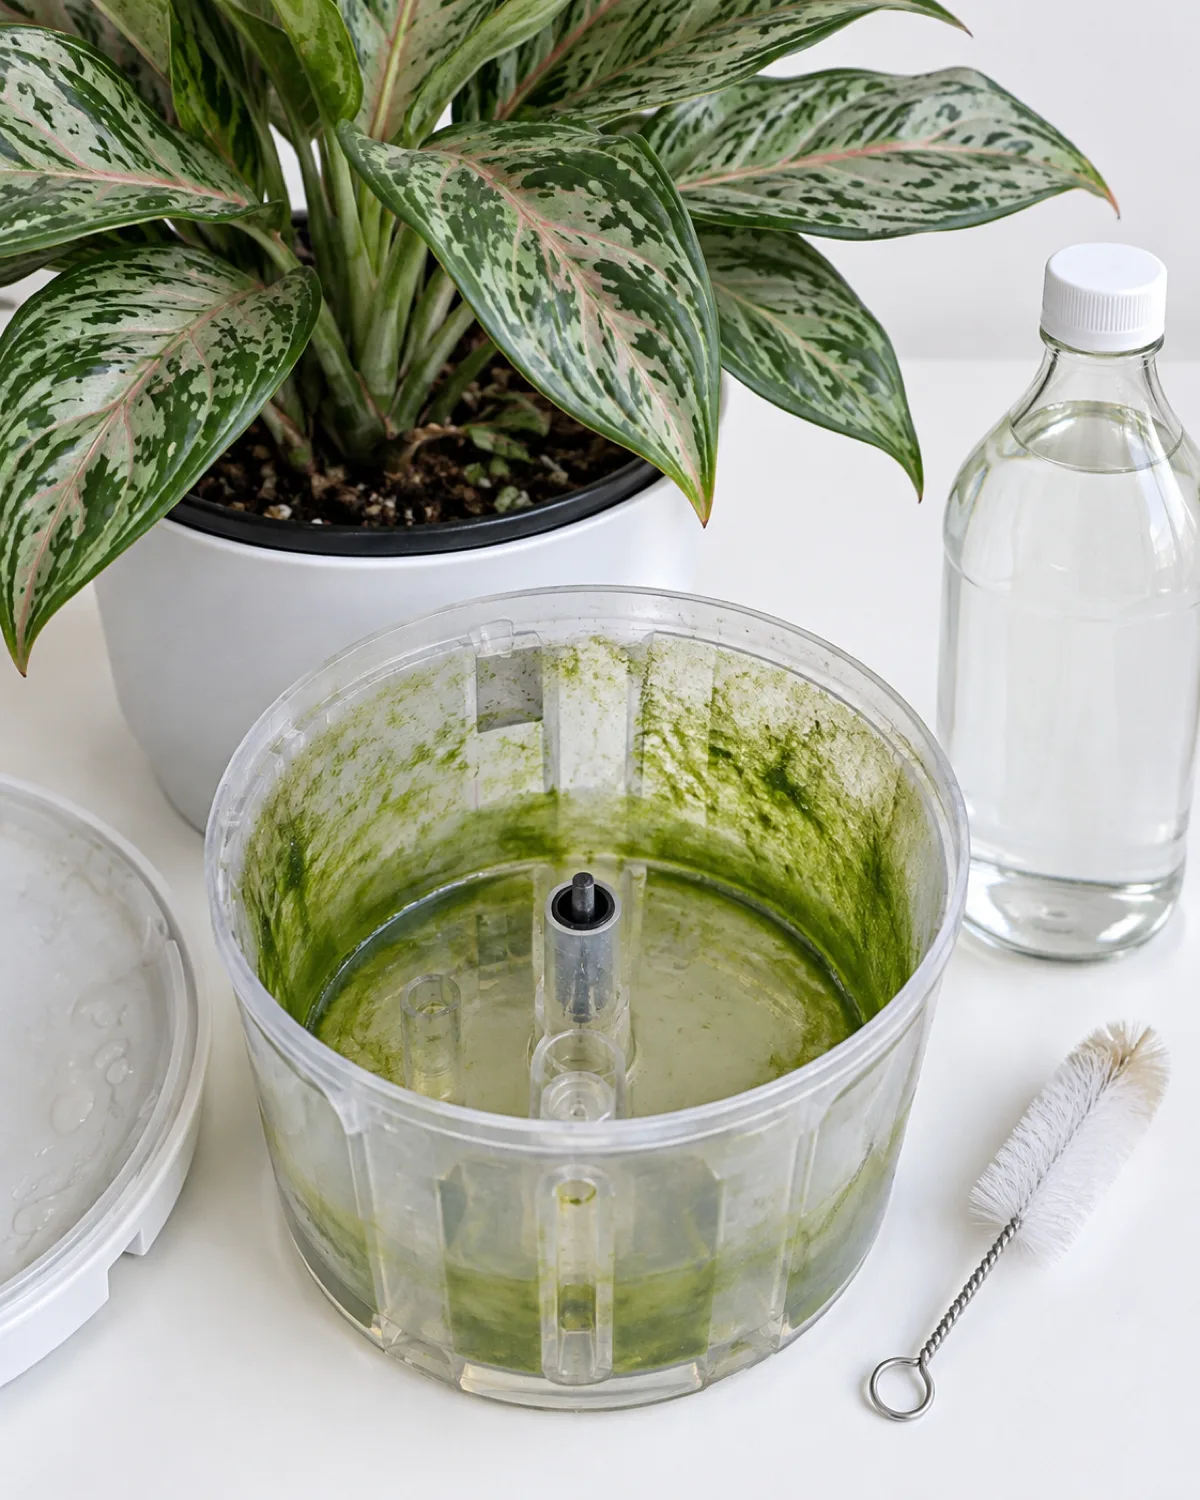
Self watering pots are low maintenance, not zero maintenance. Four problems account for nearly every issue that comes up.
Algae in the reservoir. Green slime on the reservoir walls happens when light reaches the water. The algae itself does not harm the plant, but it can clog wicking channels and look unpleasant through transparent reservoirs.
- Block light from reaching the water — wrap the reservoir in tape, use an opaque outer pot, or switch to a design with solid walls
- Clean quarterly by removing the inner pot and scrubbing the reservoir with a diluted white vinegar solution
- Rinse thoroughly before reassembling
Mineral buildup. White crusty deposits on the wick, reservoir walls, and soil surface come from dissolved minerals in tap water concentrating as water evaporates from the soil.
- Flush the soil with plain water from the top once a month to dissolve and wash out accumulated salts
- Use filtered or rainwater if your tap water is particularly hard
- Replace wicks that become stiff with mineral crust — they lose capillary effectiveness
Root rot signs. If a plant in a self watering pot develops yellowing leaves, mushy stems, or a sour smell from the soil, the roots are likely rotting from too much moisture.
- Pull the inner pot and inspect roots — healthy roots are white or tan, rotting roots are brown and mushy
- The cause is usually the wrong plant (drought-lover in a self watering pot) or soil that is too dense and retains too much water
- Trim rotted roots, repot in a lighter mix, and reconsider whether this plant belongs in a self watering system
Mosquito larvae. Standing water in the reservoir can become a breeding ground for mosquitoes if the fill opening is exposed.
- Cover the fill hole with a small piece of mesh or tape when not actively filling
- Add a BTI dunk (Bacillus thuringiensis israelensis) to the reservoir — it kills mosquito larvae without harming plants, pets, or beneficial insects
- Empty and refill the reservoir every two weeks in warm weather to break the breeding cycle
Making Any Pot Self Watering: The 5-Minute Conversion
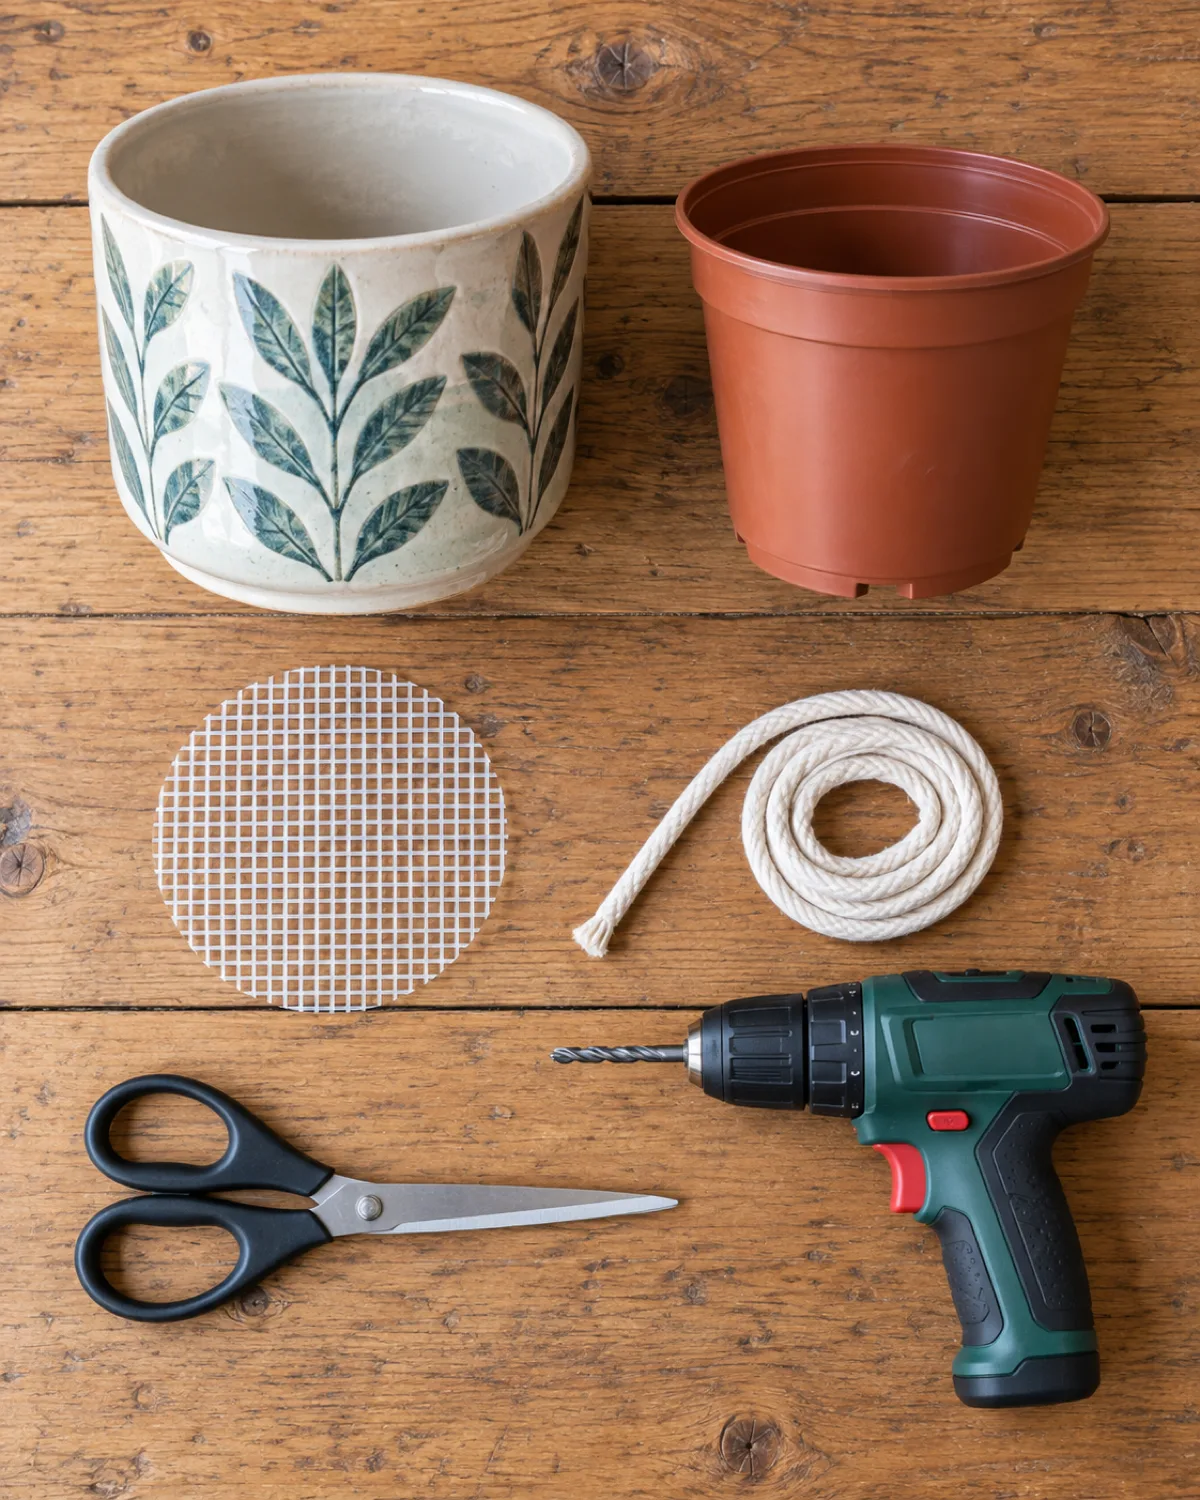
You do not need to buy a dedicated self watering planter. Any pot with a drainage hole can become self watering with a five-minute conversion using materials you already have.
The concept is a pot-in-pot system. A smaller nursery pot sits inside a larger decorative cachepot, elevated on a platform with a water reservoir below. A wick connects the soil to the water.
Materials:
- A decorative cachepot (no drainage hole needed — the reservoir goes inside it)
- A plastic nursery pot that fits inside with about 1 to 2 inches of clearance below
- Something to act as a platform — a piece of cut plastic mesh, an inverted small container, or a few pebbles stacked to the right height
- A length of cotton rope or fabric strip for wicking
Assembly in five steps:
- Set the platform inside the cachepot at a height that creates 1 to 2 inches of reservoir space below
- Thread the wick through the nursery pot's drainage hole, coiling the end inside the pot
- Set the nursery pot on the platform
- Fill the cachepot with water up to just below the platform level
- Plant in the nursery pot with a wicking-friendly soil mix (peat-perlite, equal parts)
The wick hangs into the water below and draws moisture up into the soil. Refill the cachepot reservoir when it runs dry — check by lifting the nursery pot or using a chopstick as a dipstick.
This conversion works with ceramic pots, metal containers, woven baskets, even wooden boxes — anything that can hold an inch of water without leaking. Pair it with a plant stand and you have a self watering display that looks fully custom.
The only limitation is size. The cachepot needs to be large enough to hold the nursery pot plus the reservoir space. For large floor plants, the reservoir volume may be too small for more than a few days of watering, so check the level more frequently.
Self Watering Pots: Every Style and How to Use Them
- 1How a self watering pot worksCapillary action pulls water from a reservoir below the soil through a wick or porous medium. The plant draws what it needs.
- 2Ceramic reservoir potHidden reservoir, glazed exterior, heavy and stable. Best for windowsill peace lilies and ferns where looks matter.
- 3Double-wall plastic planterLift-out inner pot, visible indicator rod, affordable. The most practical everyday self watering option.
- 4Sub-irrigated window boxLong rectangular reservoir for kitchen herbs and trailing plants. Fill tube on the end, continuous moisture across the length.
- 5Terracotta olla insertAncient tech — unglazed clay releases water through porous walls. Drops into any existing pot, no new planter needed.
- 6Wicking cord and glass bulbCotton rope for reliable DIY wicking, glass bulbs for decorative backup. Zero cost, works in any pot.
- 7Fabric pot with reservoir trayBreathable walls air-prune roots while the tray delivers bottom-up moisture. Great for ferns and calatheas.
- 8Best plants: moisture-lovers. Worst: drought-loversPeace lily, calathea, herbs = ideal. Succulents, cacti, snake plant, ZZ = root rot risk. Match the pot to the plant.
- 9Setup: wicking soil plus one initial top-waterPeat-perlite mix for wicking. Fill reservoir first, top-water once to bridge, then reservoir only.
- 10Troubleshoot algae, minerals, rot, and mosquitoesBlock light from water, flush monthly, inspect roots if yellowing, cover fill holes in summer.
- 11Convert any pot in 5 minutesNursery pot inside a cachepot, elevated on a platform with a wick into the water below. Works with any container.
kultivy.com
Frequently Asked Questions
How often do I need to refill a self watering pot?
Refill frequency depends on three variables:
- Plant size and thirst — a large peace lily in summer drinks far more than a small pothos in winter
- Pot and reservoir size — a 14-inch pot with a large reservoir may go three weeks; a 6-inch pot may need weekly fills
- Season and light — warm, bright conditions increase transpiration and drain the reservoir faster
Most self watering pots need refilling every 1 to 3 weeks. Check the indicator rod or water level weekly until you learn your plant's rhythm.
Can I use self watering pots for succulents?
No. Succulents need the soil to dry completely between waterings, and self watering pots keep roots perpetually moist. The result:
- Root rot within weeks as roots sit in constant moisture
- Stem rot spreading upward from waterlogged soil
Use a standard terracotta pot with fast-draining gritty soil instead.
Do self watering pots cause root rot?
They can, but only when paired with the wrong plant or the wrong soil. Root rot in self watering pots happens because of:
- A drought-tolerant plant that does not need constant moisture
- A heavy, dense soil mix that retains too much water around the roots
- An overfilled reservoir with no overflow drain
Choose moisture-loving plants, use a peat-perlite mix, and pick a pot with an overflow drain, and root rot is not a concern.
How do I clean algae from the reservoir?
Remove the inner pot, pour out the old water, and scrub the reservoir walls with a brush dipped in a 1:4 white vinegar to water solution. Rinse thoroughly before reassembling. To prevent algae from returning:
- Use an opaque outer pot or wrap transparent reservoirs in tape
- Keep the pot out of direct sunlight — light fuels algae growth in standing water
Are self watering pots good for beginners?
Yes — for the right plants. Self watering pots remove the most common beginner mistake (inconsistent watering) from the equation. The best beginner pairings:
- Peace lily — forgiving, communicates when it needs water, thrives on consistent moisture
- Pothos — nearly indestructible and grows fast in a self watering setup
The key mistake to avoid is putting a succulent or cactus in a self watering pot because it seems easier — it will rot.