Brown tips do not happen randomly. Each cause leaves a different pattern on the leaf — papery and translucent, bleached and sharp-edged, mushy and dark.
Matching the pattern to the cause is the only way to fix it without guessing. The leaf tip sits at the far end of the vascular system, receives moisture last, and shows stress first.
From dry apartment air to hidden salt buildup in the soil. Jump to the cause that matches what you see on your plant.
Low Humidity
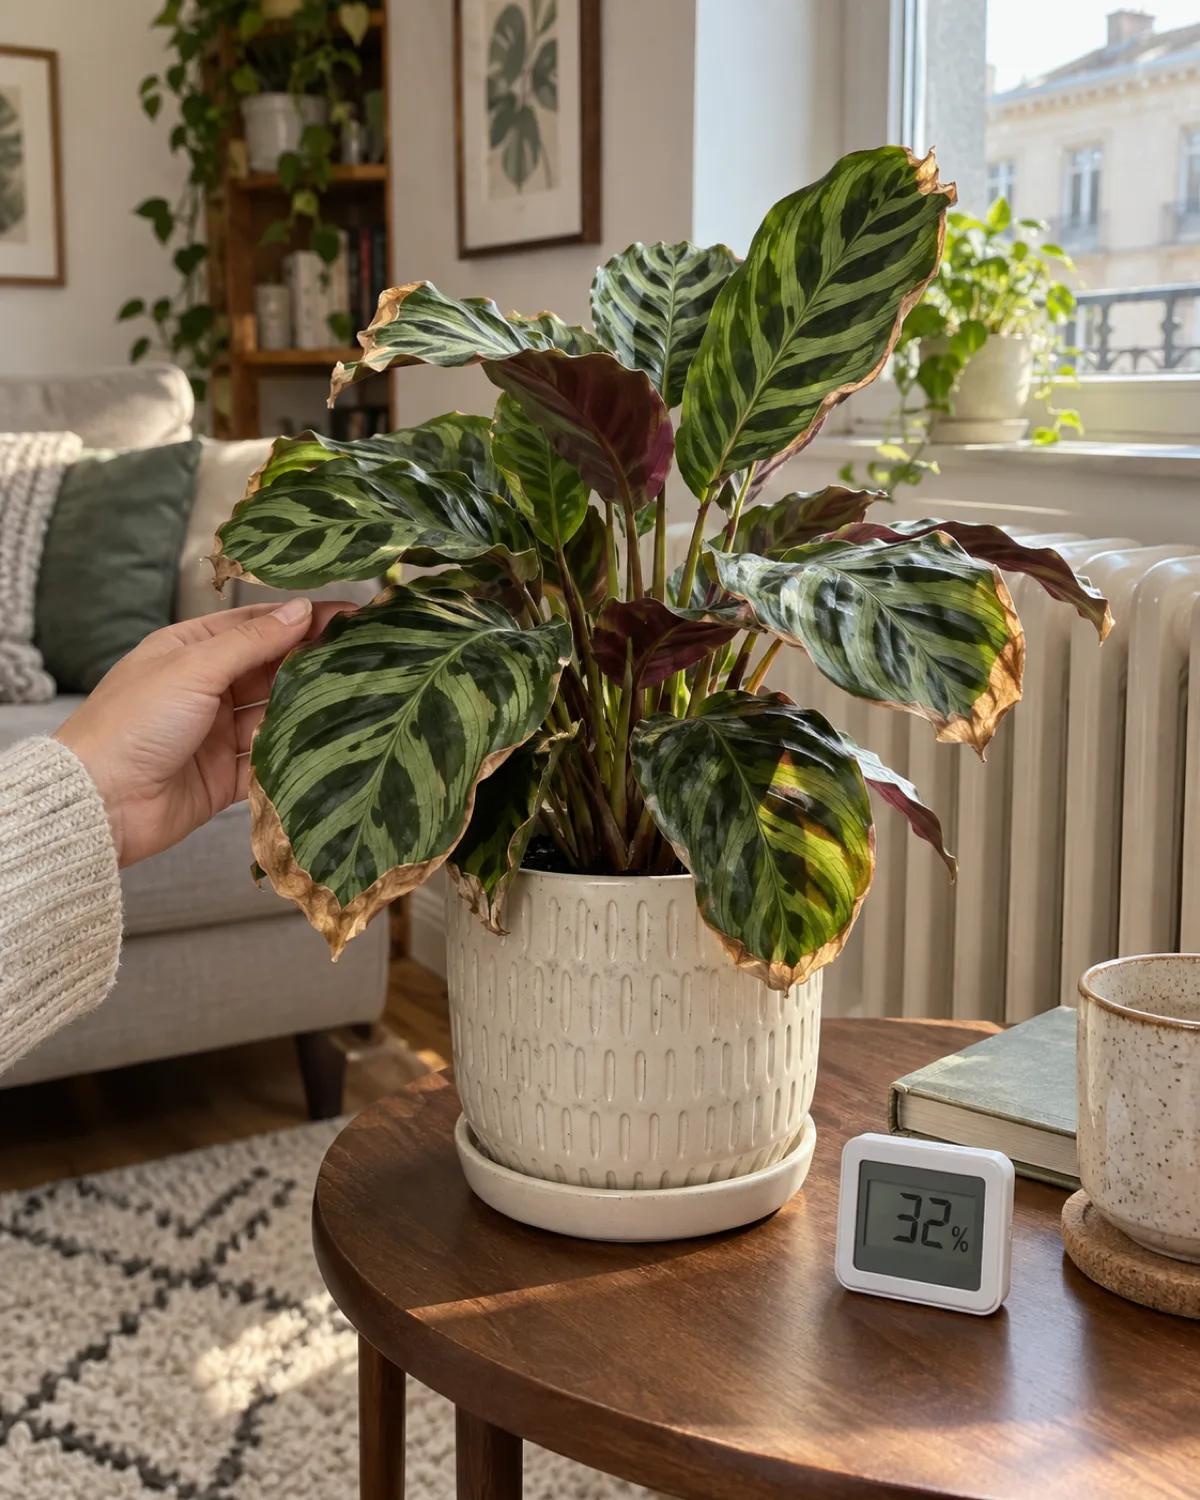
Low humidity is the single most common cause of brown leaf tips indoors. The mechanism is straightforward: leaf edges and tips have the highest surface-area-to-volume ratio on the entire plant, so they lose moisture to the air faster than the center of the leaf can replace it. The tissue dries out, dies, and turns brown.
Most tropical houseplants evolved in environments with 60 to 80 percent relative humidity. A typical apartment in winter — with forced-air heating running — sits between 25 and 35 percent. That gap is enough to brown the tips of calatheas, ferns, peace lilies, and spider plants within a week of the heating season starting.
The visual signature of humidity damage is specific:
- Tips and edges turn thin, papery, and slightly translucent
- The brown area curls inward toward the leaf center
- Multiple leaves are affected at once, starting with the oldest
- The browning is dry and crispy, never mushy or wet
The fix: A pebble tray under the pot raises local humidity by 5 to 10 percent. Grouping plants together creates a shared humidity microclimate as each plant transpires. A small humidifier aimed at the plant cluster is the most reliable solution — set it to 50 percent for most tropicals and 60 percent for ferns and calatheas.
The texture, color, and location of the browning tell you exactly what is going wrong — no guessing required.
Underwatering
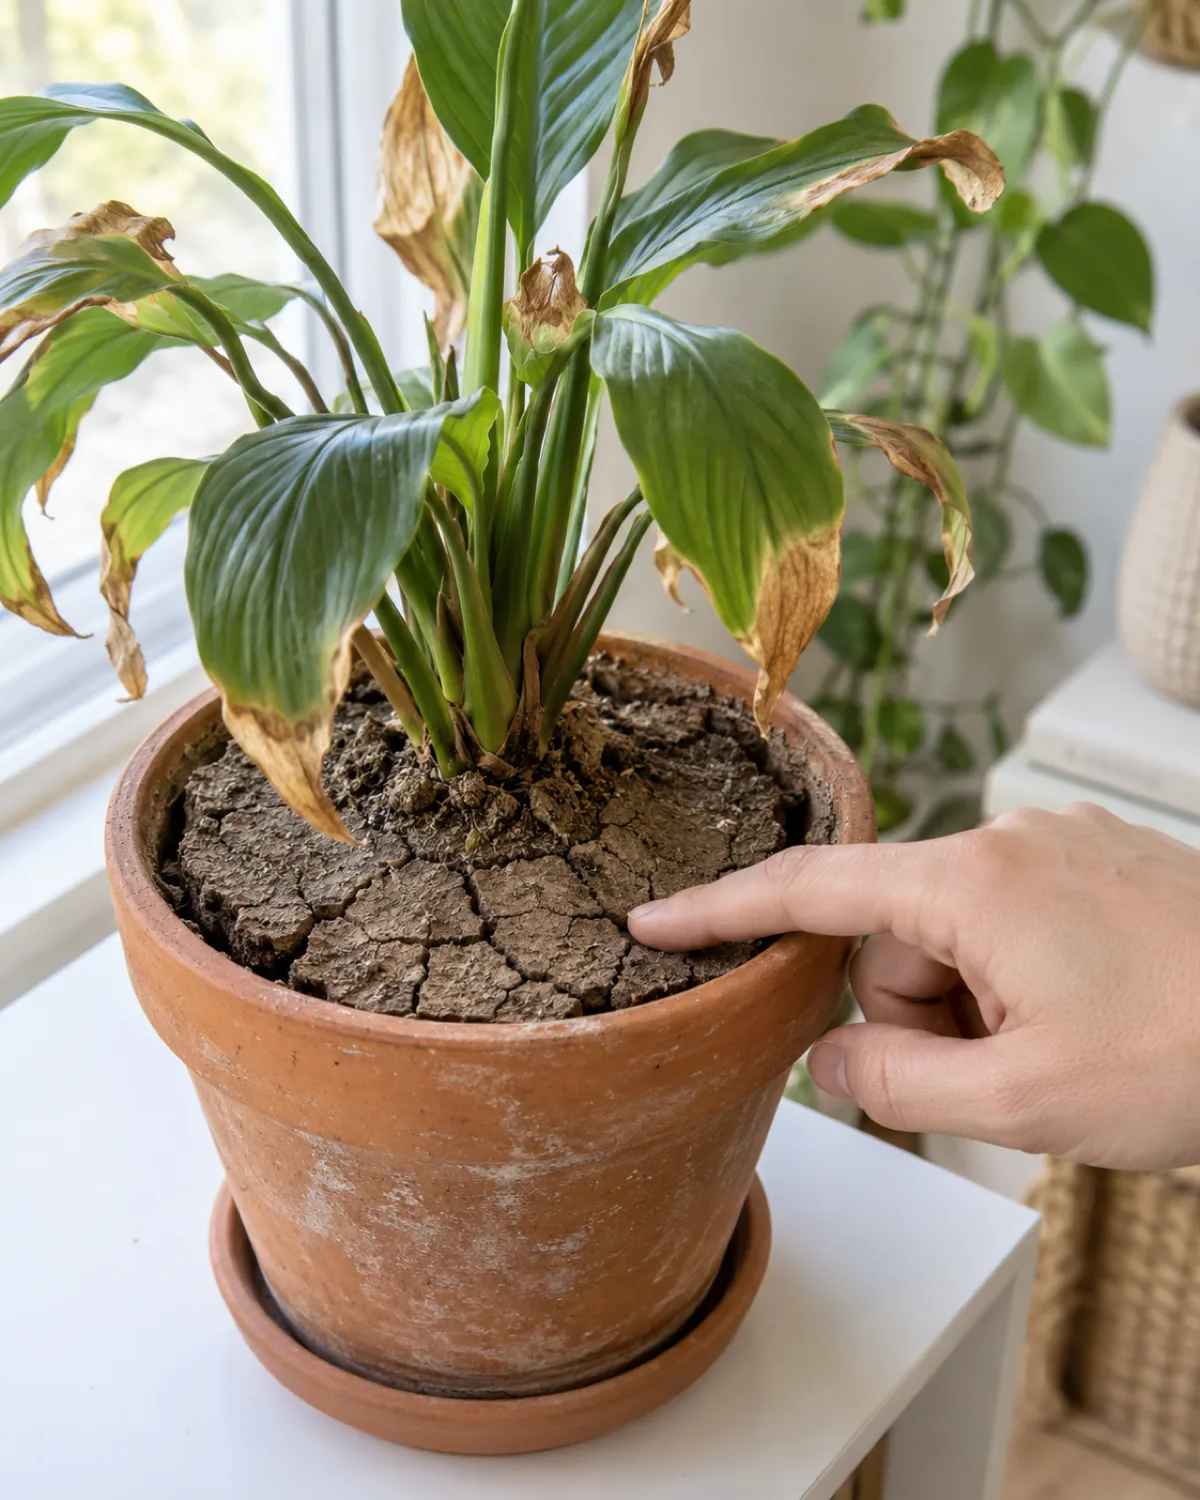
When the soil dries out completely, the plant triages. It pulls water from the extremities first — leaf tips and edges — to keep the stem and roots alive. The sacrificed tissue dies, dries, and turns crispy brown.
The distinguishing feature of underwatering damage is the soil. Pull the plant out or push a finger in: if the soil is bone dry, has pulled away from the pot walls leaving a visible gap, or feels like powder instead of a sponge, underwatering is the cause.
- The browning is dry and brittle, snapping cleanly when you bend it
- Younger leaves may curl or wilt before browning
- The entire plant may look slightly limp, not just the tips
The fix: Give the pot a thorough soak — place it in a basin of water for 20 minutes so the soil rehydrates from the bottom up. Dry soil becomes hydrophobic, and top-watering often runs straight through the gap between soil and pot wall without wetting the root zone.
After the soak, establish a consistent rhythm using the finger test: push your index finger one inch into the soil. If it is dry at that depth, water thoroughly until it drains from the bottom.
Do not overcorrect by watering on a rigid schedule. The finger test beats the calendar because soil drying time shifts with the seasons — faster in summer, slower in winter.
Fertilizer Burn
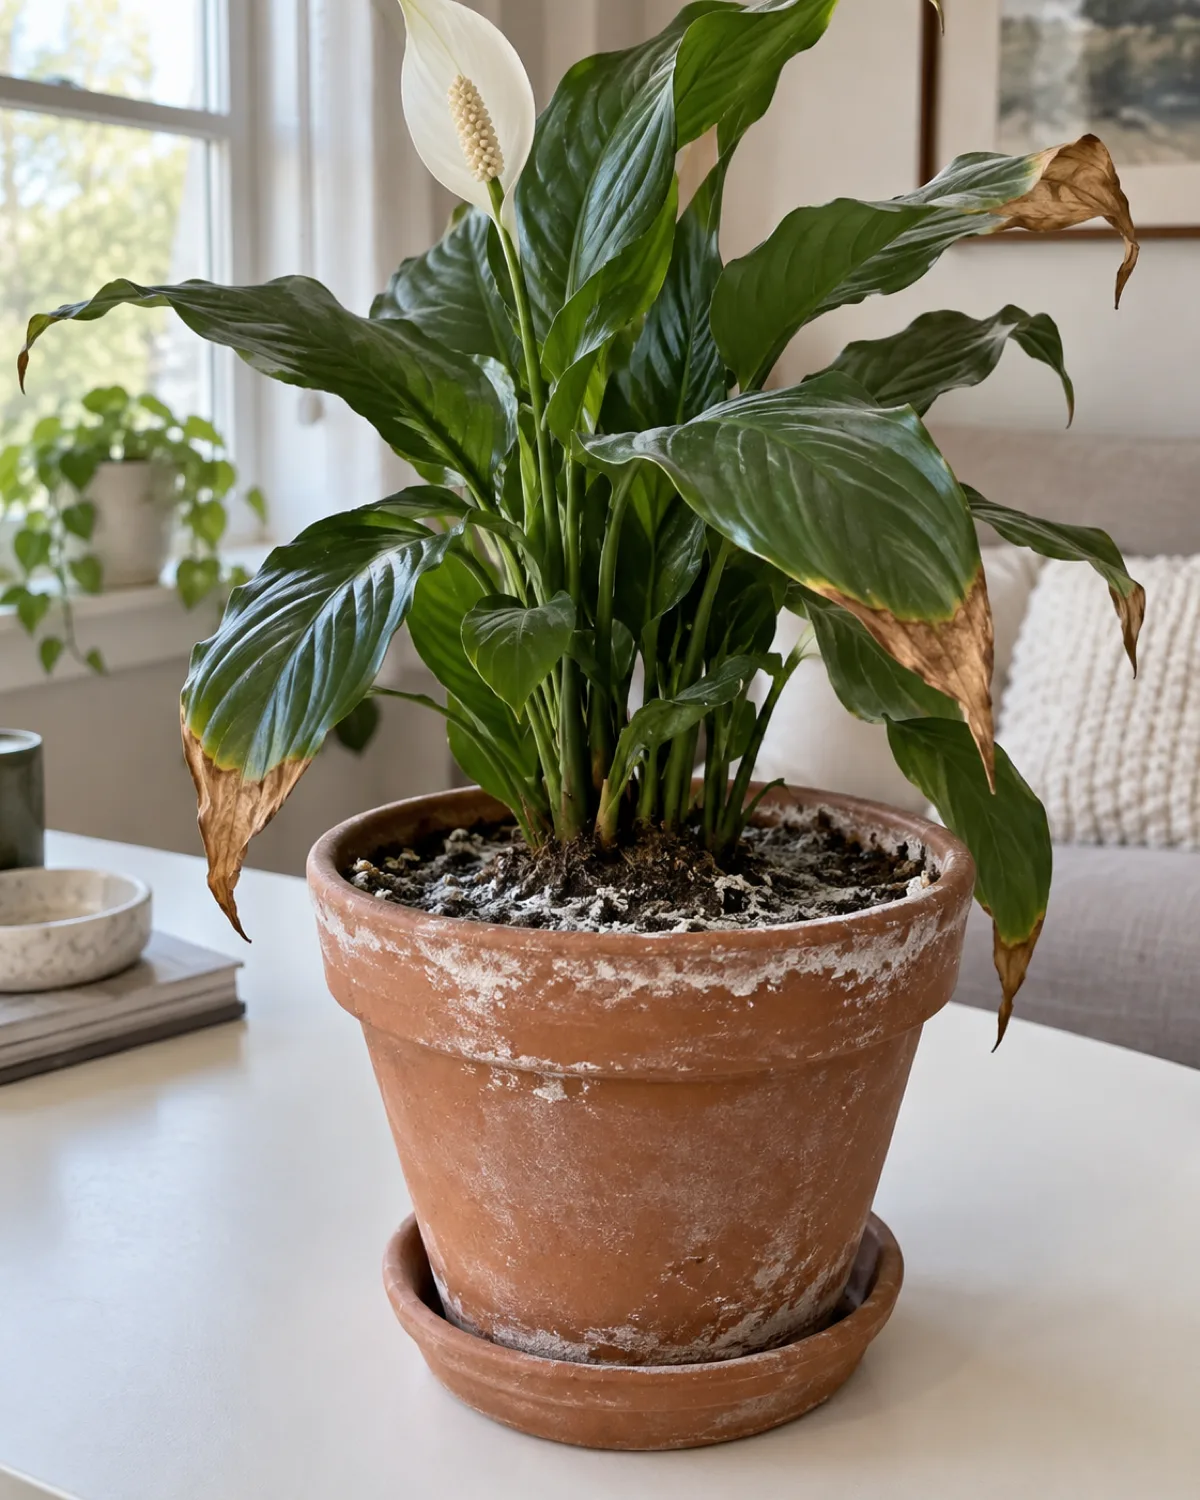
Excess mineral salts accumulate in the soil when you fertilize too often, use too strong a concentration, or skip the flush. The salts draw moisture out of the root cells through reverse osmosis — the exact opposite of what roots are supposed to do. The tips, being the last stop on the vascular highway, dry out first.
The telltale sign is a white or yellowish crusty deposit on the soil surface, the pot rim, or the drainage tray. This is mineral salt residue left behind as water evaporates, and it is a direct visual confirmation that the soil has more fertilizer than the plant can use.
- Brown tips often appear within a few days of fertilizing
- The browning has a distinct dark ring at the boundary between dead and live tissue
- Roots near the soil surface may look brown or singed
The fix: Flush the soil thoroughly by running plain water through the pot for five minutes — let it pour through the drainage holes until the runoff is clear. This dissolves and washes out the accumulated salts. After flushing:
- Cut your feeding frequency in half
- Switch to the "weakly weekly" method — use fertilizer at one-quarter strength every watering instead of full strength once a month
- Never fertilize dry soil; water first, then feed at the next watering
Master these three and you will avoid the majority of brown-tip causes before they start.
Tap Water Chemicals
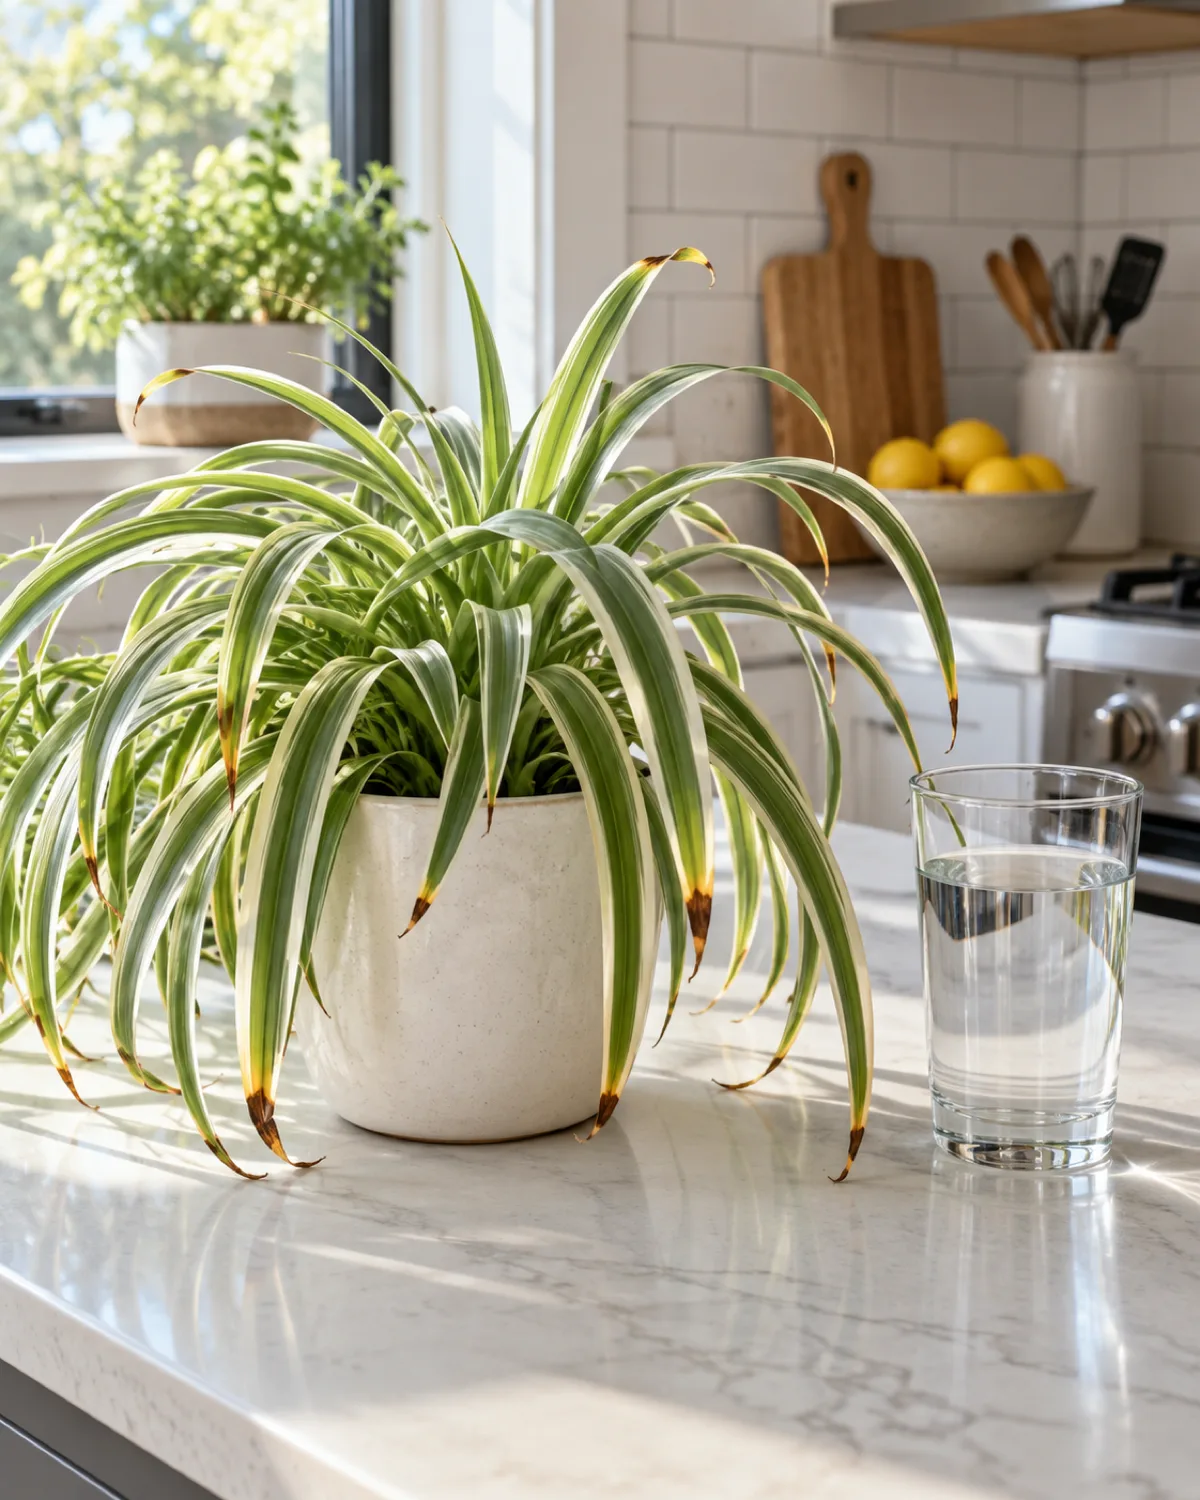
Fluoride and chlorine in treated tap water cause necrotic brown tips on sensitive species. The damage is chemical, not mechanical — these elements interfere with normal cell function in the leaf tissue, killing the cells at the point where concentration is highest: the tip.
The species most affected are spider plants, dracaenas, ti plants (Cordyline), and prayer plants (Maranta and Calathea). If you have brown tips exclusively on these plants while others in the same room are fine, tap water chemistry is almost certainly the cause.
The browning from water chemicals has a specific look:
- Concentrated at the very tip of the leaf, not spreading along the edges
- Often surrounded by a narrow yellow halo where the chemical damage is weakening but not yet killing cells
- Older leaves show more damage because they have been exposed longer
The fix: Letting water sit overnight in an open container off-gasses chlorine, but fluoride does not evaporate. For fluoride-sensitive species, you need filtered water (a carbon filter removes both), collected rainwater, or distilled water. Avoid using perlite with fluoride-sensitive plants — some perlite brands contain fluoride that leaches into the soil over time.
Too Much Direct Sunlight
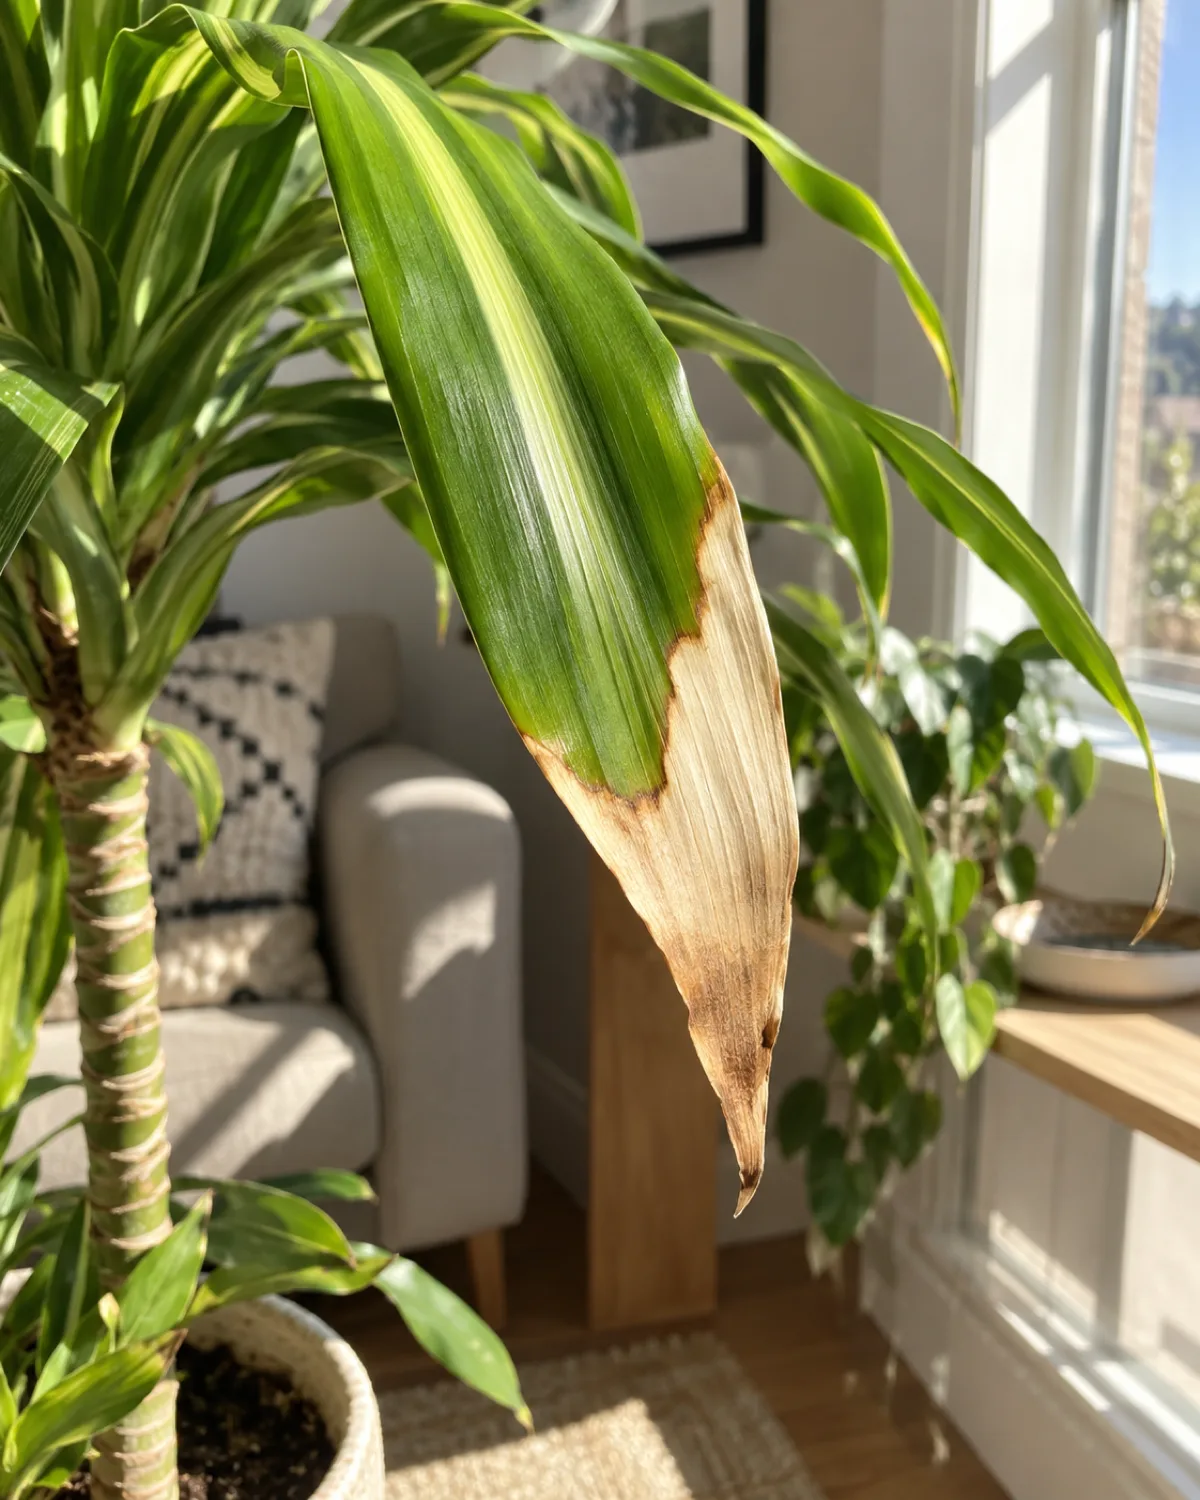
Scorched tips from too much direct sun look different from every other cause on this list. The brown area is often bleached in the center — lighter tan or even white — rather than the dark brown of humidity or fertilizer damage. The boundary between green and brown is sharp and distinct, like a line drawn with a marker.
Plants moved suddenly from low light to a bright south-facing window are most vulnerable. The leaves have not built up the protective pigments (anthocyanins) that help filter intense light, and the sudden exposure overwhelms the photosynthetic machinery in the tip cells.
- The browning appears on the side of the leaf facing the window
- Only leaves in the direct path of sunlight are affected; shaded leaves on the same plant stay green
- The damage can appear within a single afternoon of intense exposure
The fix: Move the plant back 2 to 3 feet from the window, or add a sheer curtain between the glass and the plant. If you want to move a plant from low light to a bright spot, do it gradually — an hour of direct sun the first day, two hours the next, increasing over two weeks to let the leaf tissue adapt.
Rootbound Stress
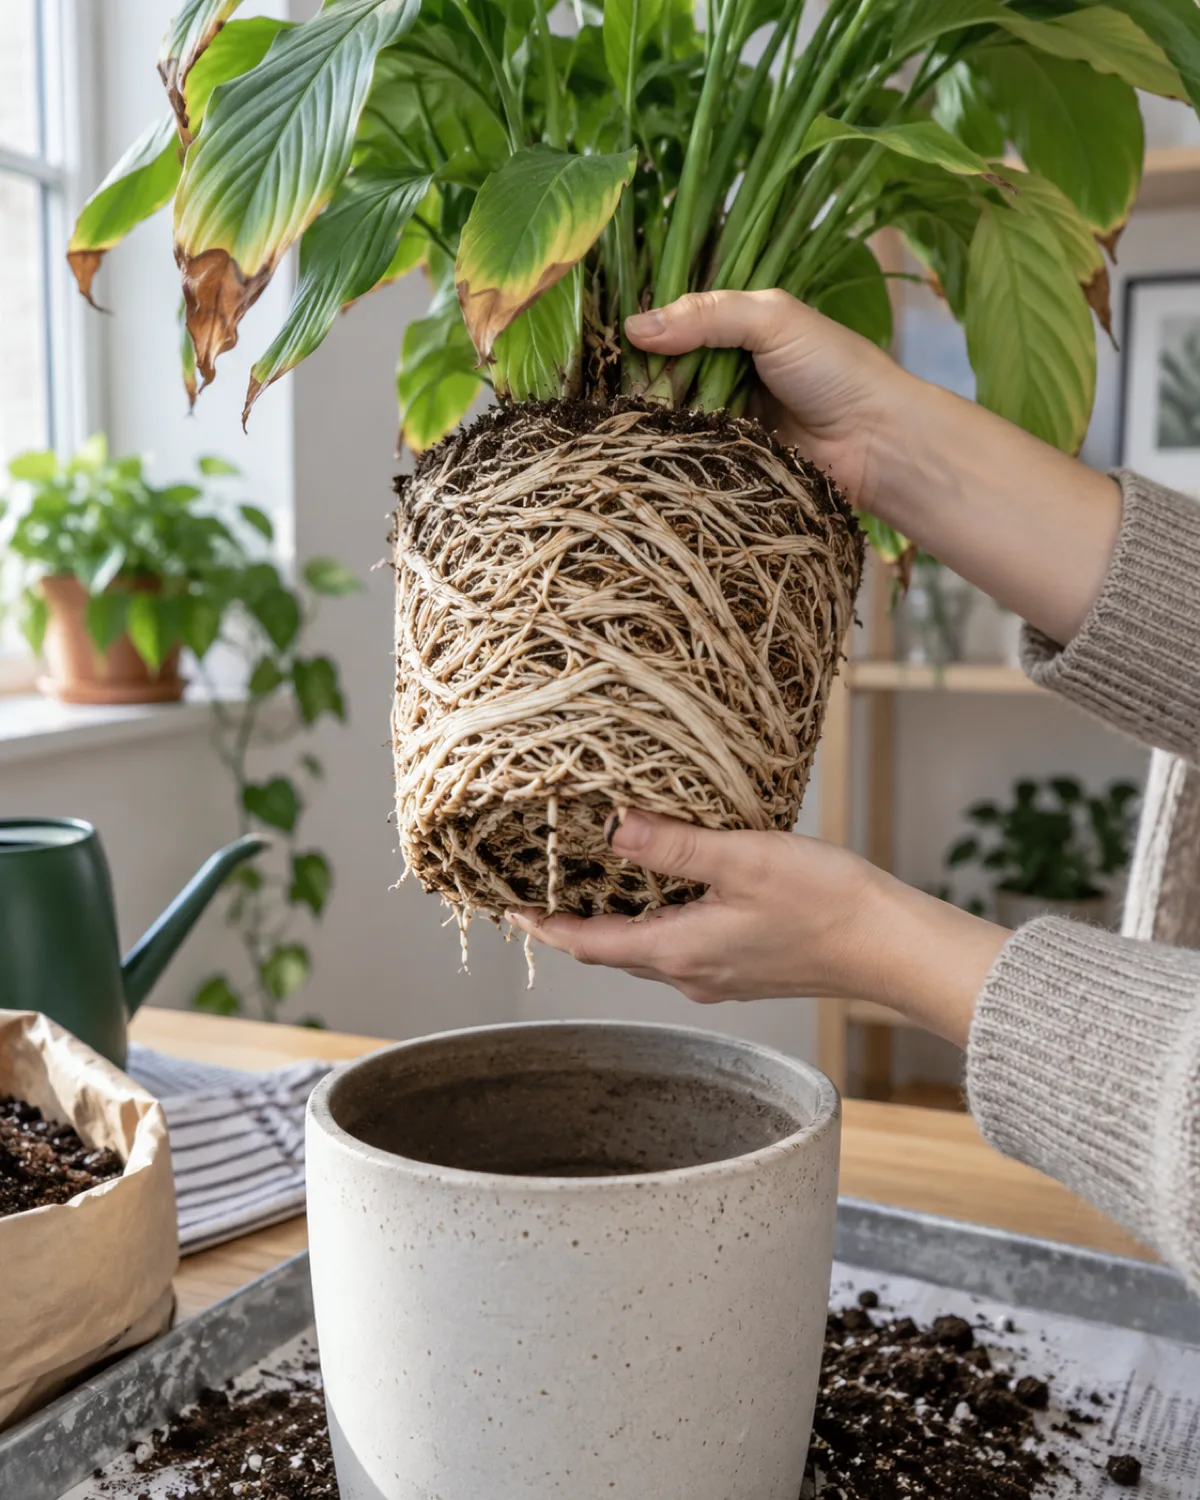
When roots fill the pot completely and begin circling the drainage holes, the root system cannot deliver enough moisture to the leaf tips no matter how consistently you water. The root-to-soil ratio has tipped so far toward root that there is not enough soil left to hold water between waterings. The tips dry out first because they sit at the end of the supply line.
The confusing part is that a rootbound plant shows underwatering symptoms — crispy brown tips, wilting between waterings — even when you are watering correctly. The soil dries out within a day because the root mass occupies most of the pot volume.
- Roots visible poking out of the drainage holes
- Roots circling the soil surface
- Water runs through the pot in seconds without being absorbed
- The plant seems thirsty again within 24 hours of watering
The fix: Repot into a container 1 to 2 inches wider in diameter. Tease apart the circling roots before placing the plant in fresh potting mix — circling roots that are not loosened will continue to circle in the new pot, eventually strangling themselves. Do not jump more than 2 inches in pot size; too much unused soil stays wet too long and invites root rot.
Cold Drafts and Temperature Swings
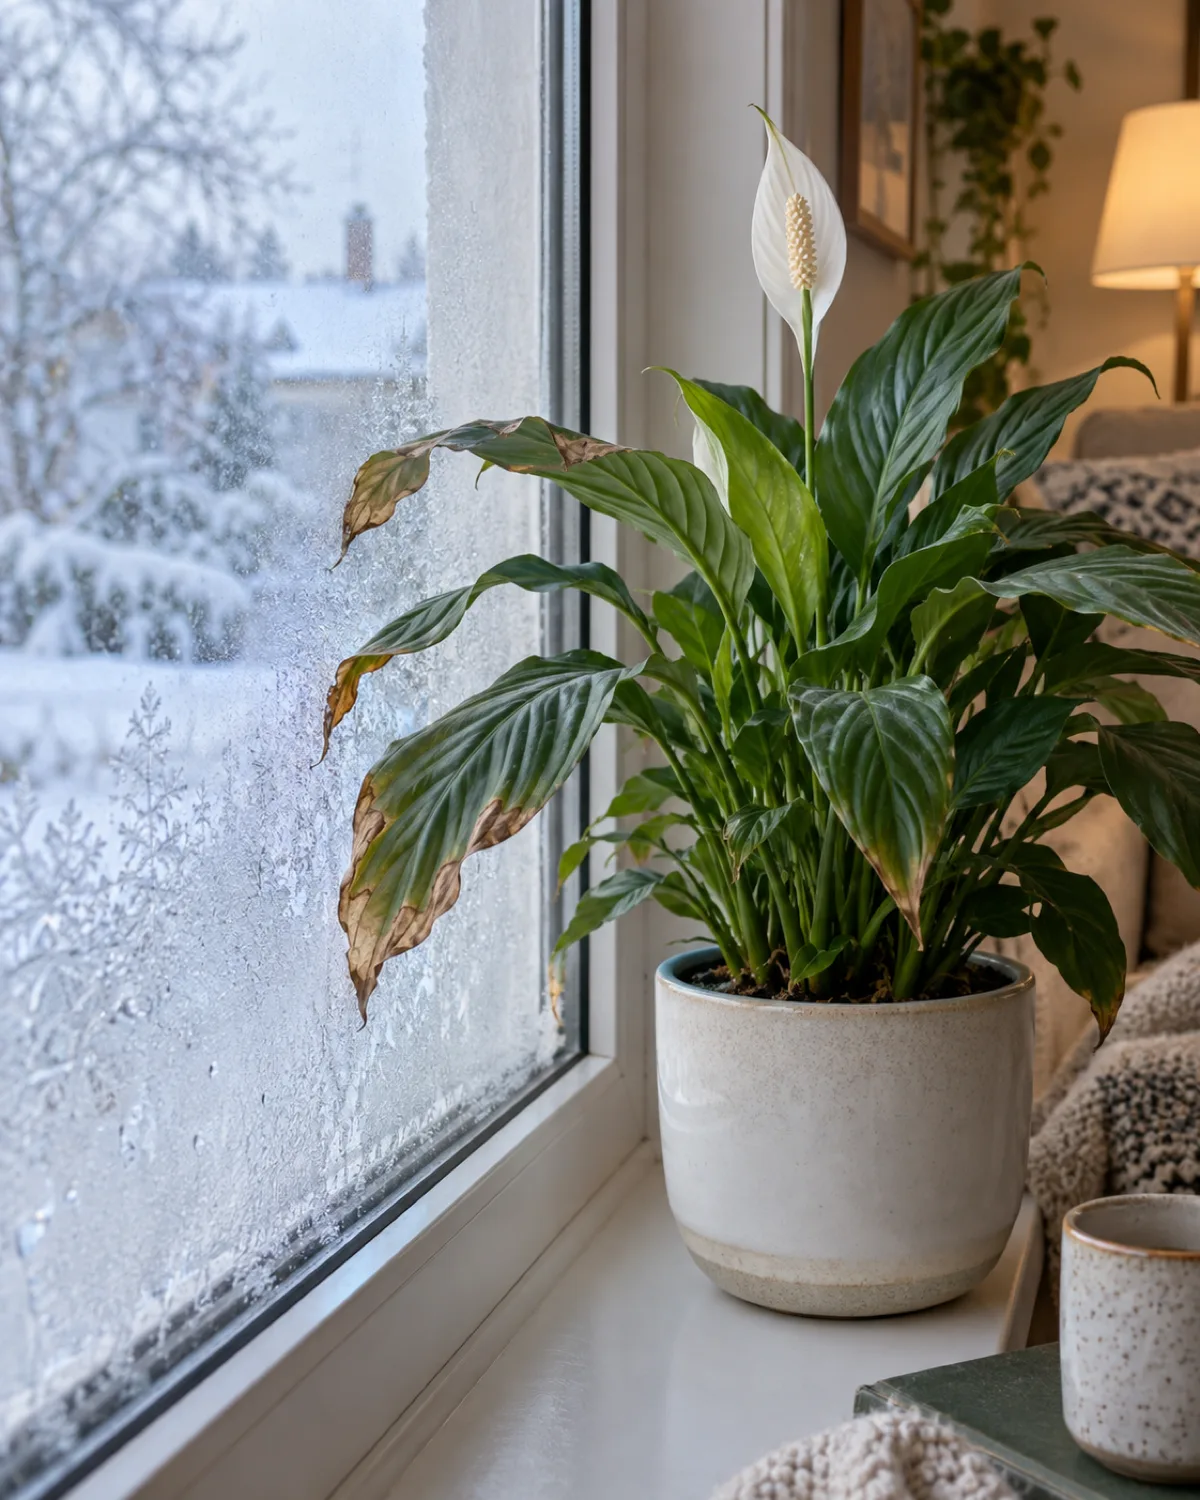
Tropical houseplants need temperatures above 55°F at all times. When a leaf presses against or sits near cold window glass in winter, the cells at the tip freeze, rupture, and die. The damage appears within 24 to 48 hours of the cold exposure and looks like a sudden brown or black patch at the leaf tip — different from the gradual browning of humidity damage.
The same mechanism works in reverse with hot air. Leaves positioned directly in the path of a heating vent receive blasts of dry, hot air that dehydrate the tip cells faster than the rest of the leaf can compensate.
- Browning appears only on leaves nearest the cold source (window, exterior door, AC vent)
- Leaves further from the source on the same plant remain healthy
- The damage is sudden — you will see green leaves one day and brown tips the next
The fix: Move plants at least 6 inches from cold window glass in winter. If you cannot move the plant, add a layer of insulation — even a folded towel — between the pot and the glass. Avoid placing plants near exterior doors that open frequently in winter, and never position them directly under an HVAC vent. A thermometer at plant height catches cold-spot problems before the leaves do.
Overwatering
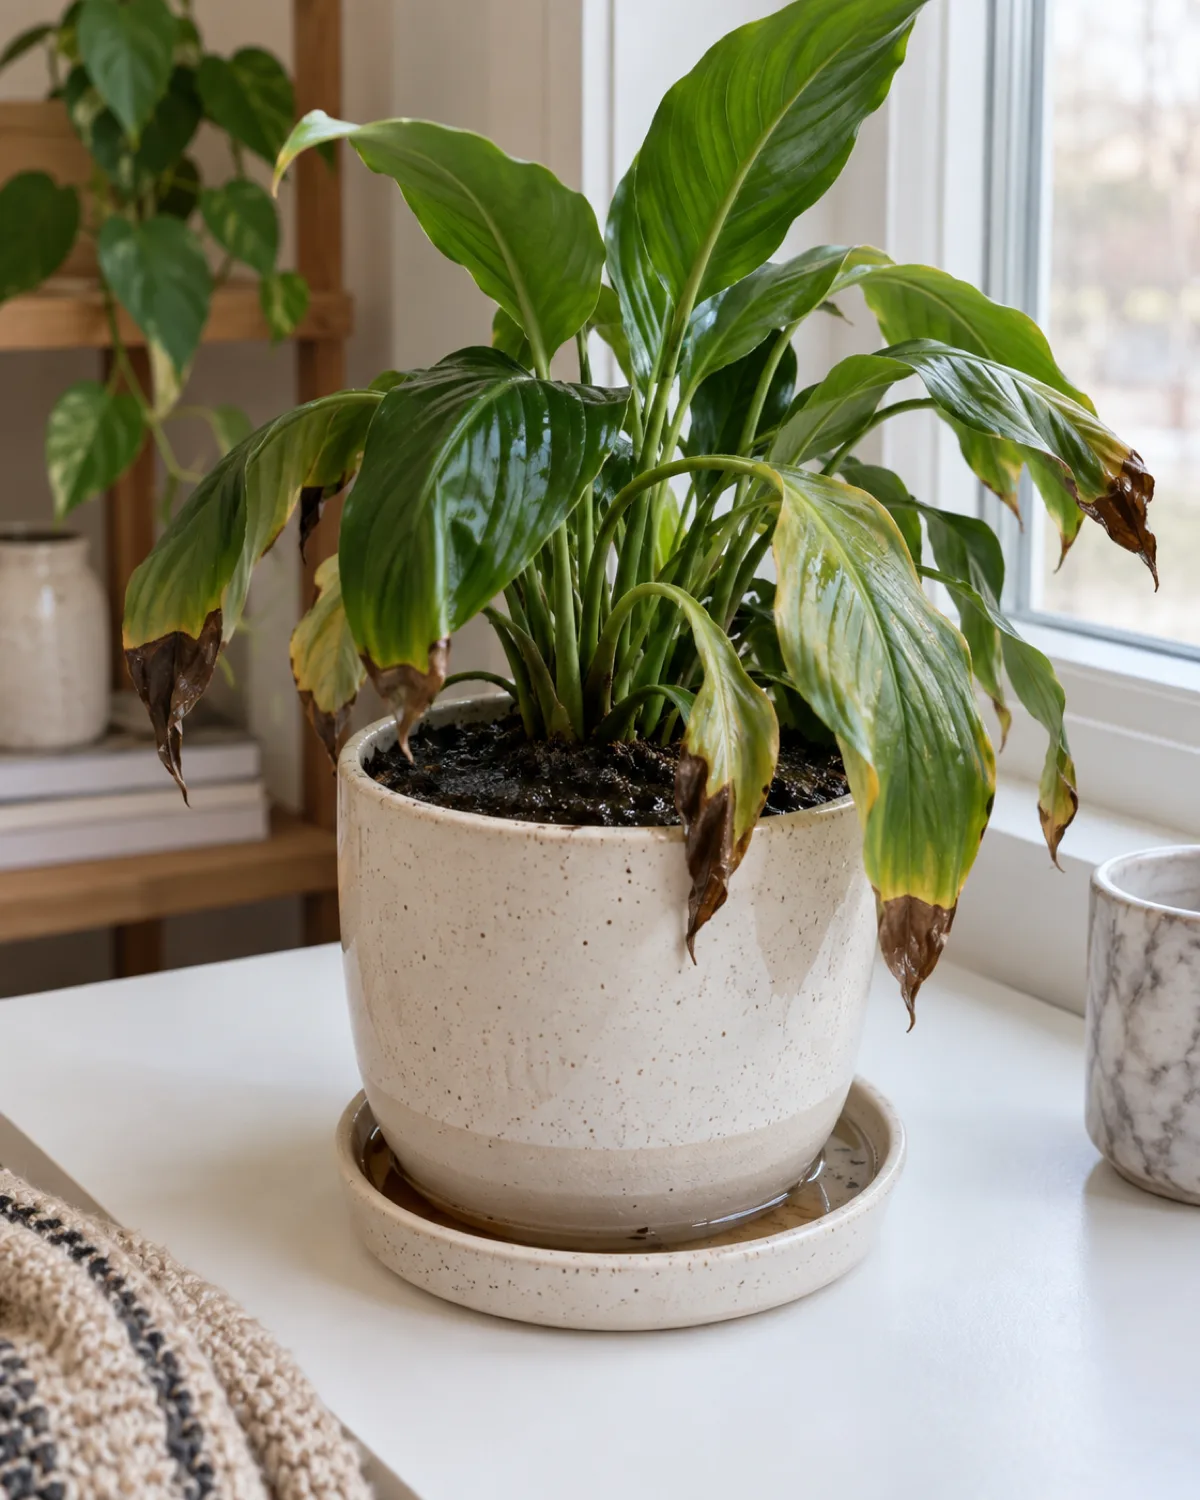
Overwatering causes brown tips through a counterintuitive pathway: waterlogged soil suffocates the roots by filling the air pockets they need for gas exchange. Oxygen-starved roots lose the ability to absorb water, so the plant effectively dehydrates from the tips inward — despite sitting in wet soil.
The key diagnostic difference is texture. Brown tips from overwatering feel soft or slightly mushy when you press them, and the brown color is darker — almost blackish — compared to the light, crispy brown of underwatering. The soil will be visibly wet, and you may notice a slightly sour smell from the pot.
- Brown tips feel soft rather than crispy
- Soil is constantly damp or wet
- Lower leaves may turn yellow while upper leaves brown at the tips
- A musty or sour smell from the soil indicates anaerobic bacteria in waterlogged conditions
The fix: Stop watering immediately and let the soil dry to the appropriate depth before watering again. Check that the drainage holes are clear — blocked holes trap water at the root zone.
If the soil stays wet for more than a week, repot with a chunkier mix: add perlite at a 1:1 ratio with your existing potting soil to increase drainage and aeration. Remove standing water from the saucer after every watering.
Pest Damage
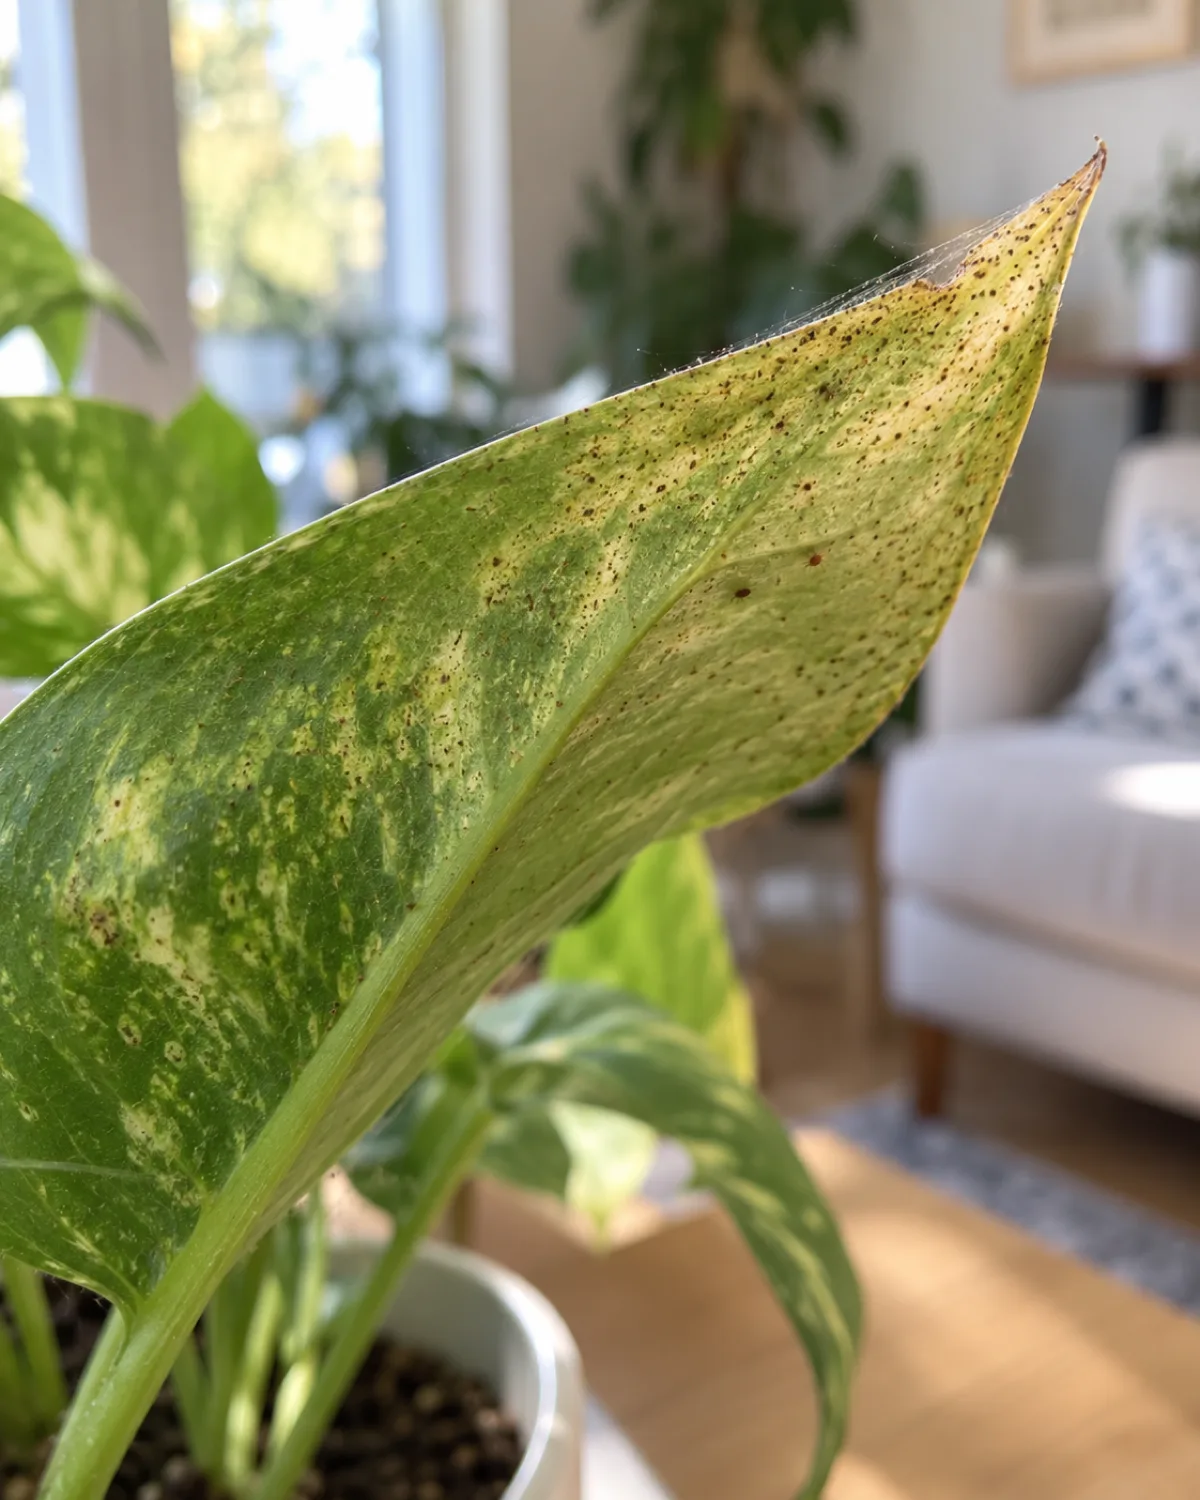
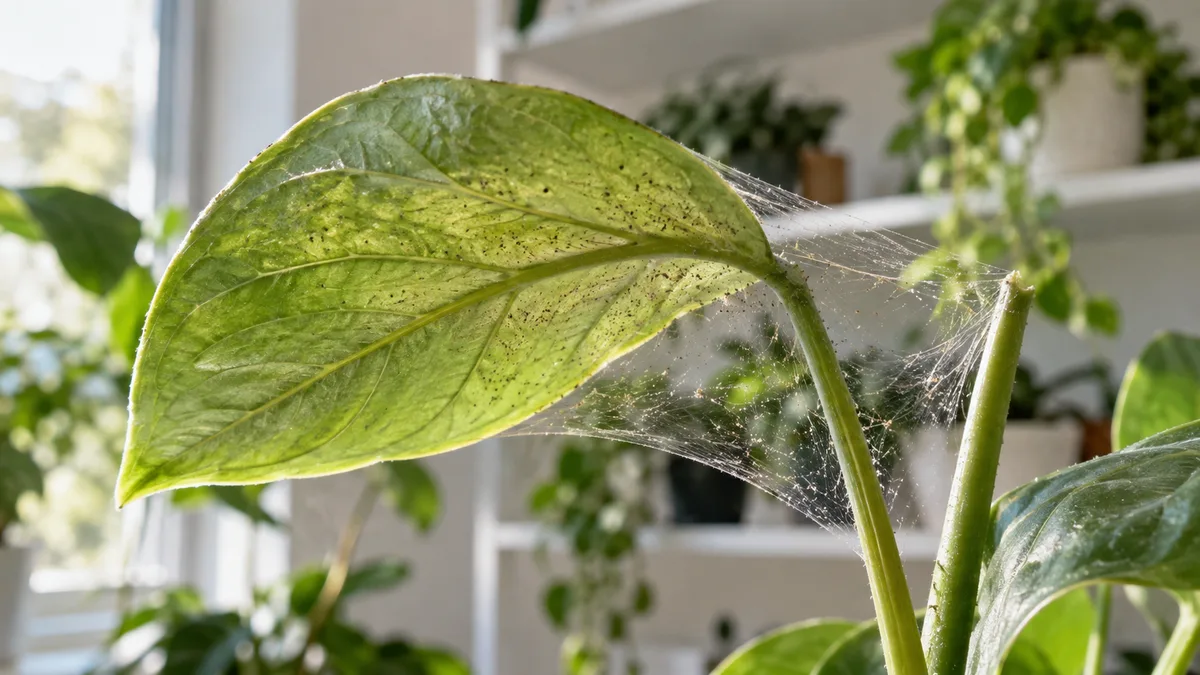
Spider mites and thrips feed at leaf tips and edges because the tissue there is thinner and easier to puncture. Their feeding leaves a distinctive stippled browning — tiny dots and scratches rather than the solid patches of environmental damage.
Spider mites produce fine webbing visible between leaves and along the midrib. If you suspect mites, shake the leaf over a piece of white paper — the specks that fall off and move are mites. Thrips leave black frass dots (excrement) on the leaf surface and cause silvery streaking before the tissue turns brown.
- Browning is stippled or streaked, not solid
- Fine webbing between leaves (spider mites)
- Black dots on leaf surface (thrips frass)
- Damage spreads from leaf to leaf over days
The fix: Isolate the affected plant immediately to prevent spread. Wipe all leaves — top and bottom — with a cloth dipped in diluted neem oil (1 teaspoon per quart of water with a drop of dish soap as emulsifier). Repeat every 5 to 7 days for three full cycles to catch mites at every life stage.
For heavy infestations, introduce predatory mites (Phytoseiulus persimilis) as biological control — they eat spider mites faster than you can spray.
How to Trim Brown Tips
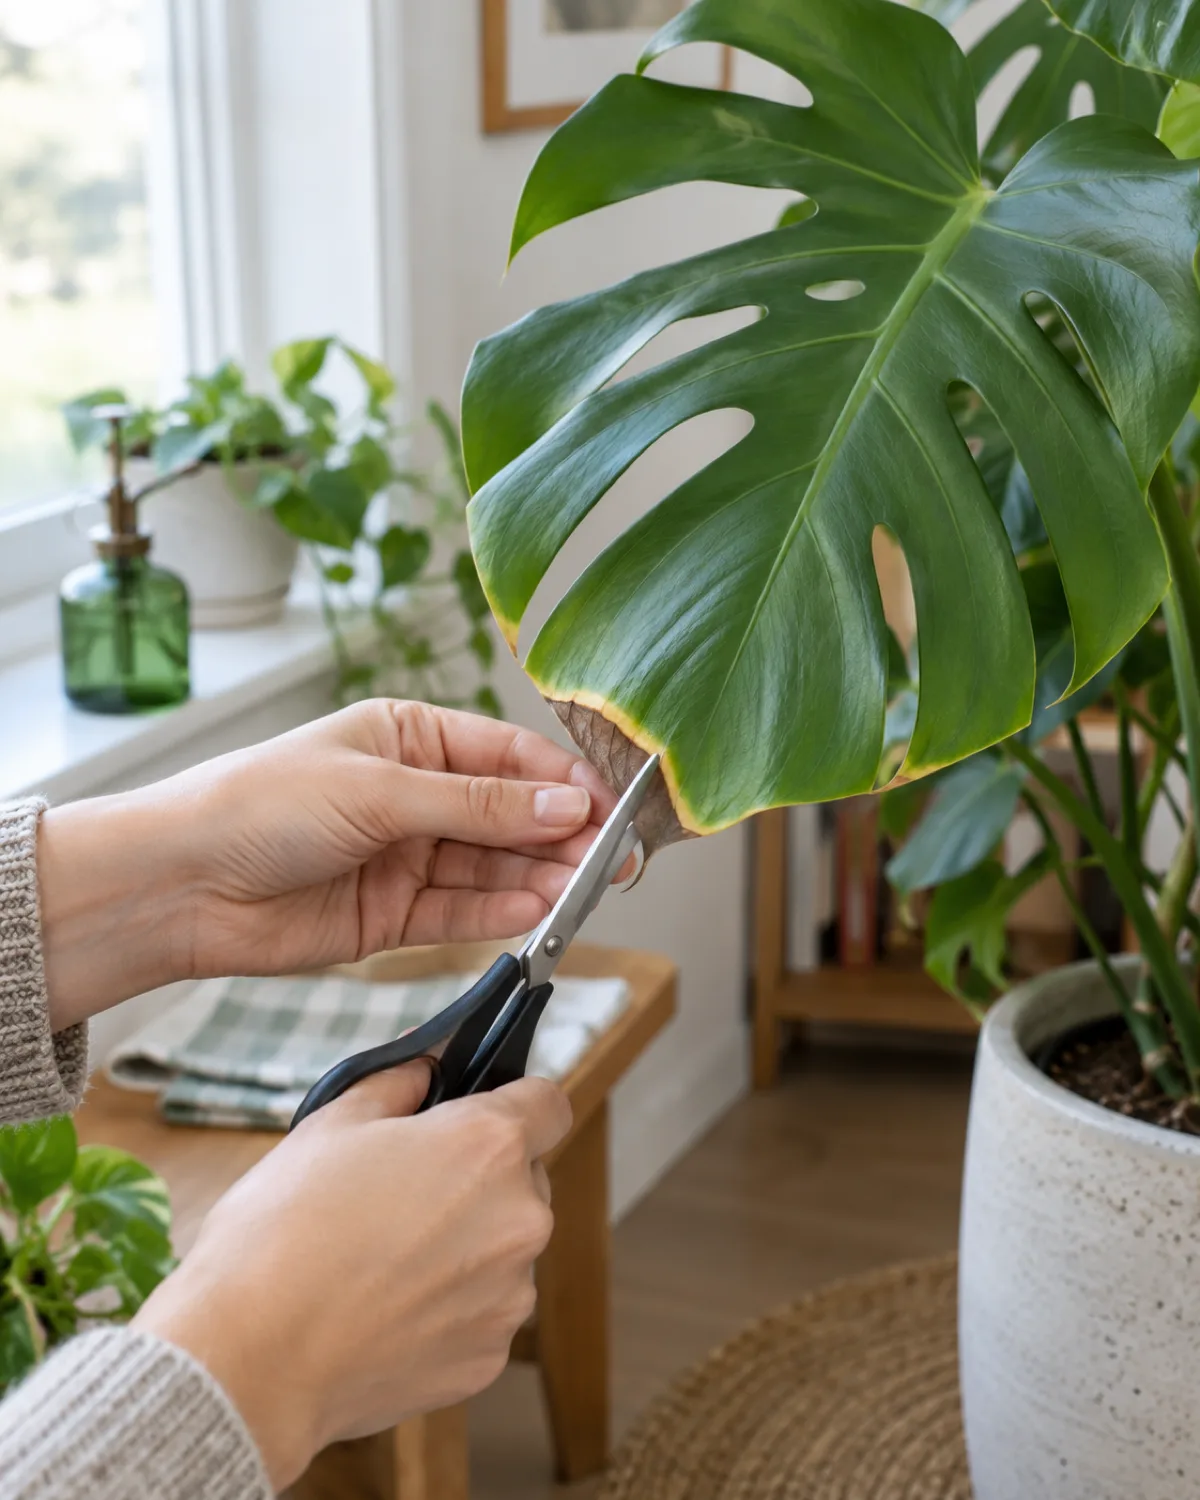
Brown tissue will not regenerate. Once a leaf tip has turned brown, that tissue is dead and will stay brown regardless of what you fix in the plant's environment. Trimming removes the dead tissue and improves the plant's appearance while the underlying cause is being addressed.
The technique matters because cutting into live green tissue creates a new wound that will brown at the cut edge — undoing the trim within a week. The goal is to cut into the dead brown zone only, leaving a thin margin of brown tissue as a protective barrier between the cut and the living cells.
- Use sharp, clean scissors or pruning snips — dull blades crush the tissue and create ragged wounds
- Sterilize the blades with rubbing alcohol between plants to avoid spreading disease
- Follow the natural shape of the leaf as you cut — angle the scissors to mimic the original leaf contour rather than cutting a flat line across the tip
- Leave 1 to 2 millimeters of brown tissue at the cut line
Never remove more than 20 percent of a single leaf at once. If the browning extends beyond 20 percent, the leaf is losing more photosynthetic surface than the trim is worth — let it fall naturally or remove the entire leaf at the base.
Prevention Checklist
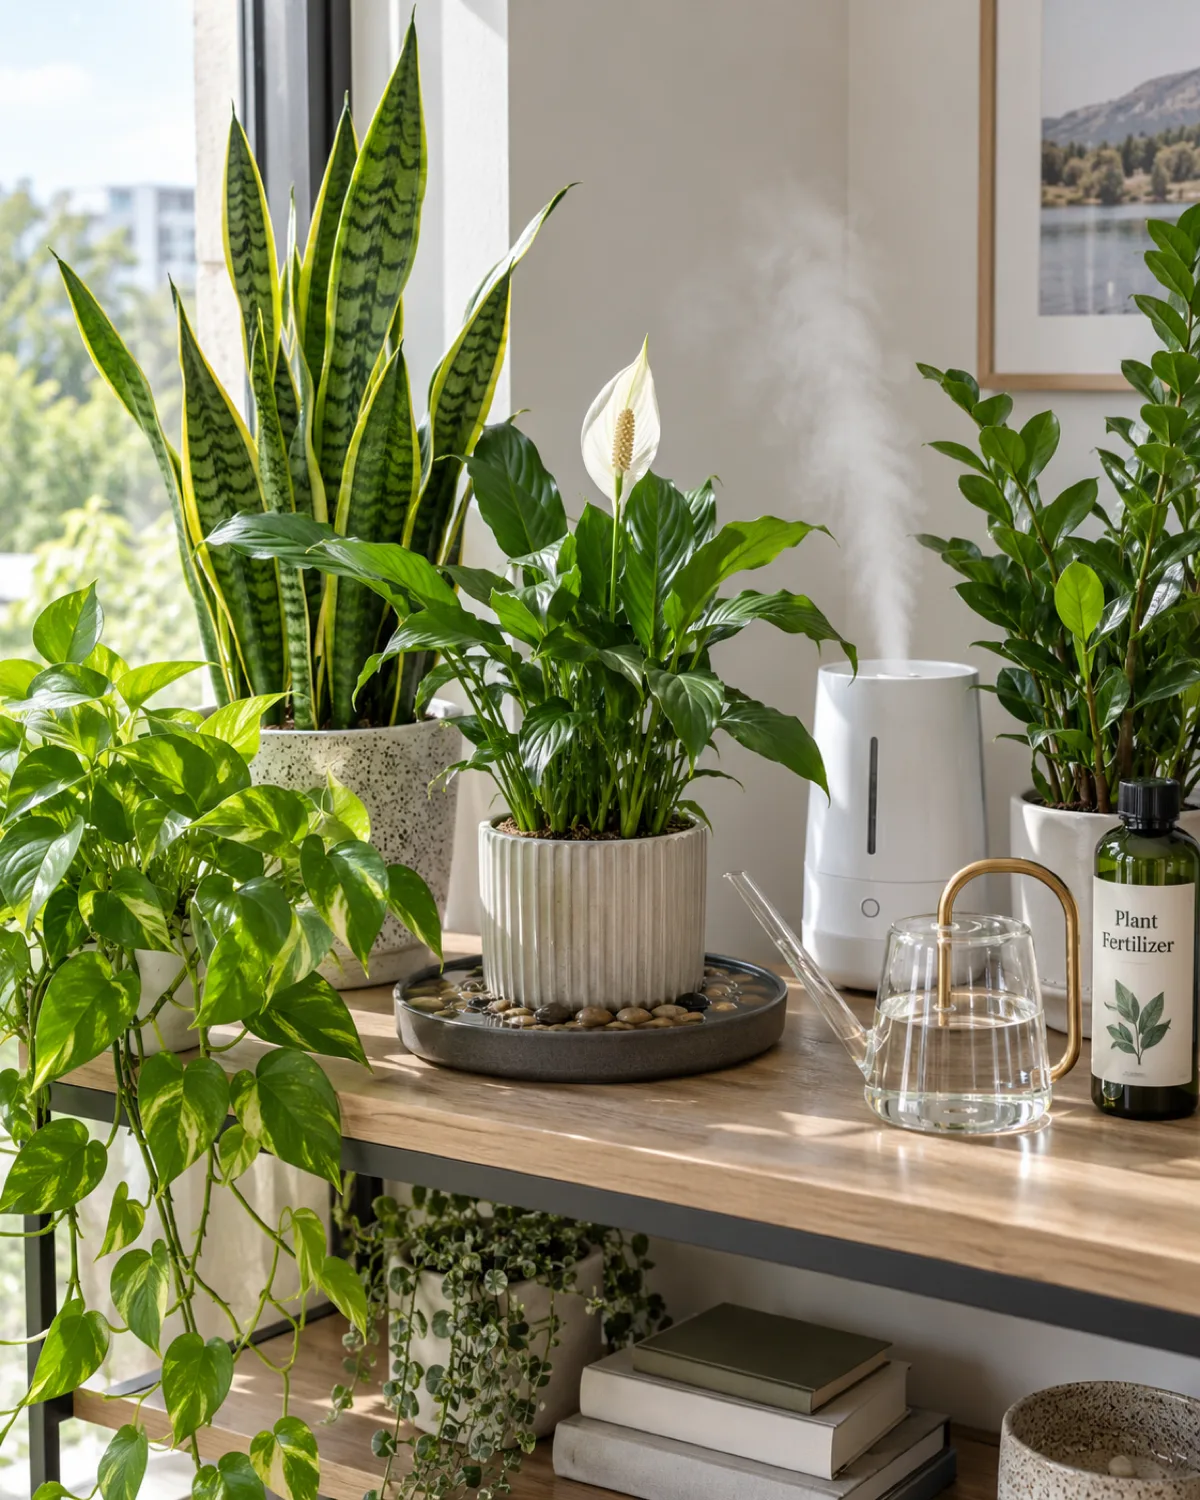
Most brown tips are preventable with five consistent habits. None of them require expensive equipment or advanced knowledge — just routine attention to the variables that leaf tips are most sensitive to.
The five-point prevention system:
- Humidity above 50% for tropicals: A hygrometer at plant height tells you the actual humidity, not what you think it is. Below 50 percent, run a humidifier. Below 40 percent, you will see damage within a week on ferns, calatheas, and peace lilies
- Consistent watering via the finger test: The soil surface lies. It dries out first while the root zone may still be wet. Push a finger one inch down. Dry at one inch means water. Moist at one inch means wait
- Monthly soil flush: Run plain water through the pot for five minutes once a month. This dissolves mineral salts that accumulate invisibly and prevents the sudden fertilizer-burn browning that catches people off guard
- Filtered water for sensitive species: Spider plants, dracaenas, prayer plants, and ti plants need water without fluoride. A basic carbon filter pitcher is enough
- Feed at half-strength during growing season only: No fertilizer from November through February for most houseplants. During the growing season, half the recommended dose at every watering beats full strength once a month
The plants that almost never get brown tips — pothos, snake plants, ZZ plants — share one trait: thick, waxy leaves with low surface-area-to-volume ratio. If you want zero-maintenance greenery without monitoring humidity or water chemistry, start with those species and expand to sensitive plants once you have the environmental controls in place.
FAQ
Quick-reference answers:
- Will brown leaf tips turn green again? No. Brown tissue is dead tissue. The cells have lost their chlorophyll and structural integrity permanently. Trimming is the only way to remove the brown — the plant will not repair it. New growth from the center of the plant will come in green if you have fixed the underlying cause
- How do I know if the browning is from humidity or underwatering? Check the soil. If the soil is moist and the tips are browning, humidity is the cause. If the soil is dry, underwatering is the cause. Both produce crispy brown tips, but the soil tells you which pathway is active
- Is it normal for lower leaves to get brown tips? Some browning on the oldest leaves is normal aging — the plant redirects resources from old leaves to new growth. If only the bottom one or two leaves are affected and new growth is healthy, this is not a problem to solve
More common questions:
- Can I prevent brown tips entirely? On thin-leaved tropicals like calatheas and ferns, some minimal tip browning is almost unavoidable in home environments. You can minimize it with humidity control and water quality, but expect minor cosmetic browning on the most sensitive species. Thick-leaved plants like pothos and snake plants almost never brown at the tips
- Should I cut off the entire leaf or just the brown tip? If less than 20 percent of the leaf is brown, trim just the tip. The remaining green tissue is still photosynthesizing and feeding the plant. Only remove the entire leaf if more than half is brown or if the leaf has turned yellow — at that point the plant is already reabsorbing nutrients from it
- My plant has brown tips and yellow leaves — what is happening? Brown tips plus yellow leaves usually indicates overwatering. The roots are suffocating, which causes yellowing from the base while the tips brown from dehydration. Check the soil moisture and drainage immediately
Save for Reference
Brown Leaf Tips — Diagnostic Quick Reference
- 1Low HumidityPapery translucent edges that curl inward — run a humidifier to 50% for tropicals.
- 2UnderwateringCrispy tips with dry cracked soil — soak from the bottom and use the finger test.
- 3Fertilizer BurnWhite salt crust on soil — flush with plain water for five minutes, halve feeding.
- 4Tap Water ChemicalsTips with yellow halo on spider plants and dracaenas — switch to filtered water.
- 5Too Much Direct SunBleached sharp-edged patches — move back 2–3 feet or add a sheer curtain.
- 6Rootbound StressTips brown despite good watering, roots circling — repot 1–2 inches wider.
- 7Cold DraftsSudden browning on window-side leaves — move 6 inches from cold glass.
- 8OverwateringSoft mushy brown tips with wet soil — let dry, add perlite, clear drainage holes.
- 9Pest DamageStippled dots with webbing — isolate, neem oil wipe, repeat every 5–7 days × 3.
- 10Trimming TechniqueCut into brown zone only with sterilized scissors, follow leaf shape, ≤20% per leaf.
- 11Prevention SystemHumidity 50%+, finger test, monthly flush, filtered water, half-strength feed.
Save this list · Kultivy

Mara Quinn edits Kultivy, where she shares houseplant care, propagation, beginner-friendly plant picks, and plant-styling ideas for anyone who wants their indoor plants to actually thrive. Every guide is image-led and reviewed for clarity, usefulness, image accuracy, and Pinterest-to-page alignment before it goes live. Visit the About page.