Most houseplants need a node and a glass of water before they will grow roots. Succulents skip the formalities. A leaf that falls off during repotting can sprout a whole new plant on a dry tray without help.
That ability comes from meristematic tissue in every leaf and stem — cells that become roots, shoots, or a rosette based on environmental signals. The same mechanism lets wild echeveria regenerate after an animal knocks off a branch.
"Easy" does not mean "automatic." Watering too soon kills more propagations than neglect. Here is how four methods work.
Leaf propagation, stem cuttings, beheading, offset separation, division, soil mixes, light rules, and the timeline that keeps you from giving up too early. Jump to the method you need.
Why Succulents Are the Easiest Plants to Propagate
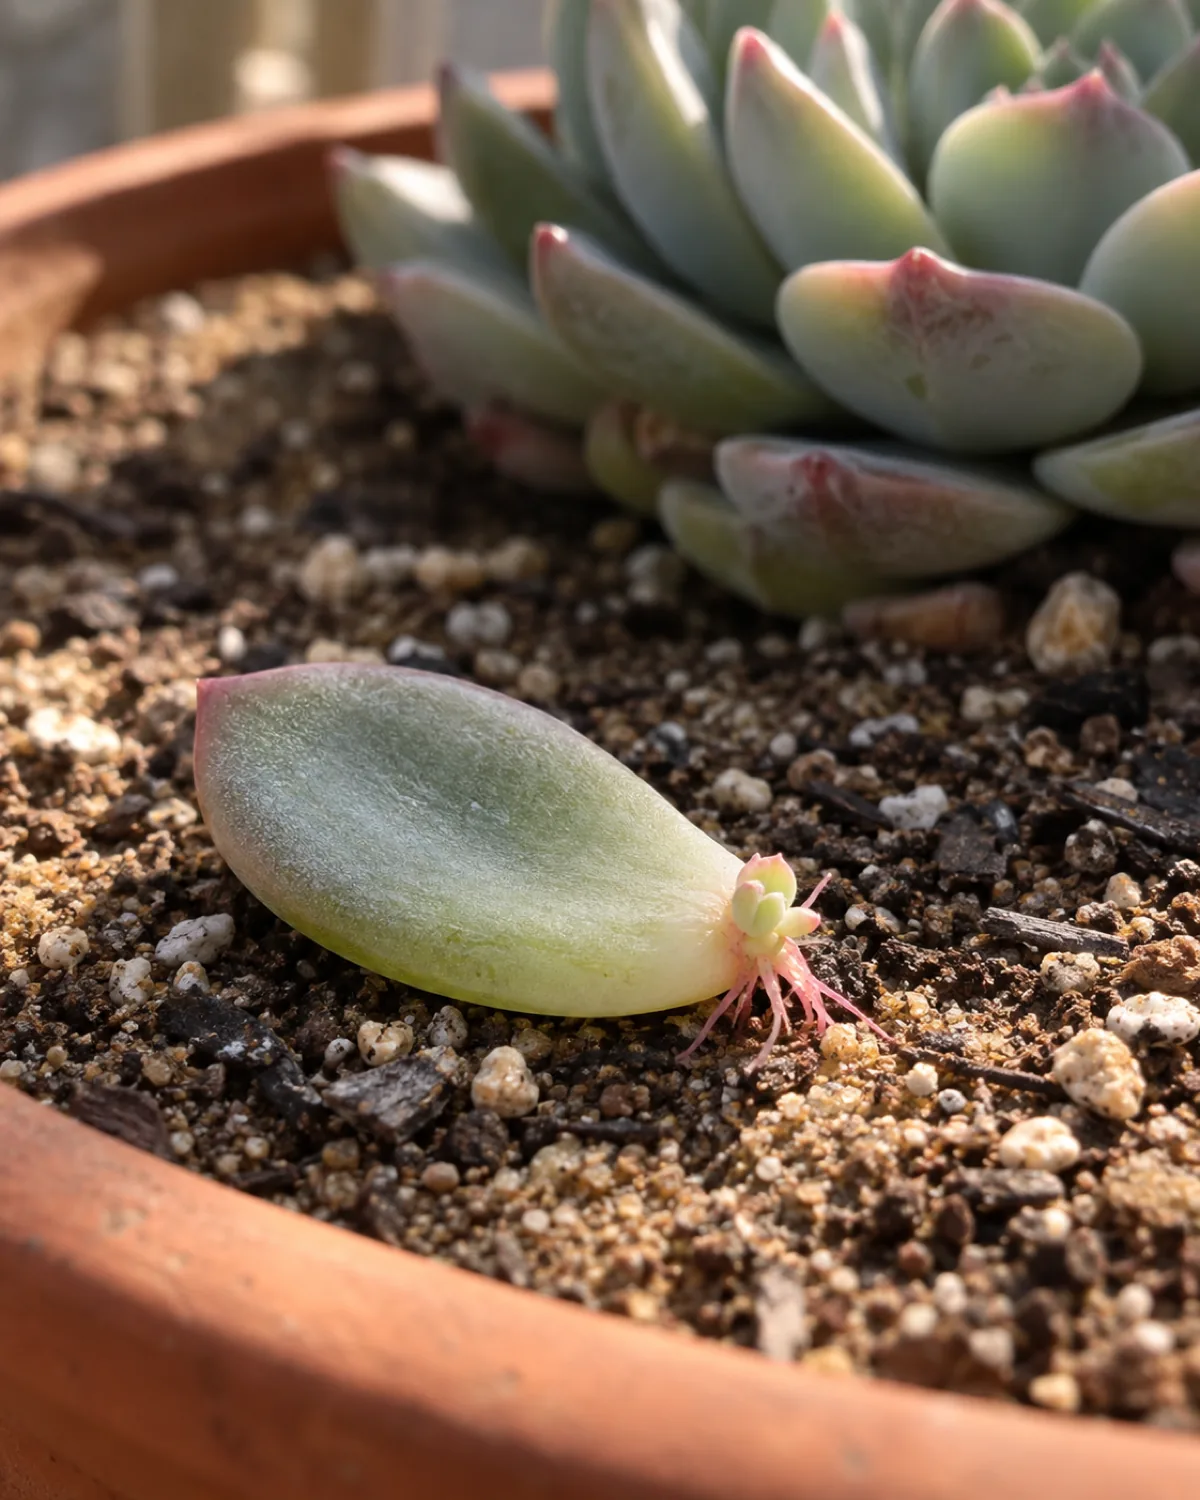
Tropical plants need a node with an axillary bud to regenerate. Succulents do not. Their leaves and stem segments contain meristematic cells — undifferentiated tissue that can develop into roots, shoots, or an entire rosette based on environmental signals like light exposure and moisture gradients.
This is not a lab trick. It is a survival mechanism. In their native habitats across Mexico, Southern Africa, and Madagascar, wild succulents regularly lose leaves and branches to animals, wind, and gravity. Those fragments callous over, touch dry ground, and grow into independent plants without any human intervention.
The practical result for propagation:
- Leaves work as standalone cuttings. A single echeveria leaf with a clean base can produce a full rosette in two to three months. No node required, no rooting hormone needed
- Stems root without water. Unlike pothos or philodendron, succulent stem cuttings root better in dry gritty soil than in a glass of water
- Offsets arrive pre-rooted. Species like sempervivum and aloe send out pups that often have their own root systems before you even separate them
The general propagation guide covers node-based methods for tropical houseplants. This guide goes deep on the succulent-specific techniques that work precisely because succulents break the normal rules.
When to Propagate for the Highest Success Rate
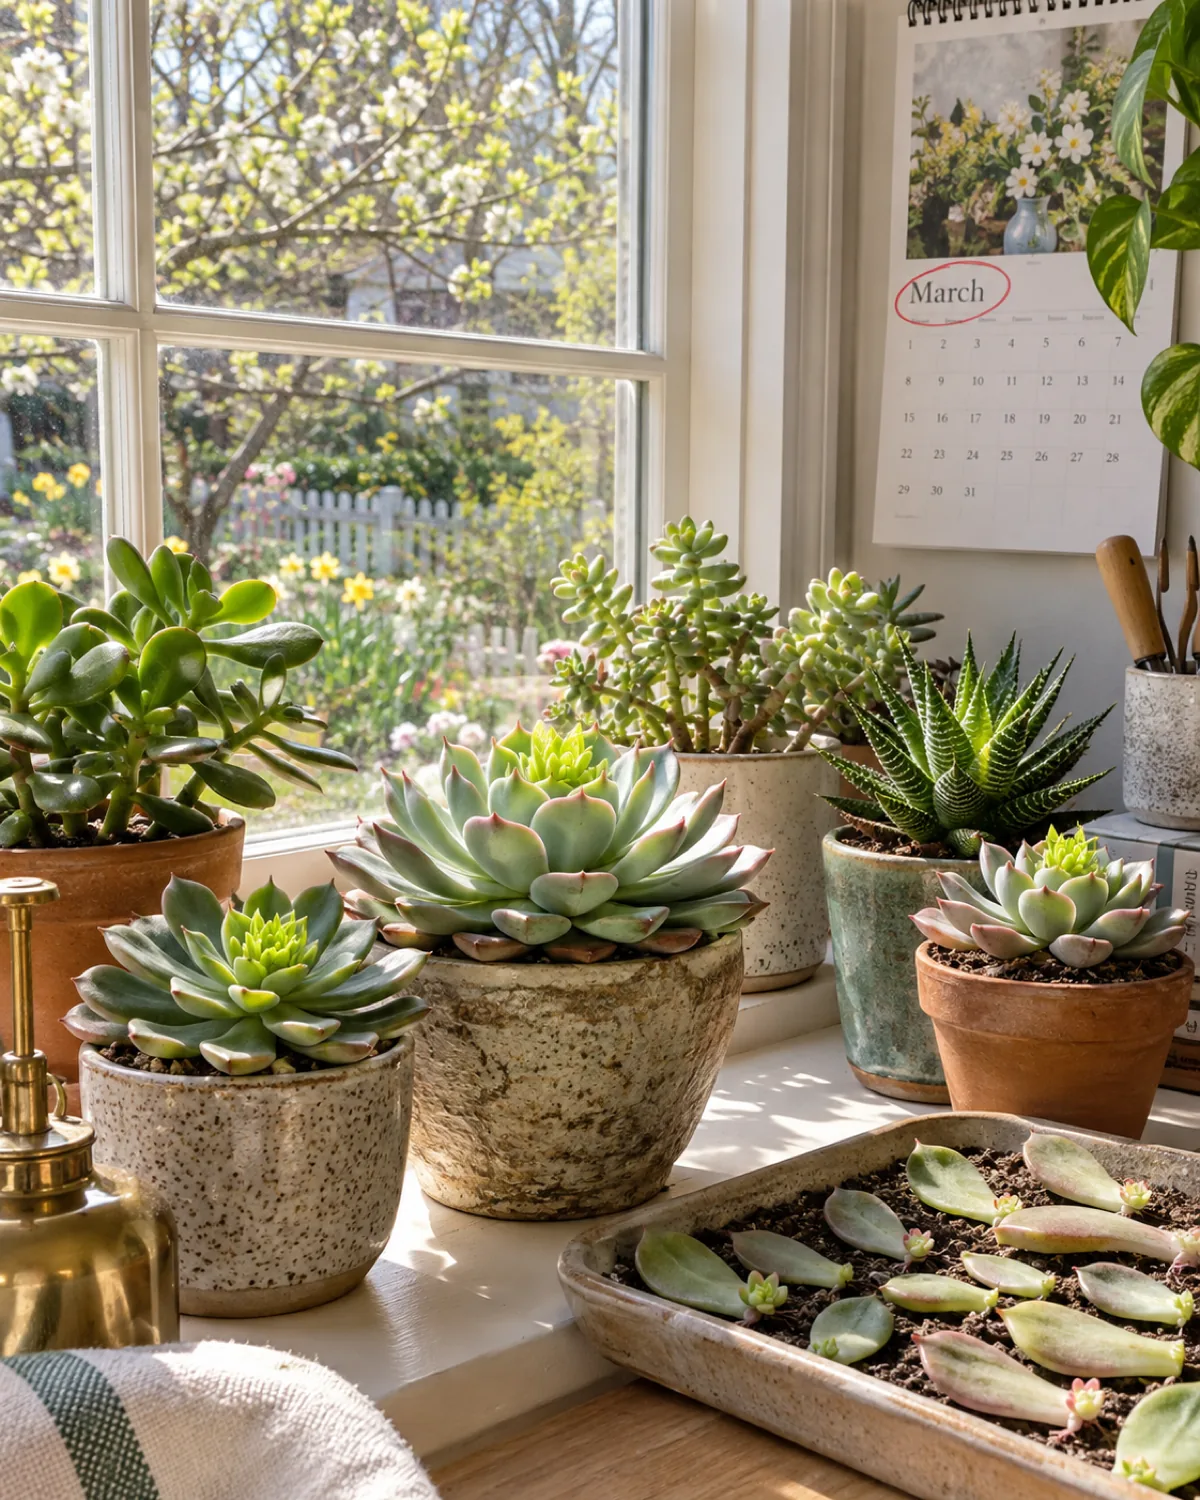
Spring through early summer is the window. Succulents grow actively when temperatures sit between 65°F and 80°F and day length is increasing. During this period roots develop faster, rosettes emerge sooner, and the overall success rate roughly doubles compared to winter attempts.
The reason is hormonal. Active growth means higher levels of auxin — the plant hormone that drives root initiation. A leaf detached in April will push out roots in two weeks. The same leaf detached in December might sit unchanged for six weeks before doing anything, if it survives at all.
Timing guidelines by method:
- Leaf propagation: best in March through June. The long rooting timeline (two to eight weeks for roots, another four to eight for a rosette) benefits most from the active growth runway
- Stem cuttings: April through July. Callousing happens faster in warm dry air, and root establishment takes advantage of the remaining growth season
- Offset separation: any time the pup has its own roots, but spring separation lets the pup establish before winter dormancy slows everything down
- Division: early spring before the growth flush, so divided sections fill their new pots quickly
Indoor succulents under grow lights blur the seasonal lines somewhat because temperature and day length stay consistent. Even so, most indoor growers see better results in spring when ambient humidity is lower and natural light supplements whatever artificial setup is running.
Leaf Propagation Step by Step
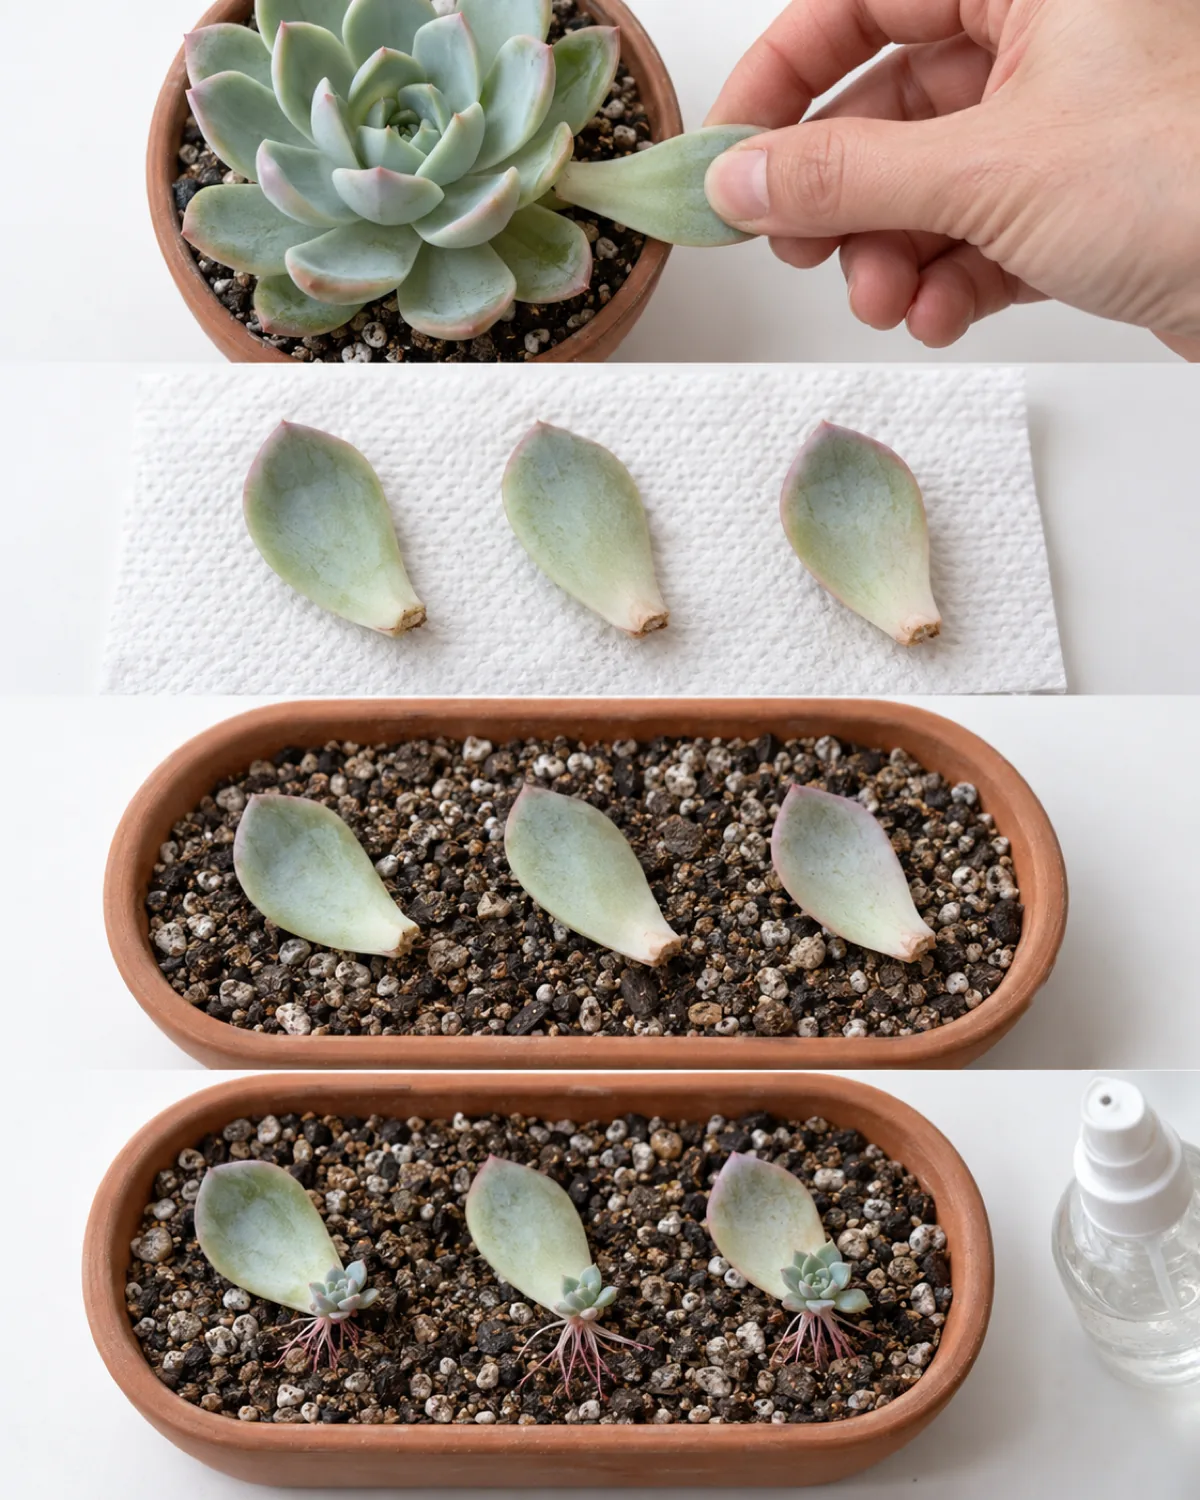
This is the method that makes succulents famous for easy propagation. A single leaf can become a complete plant in three to six months, and you can start dozens at once on a single tray.
The five steps:
- Choose a healthy leaf. Pick from the middle of the rosette — not the oldest bottom leaves and not the tiny ones at the center. Plump, firm, no discoloration
- Twist and pull cleanly. Grip the base and rock side to side until it snaps free. The base must come away completely — tissue tearing on the stem means that leaf will not propagate
- Callous for two to five days. Set the leaf on a dry paper towel away from direct light. The broken end forms a dry seal. Skip this and wet tissue rots on soil contact
- Lay on dry gritty soil. Place calloused leaves flat on a shallow tray of fast-draining mix (more on soil in section 9). Do not bury them
- Mist every two to three days. Spray the soil surface lightly — dampness that dries within hours, not sustained wetness. Roots emerge first, then a tiny rosette
One leaf per species is enough to practice the technique. Once you see the first roots, start a batch of ten or more — the success rate for well-executed leaf pulls runs around 60 to 80 percent, so volume compensates for the ones that fail.
Why Most Leaf Propagation Attempts Shrivel and Die
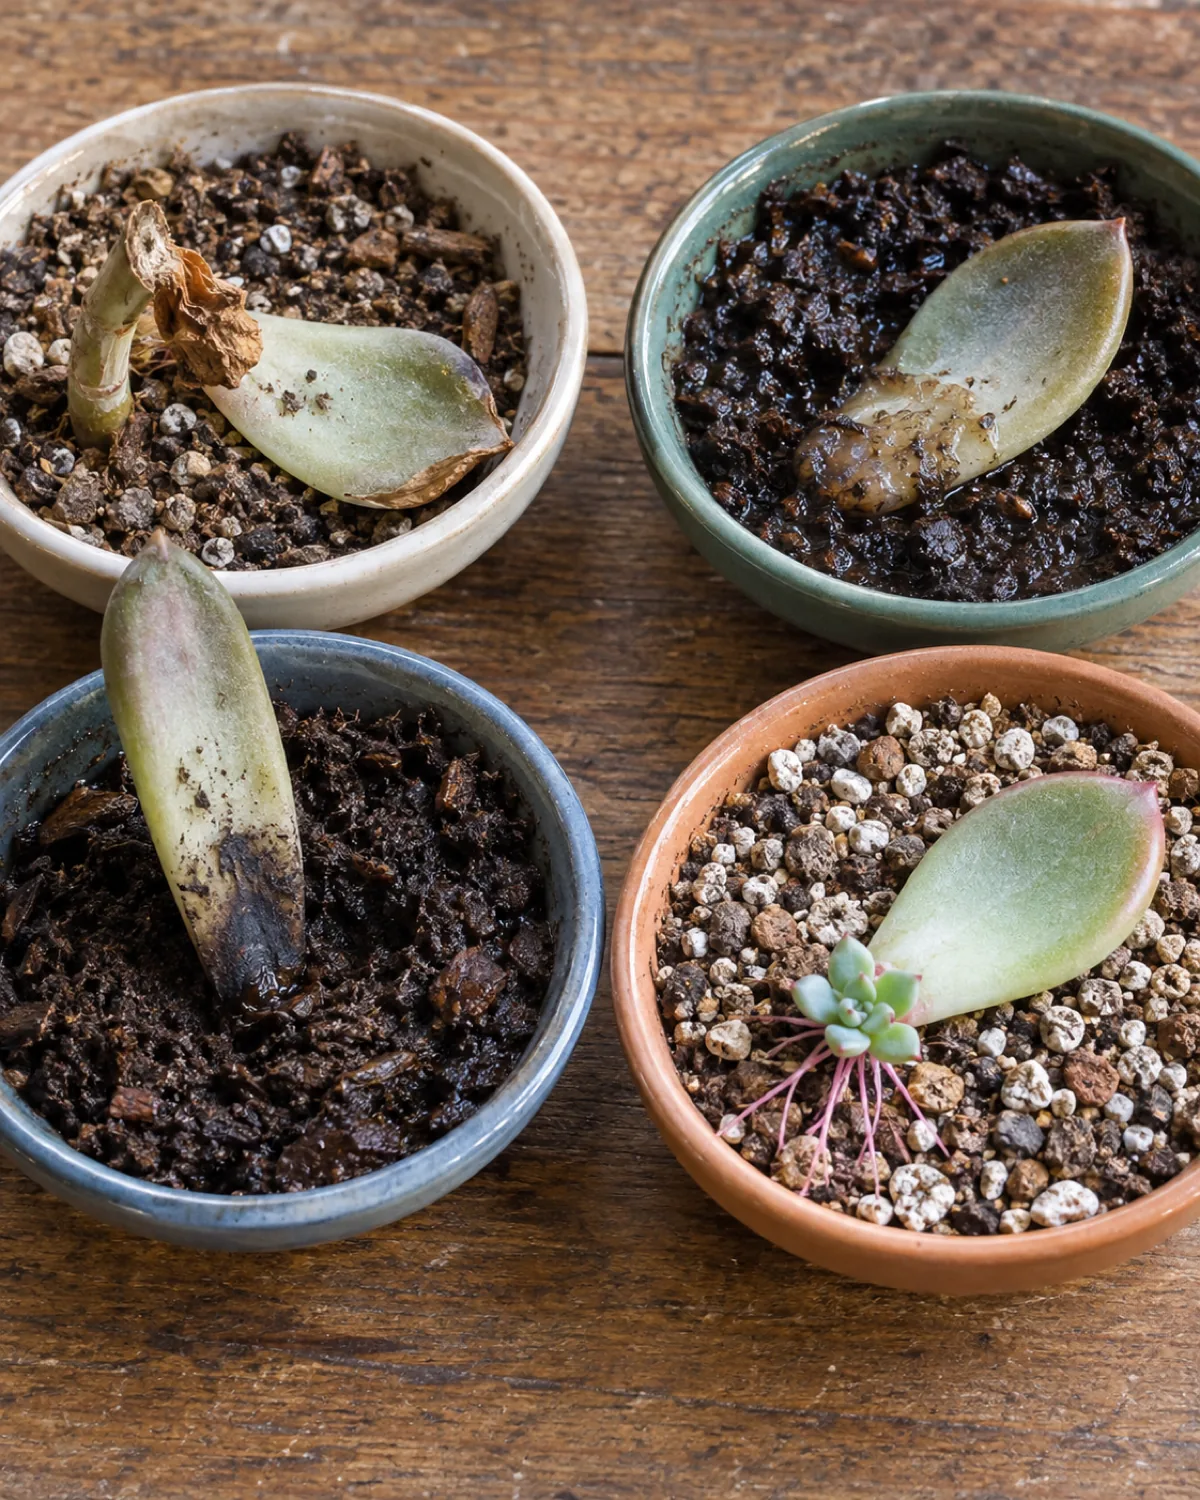
The leaf propagation success rate drops to near zero when any of these four mistakes happen. Each one is preventable, and most new propagators make at least one on the first attempt.
Incomplete leaf pull. The single most common killer. If the leaf tears instead of releasing cleanly at the base, the meristematic tissue stays on the stem. Without that tissue, the leaf has no cells capable of generating roots. There is no fix — discard the torn leaf and try again with a clean twist from a different angle.
Watering before the callous forms. A freshly detached leaf has an open wound. Placing it on moist soil or misting it immediately invites bacteria and fungal spores directly into the exposed tissue. The result is a mushy, translucent base that smells faintly sweet — rot.
- The callous only needs two to five days in dry air
- When in doubt, wait an extra day rather than rushing to soil
Burying the leaf. Pushing the leaf end into soil traps moisture around the wound, even if the surface dries quickly. Leaves laid flat on the surface can breathe on all sides, and roots grow downward naturally when they are ready.
Giving up too early. A leaf can sit on a tray looking completely unchanged for three to four weeks before showing any sign of life. During that time, cellular processes are happening below the visible surface. Tossing apparently "dead" leaves is the second biggest waste — many of them would have sprouted roots the following week.
The simple diagnostic: if the leaf is still plump and firm, it is still alive. Only when it turns translucent, mushy, or papery should you remove it.
Stem Cutting Propagation for Leggy Succulents
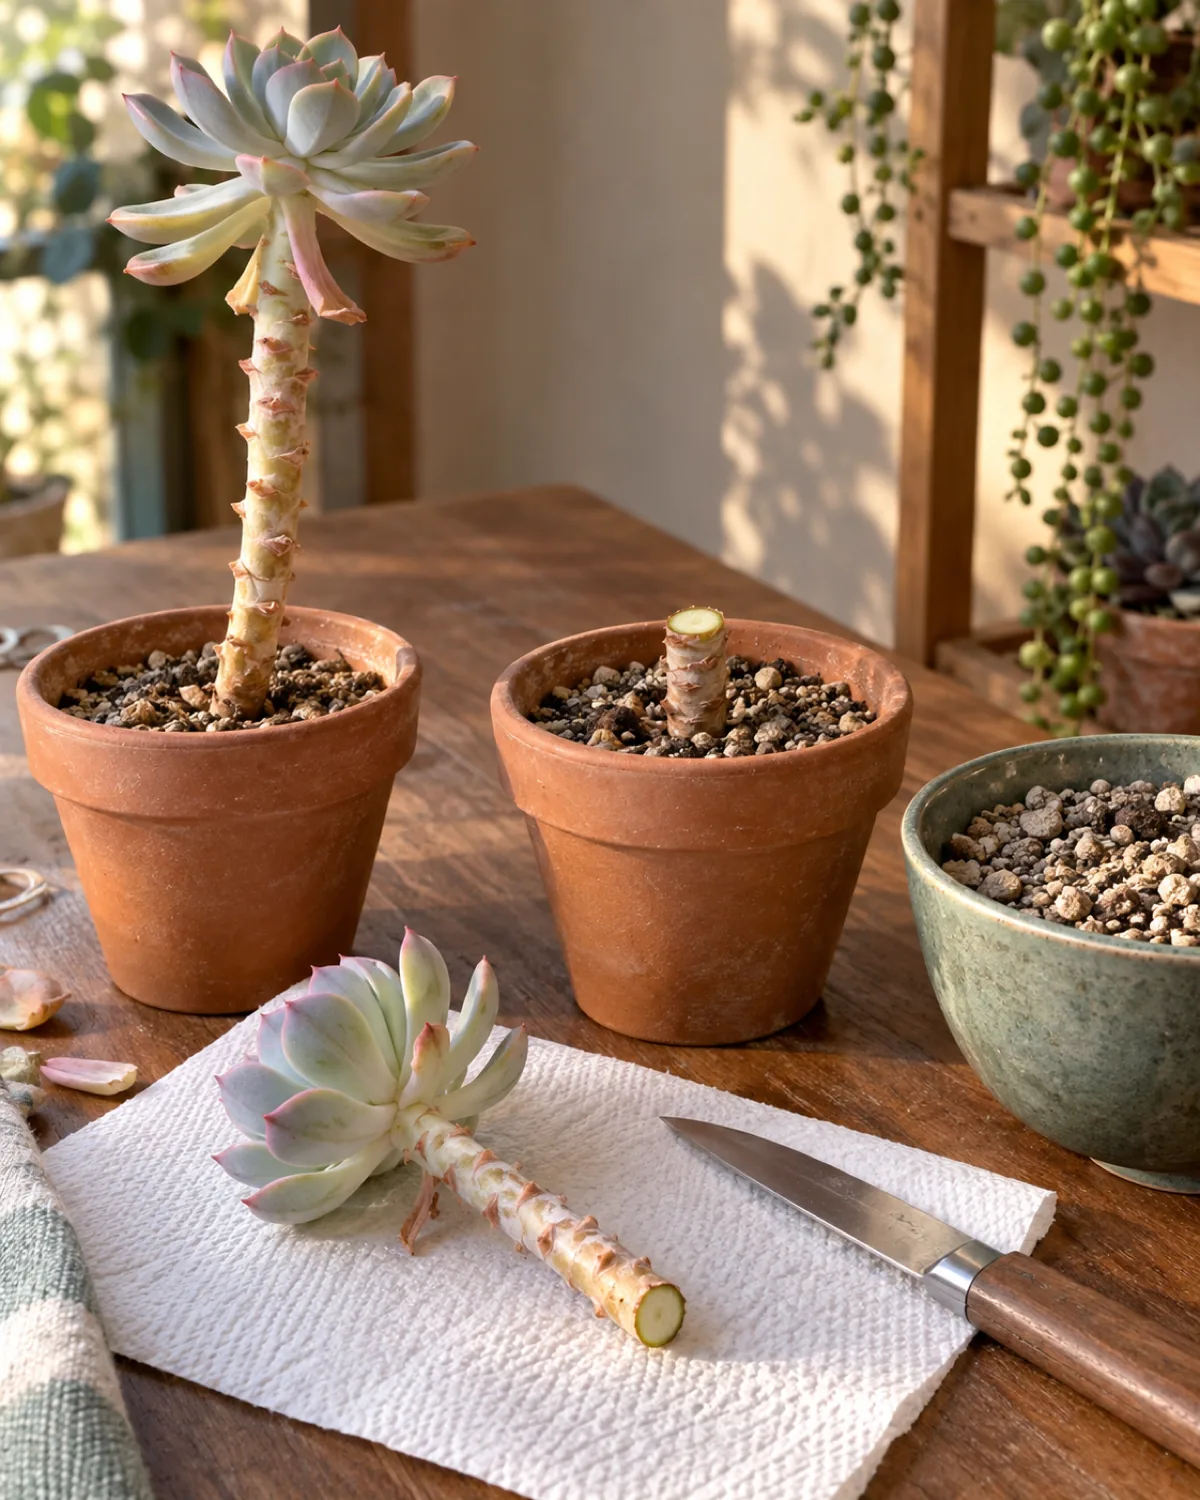
When a succulent stretches toward light and develops a long bare stem with all the leaves clustered at the top, stem cutting propagation turns that problem into more plants. The technique works well for echeveria, graptoveria, sedum, and any rosette-former that has etiolated.
The succulent care guide covers why etiolation happens and how to prevent it. This section focuses on what to do once the damage is already done.
Cut the stem three to four inches below the rosette head using a clean sharp blade — a razor blade or craft knife works better than scissors, which compress the tissue. Strip the lowest two or three leaves from the cutting (save them for leaf propagation) so you have a clean stem base.
Then stop. Do not plant it.
- Callous the cutting for three to seven days. Stem wounds are larger than leaf wounds and need more time to seal. Set the cutting upright in an empty jar or lying on a paper towel in a dry room with indirect light
- Plant in dry gritty mix. Push the calloused stem about an inch into the soil — deep enough to stand upright. Water nothing
- Wait two full weeks before the first watering. Roots initiate best in dry conditions for succulents. The first watering should be a soak-and-dry: saturate the soil, let it drain completely, then wait until it is bone dry before watering again
The rosette head typically roots within two to three weeks. Tug gently after three weeks — if there is resistance, roots have anchored.
The leftover stump in the original pot is not waste. Keep watering it on its normal schedule and it will often push out multiple new rosette heads from dormant nodes along the stem.
Beheading: The Dramatic Propagation That Saves Stretched Plants
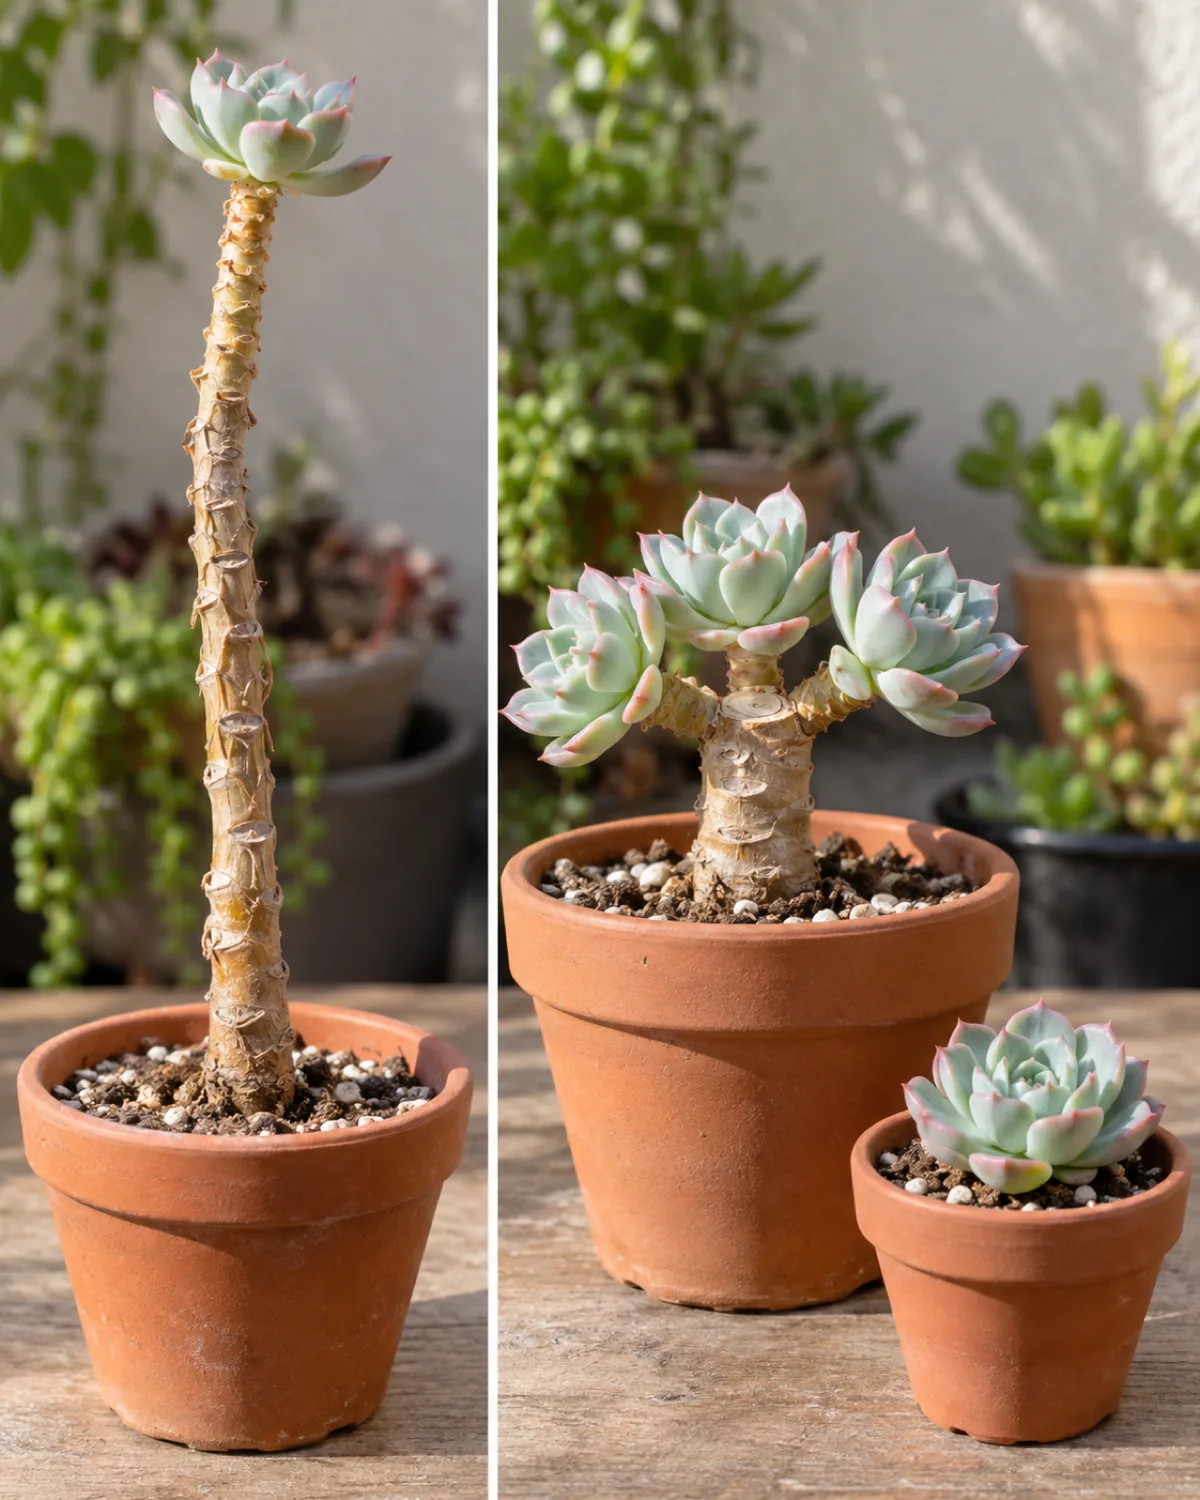
Beheading sounds violent because it is. You cut the entire rosette head off a succulent and root it as a new plant. The stump left behind grows multiple new heads. One ugly plant becomes several attractive ones.
This method exists specifically for severe etiolation — when the stem is so stretched that the plant looks like a lollipop on a stick and no amount of better light will compact the existing growth. The new rosette you root will grow compact from day one if you give it proper light.
The process:
- Cut one to two inches below the lowest leaf of the rosette using a clean blade. Include enough stem that you can bury it in soil for stability
- Strip any leaves from the stem section of the rosette head. Those leaves go to the leaf propagation tray
- Callous the rosette head for five to seven days. The wound surface is large, so it needs the full week
After callousing, plant the rosette head in dry gritty mix and treat it exactly like a stem cutting — no water for two weeks, bright indirect light, gentle tug test at three weeks.
The real payoff is the stump. Within three to six weeks, dormant nodes along the bare stem activate and push out multiple new rosettes. A single stem can produce two to five new growing points, turning one stretched plant into a bushy multi-headed specimen. Continue watering the stump on its normal schedule while those new heads develop.
Offset and Pup Separation
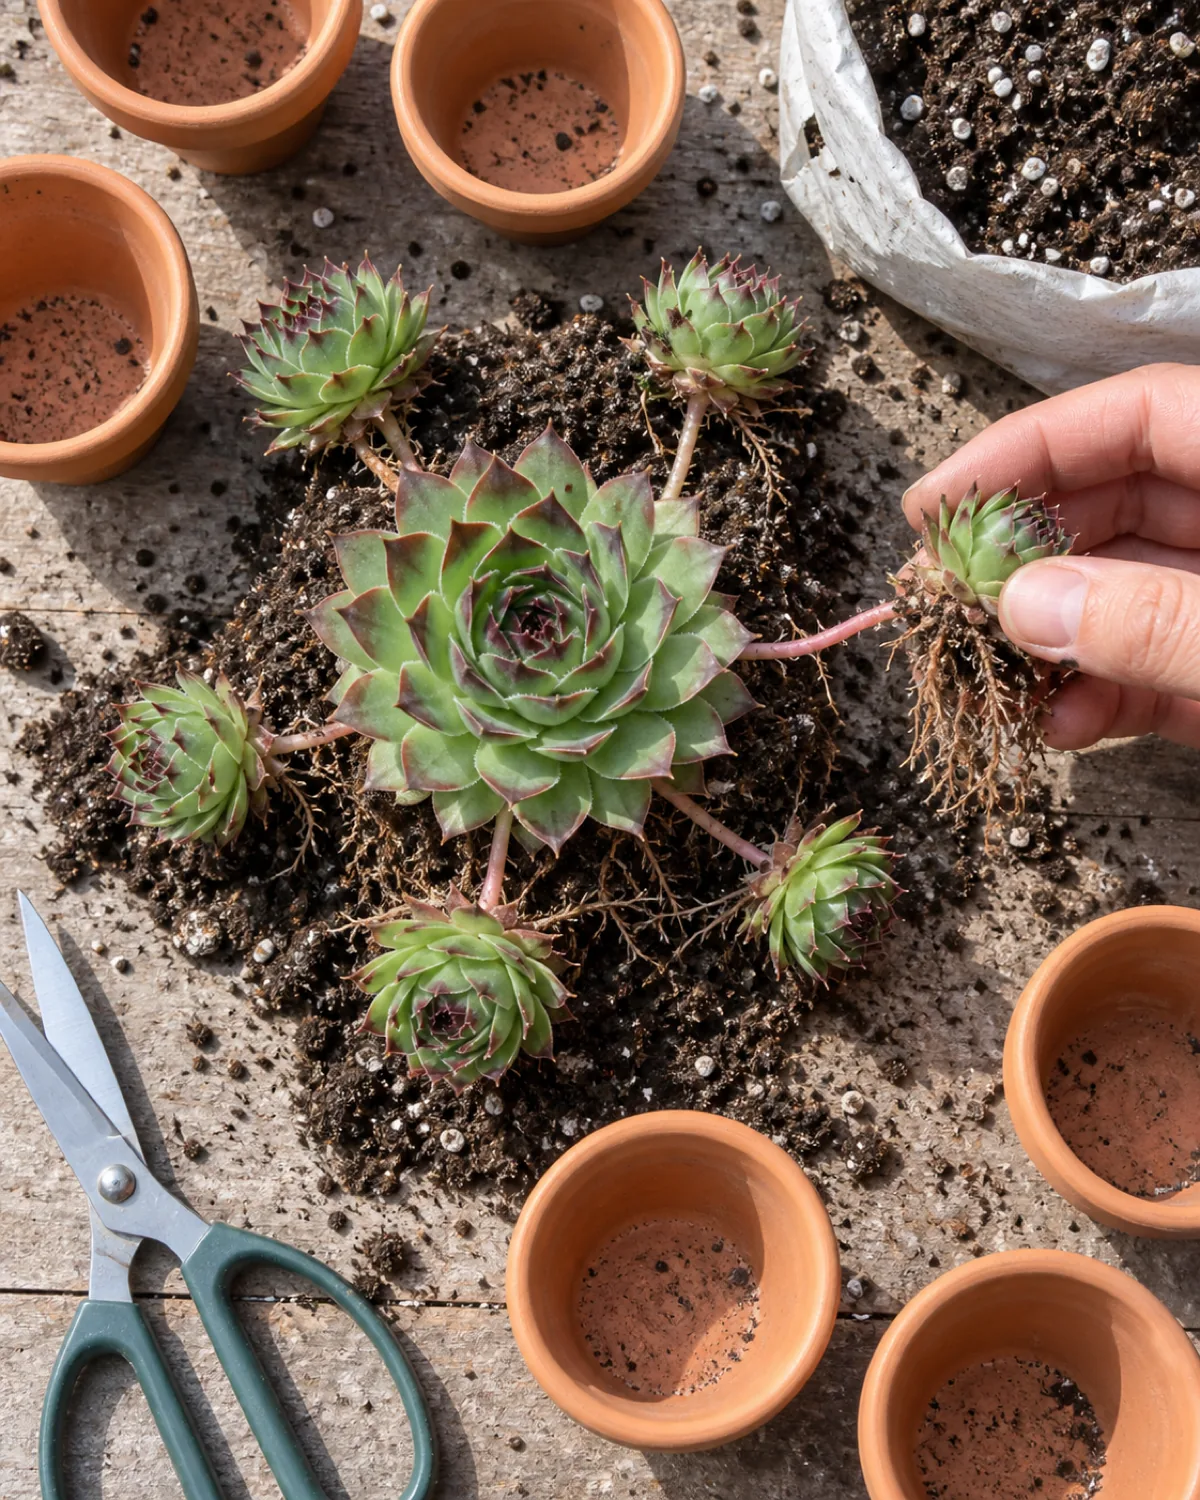
Some succulent species do the propagation work for you. Echeveria, sempervivum (hen and chicks), aloe, haworthia, and agave produce offsets — small clonal plants that grow from the base of the mother connected by a short runner or directly from the root zone.
The question is not how to make offsets appear — they come on their own schedule. The question is when to separate them.
Wait until the pup meets two conditions:
- It has its own visible root system. Gently push aside the soil at the base of the pup. If you see white or pale roots, it is ready. If only the runner connects it to the mother, wait another month
- It is at least one-third the size of the mother. Smaller pups can survive separation but establish much more slowly
The separation itself:
- Unpot the mother plant and shake off loose soil so you can see the connection point
- If the pup has its own roots, twist it gently away from the mother. If a runner is tough, cut with clean scissors rather than tearing
- Let the separated pup callous for one to two days — even with existing roots, the wound needs a brief seal
- Pot in dry gritty mix in a two to three inch container. Water lightly after one week
Offset propagation has the highest success rate of any method — close to 95 percent when the pup has its own roots. The plant is already mostly self-sufficient before you intervene.
Division for Clumping Succulents
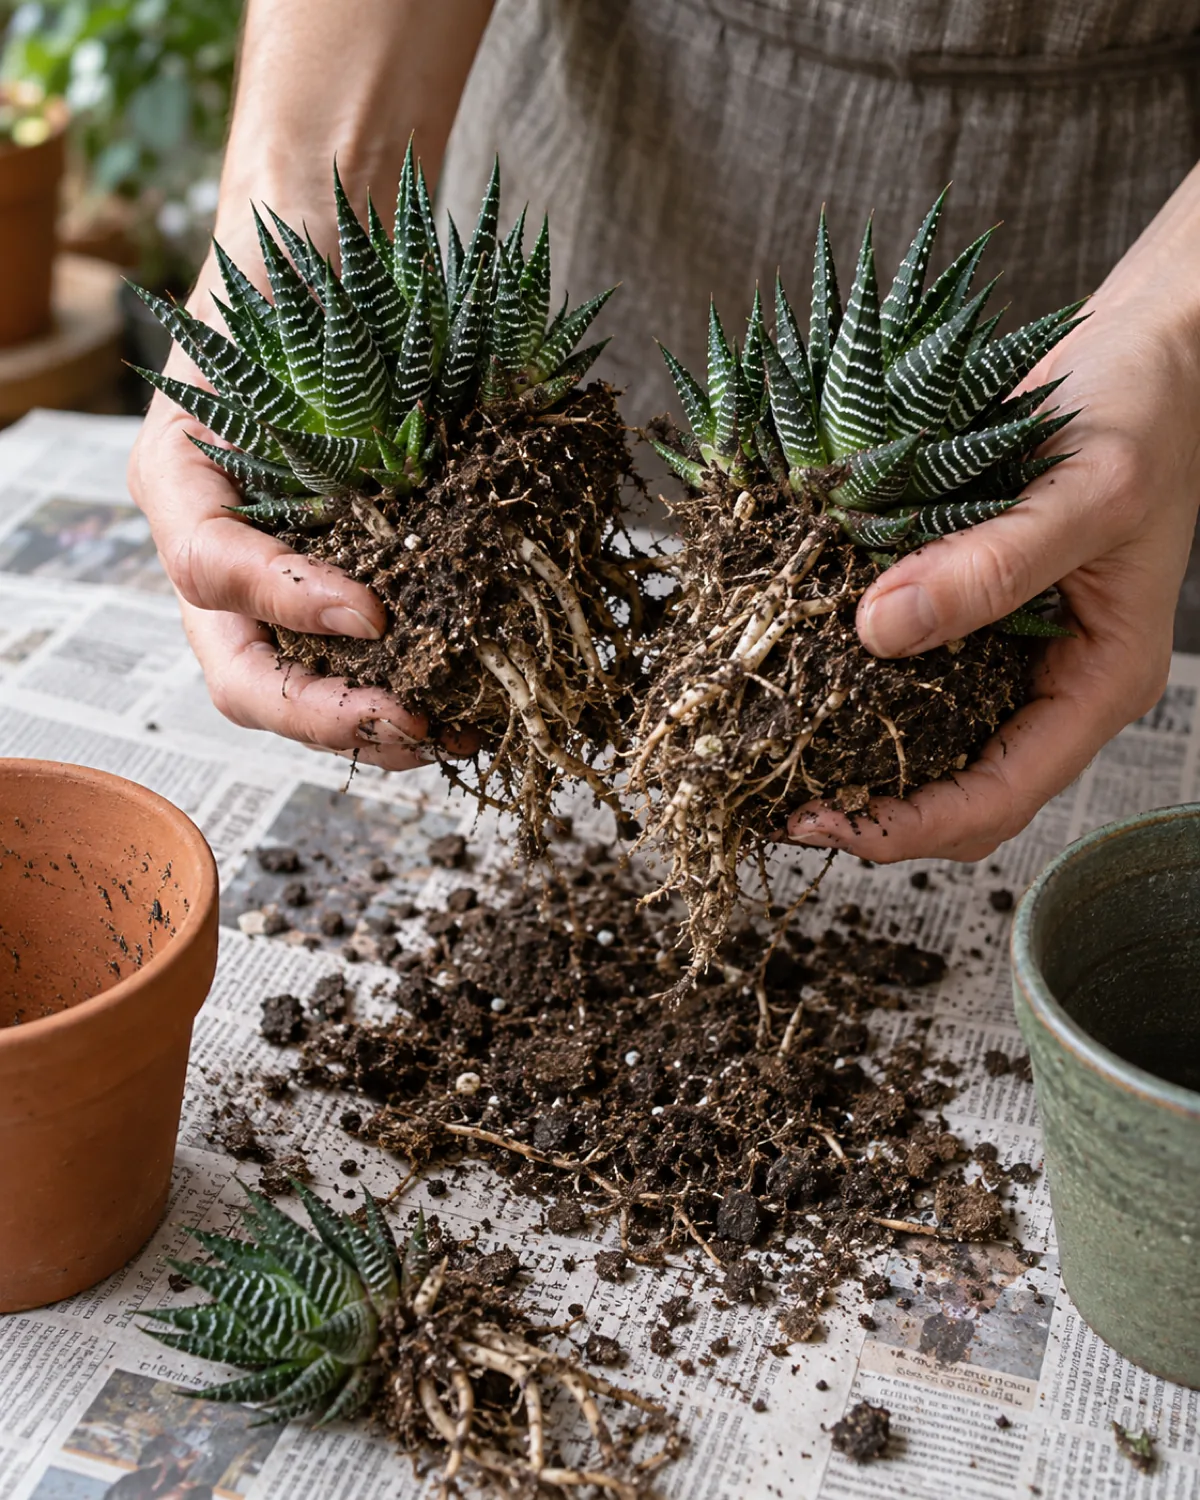
Division differs from offset separation in one important way: you are splitting a shared root system rather than detaching an already-independent pup. This works for species that grow as dense clumps where individual plants are hard to tell apart — sedum, haworthiopsis, gasteria, and some aloe species that form tight colonies.
The technique is closer to repotting than to cutting:
- Water the plant two days before dividing. Moist roots flex better than dry brittle ones
- Unpot the entire clump and set it on newspaper
- Tease the root ball apart with your fingers from the outside edges toward the center. Separate at natural divisions where rosettes have their own root section
- If roots are tangled badly, slice through the root ball with a clean knife. Each division needs its own roots and at least two rosettes or stems
After dividing:
- Let divisions sit in open air for one day so any torn roots can callous
- Pot each division in dry gritty mix
- Water lightly after one week with a soak-and-dry approach
- Keep in bright indirect light for two weeks while roots reestablish
Division works year-round but recovers fastest when done in early spring just before the growth season begins.
The Soil Mix That Makes or Breaks Root Development
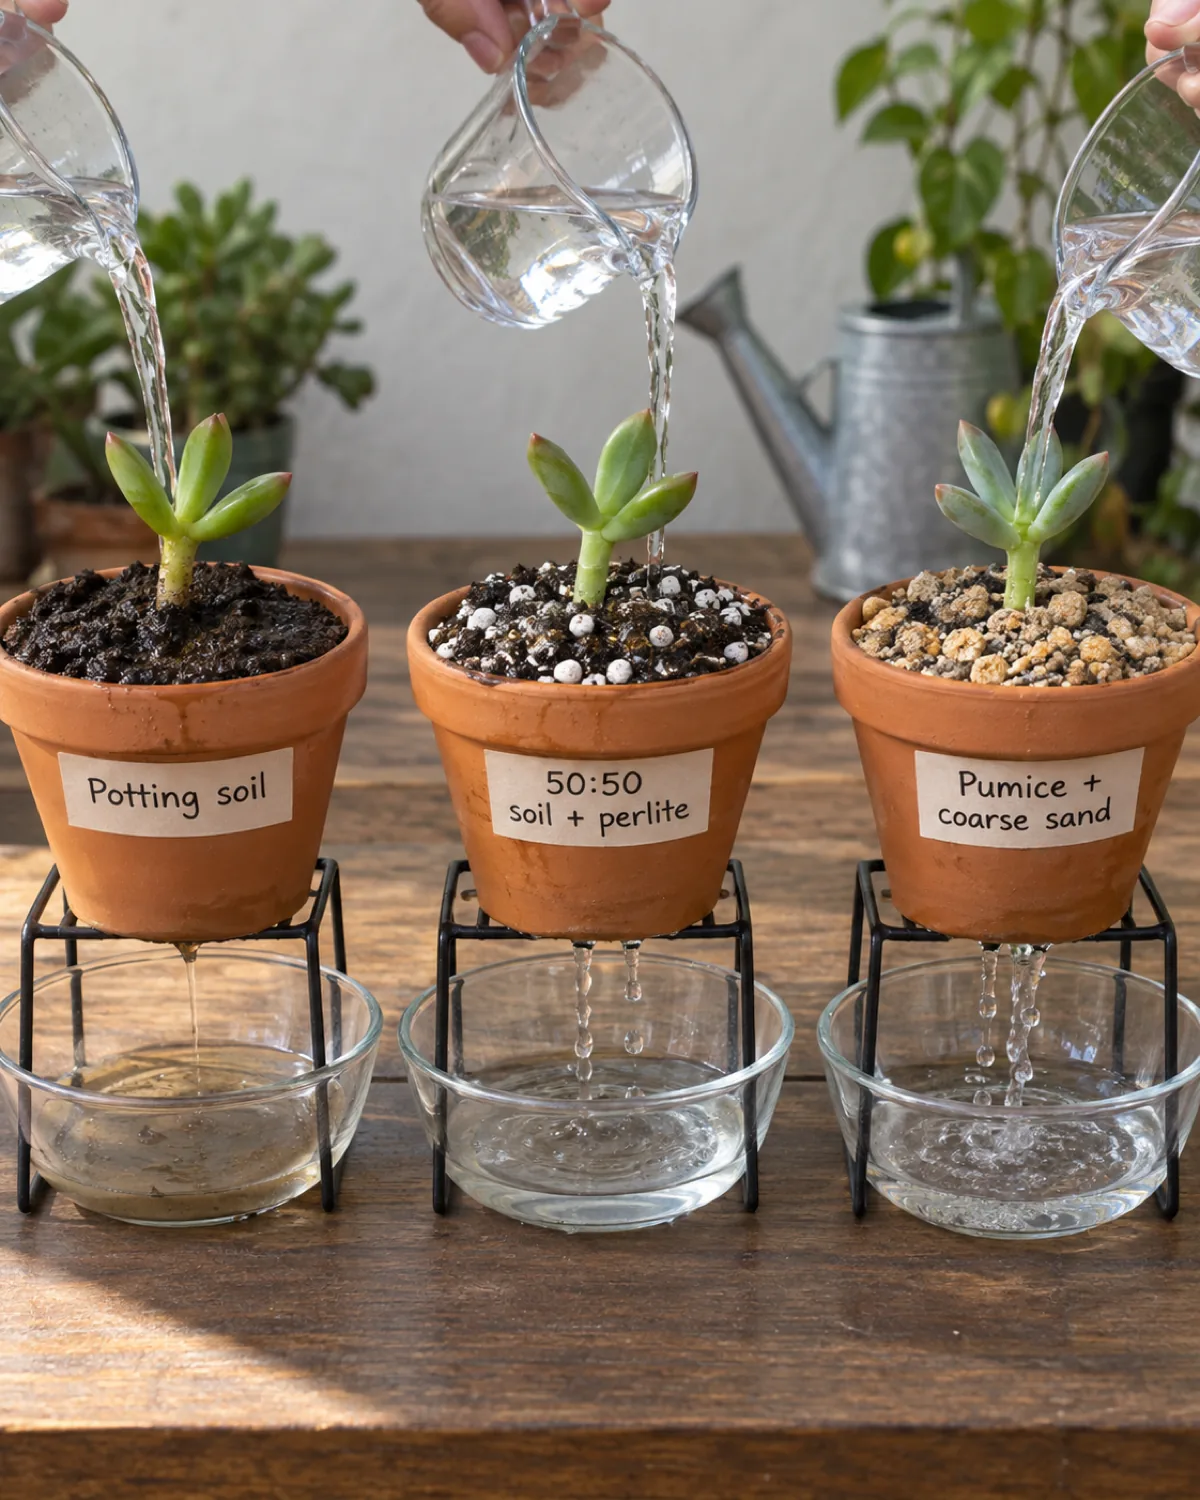
The soil you use for propagation needs to drain faster than anything you would use for an established plant. Propagations have no root system yet, which means any moisture sitting in the soil has nowhere to go except into the cut tissue — and that means rot.
The baseline propagation mix:
- 50 percent succulent or cactus soil (the bagged kind from any garden center)
- 50 percent perlite or pumice for additional drainage and aeration
That 50/50 ratio is the minimum. Some growers go even grittier — 70 percent mineral (perlite, pumice, coarse sand) to 30 percent organic — and see faster rooting because the soil dries so quickly that the plant is forced to send out roots to chase moisture.
What to avoid:
- Standard potting mix alone. Too moisture-retentive. It stays damp for days, creating exactly the conditions that cause stem rot
- Fine sand. Compacts and reduces air pockets instead of creating them. Coarse horticultural sand works; beach sand and play sand do not
- Soil with added moisture-retaining crystals. Some potting mixes include polymer beads. These work against propagation by keeping the zone around the cut perpetually damp
Container size matters as much as mix. A two to three inch pot dries out within a day or two. A six inch pot filled with the same mix stays damp for four to five days in the center — long enough to rot a fresh cutting. Use the smallest pot that holds the propagation upright.
Light and Water Rules During the Rooting Phase
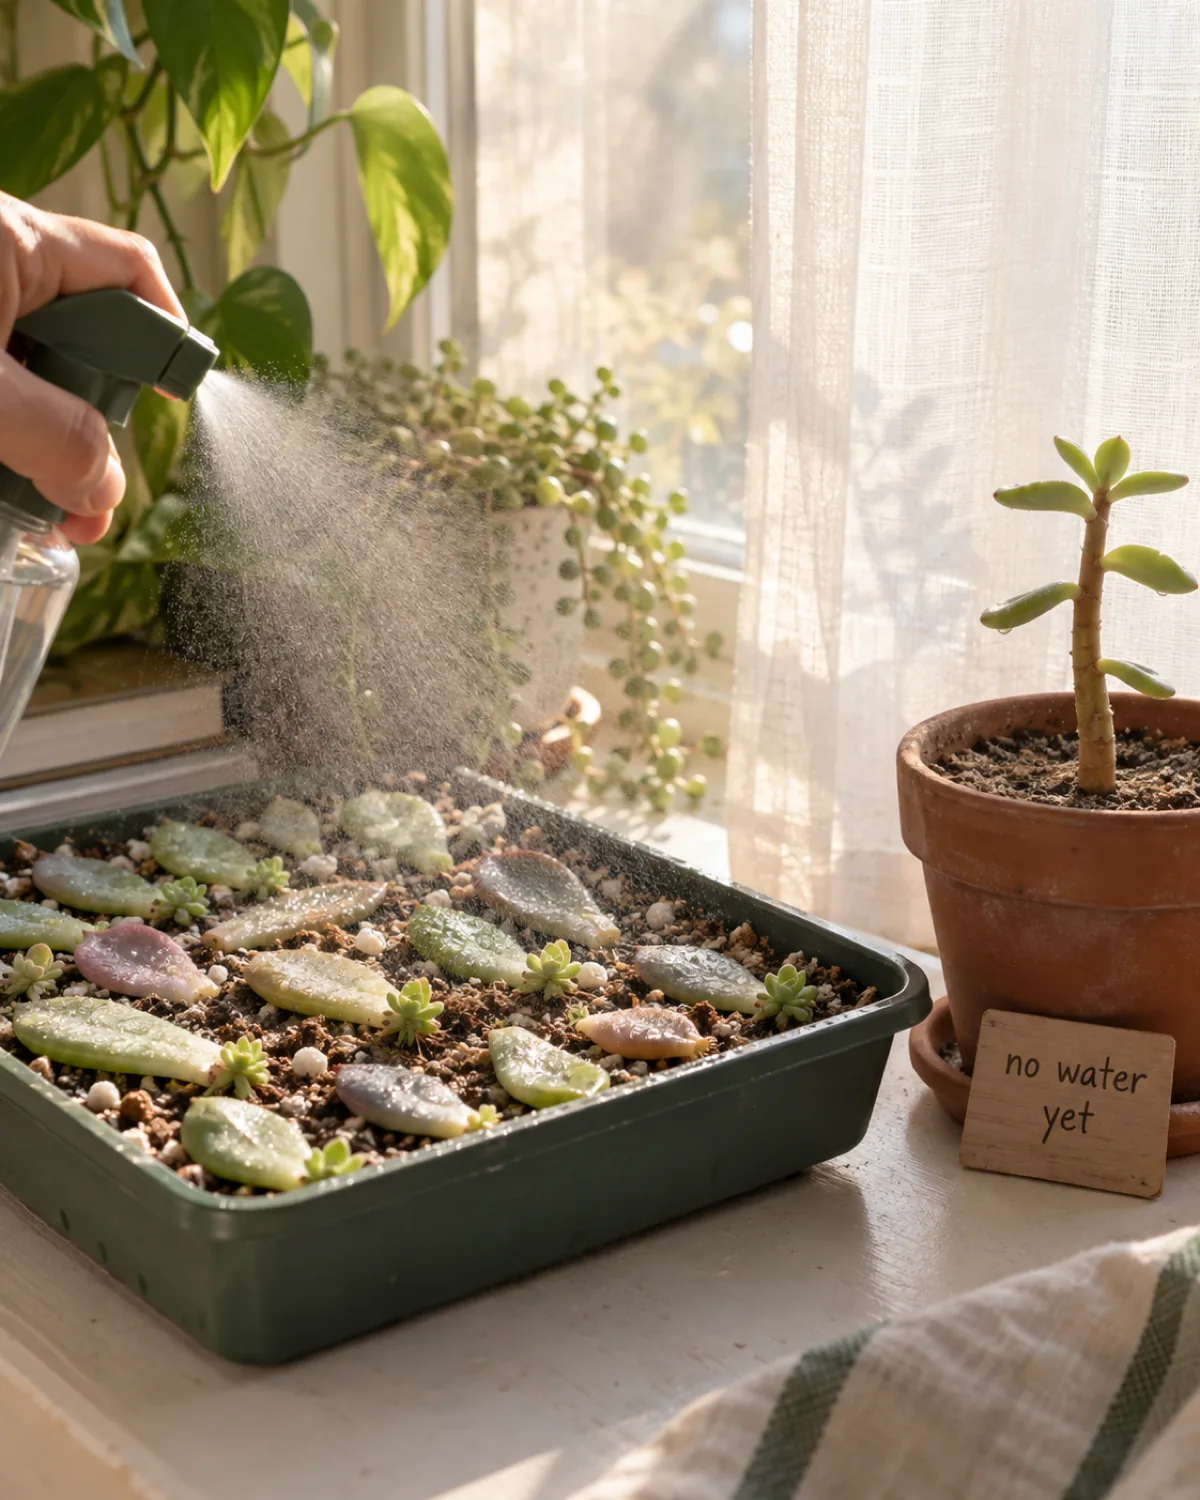
Light and water rules during propagation are the opposite of what established succulents need. Established plants want direct sun and deep infrequent watering. Propagations want bright indirect light and either surface misting or no water at all, depending on the method.
Light rules:
- Bright indirect light for all propagation methods until roots establish. An east-facing window or a spot two feet back from a south-facing window works
- No direct afternoon sun. Rootless cuttings cannot replace water lost to transpiration fast enough, and the leaves will shrivel or sunburn
- Grow lights on a timer set to 12 hours work well for propagation trays kept away from windows
Water rules by method:
- Leaf propagation: mist soil surface every 2-3 days from day one. Switch to soak-and-dry when the rosette is dime-sized
- Stem cutting: no water for 2 weeks after planting. Soak-and-dry once roots confirmed
- Beheaded rosette: same as stem cutting — no water for 2 weeks, then soak-and-dry
- Offset with roots: light water after 1 week, then normal succulent schedule
- Division: light water after 1 week, then normal succulent schedule
One thing that confuses new propagators: the mother leaf shriveling during leaf propagation is normal and good. The baby rosette feeds off the mother leaf's stored water and nutrients. As the rosette grows, the mother leaf wrinkles, thins, and eventually dries up completely. Do not remove the mother leaf early — it is a food source, not a dead weight.
Timeline Expectations: What Normal Progress Looks Like
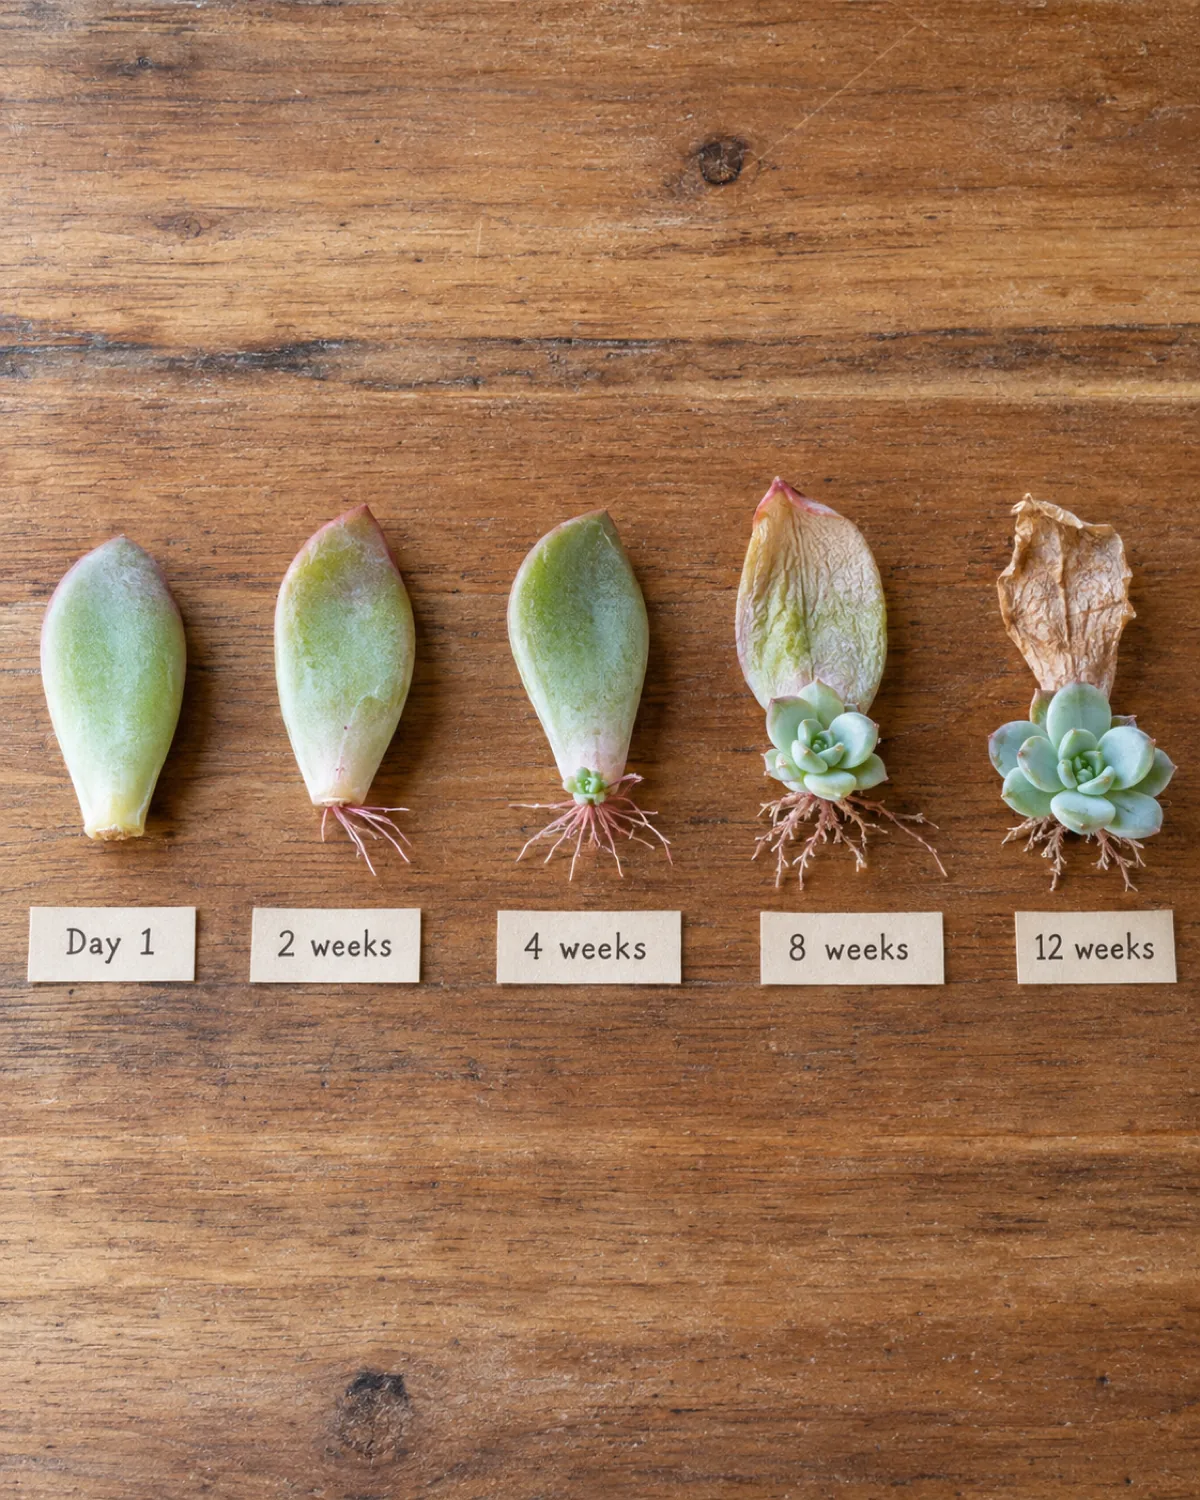
Succulent propagation tests patience more than skill. The timeline below represents typical indoor propagation during the active growth season (spring through summer). Winter propagation runs 50 to 100 percent slower.
Leaf propagation timeline:
- Days 1-5: Callous forms, no visible change
- Weeks 2-4: First roots emerge from the leaf base — thin pink or white threads
- Weeks 4-8: Tiny rosette nub appears alongside roots. The mother leaf begins showing wrinkles
- Months 2-4: Rosette grows to dime-size. Mother leaf is visibly shriveling as it feeds the baby
- Months 3-6: Rosette reaches nickel to quarter-size. Mother leaf is papery or completely dried up. The baby plant is ready for its own small pot
Stem cutting timeline:
- Days 1-7: Callousing period
- Weeks 2-3: Roots initiate below the soil line (not visible)
- Week 3-4: Tug test confirms root anchorage
- Month 2: New leaf growth resumes from the center of the rosette
Offset separation timeline:
- Week 1: Recovery from separation, no watering
- Weeks 2-3: New root growth begins if separated during active season
- Month 1-2: New leaf growth confirms successful establishment
The most important benchmark: visible roots on leaf propagations typically appear between week two and week four. If you see nothing at week four, check the callous — if it is dry and firm, the leaf is still viable. Many leaves sprout roots at week five or six after what looks like total inactivity.
If the leaf is mushy or translucent at any point, it has rotted. Remove it before it spreads mold to neighboring leaves on the tray.
Common Propagation Failures and How to Fix Them
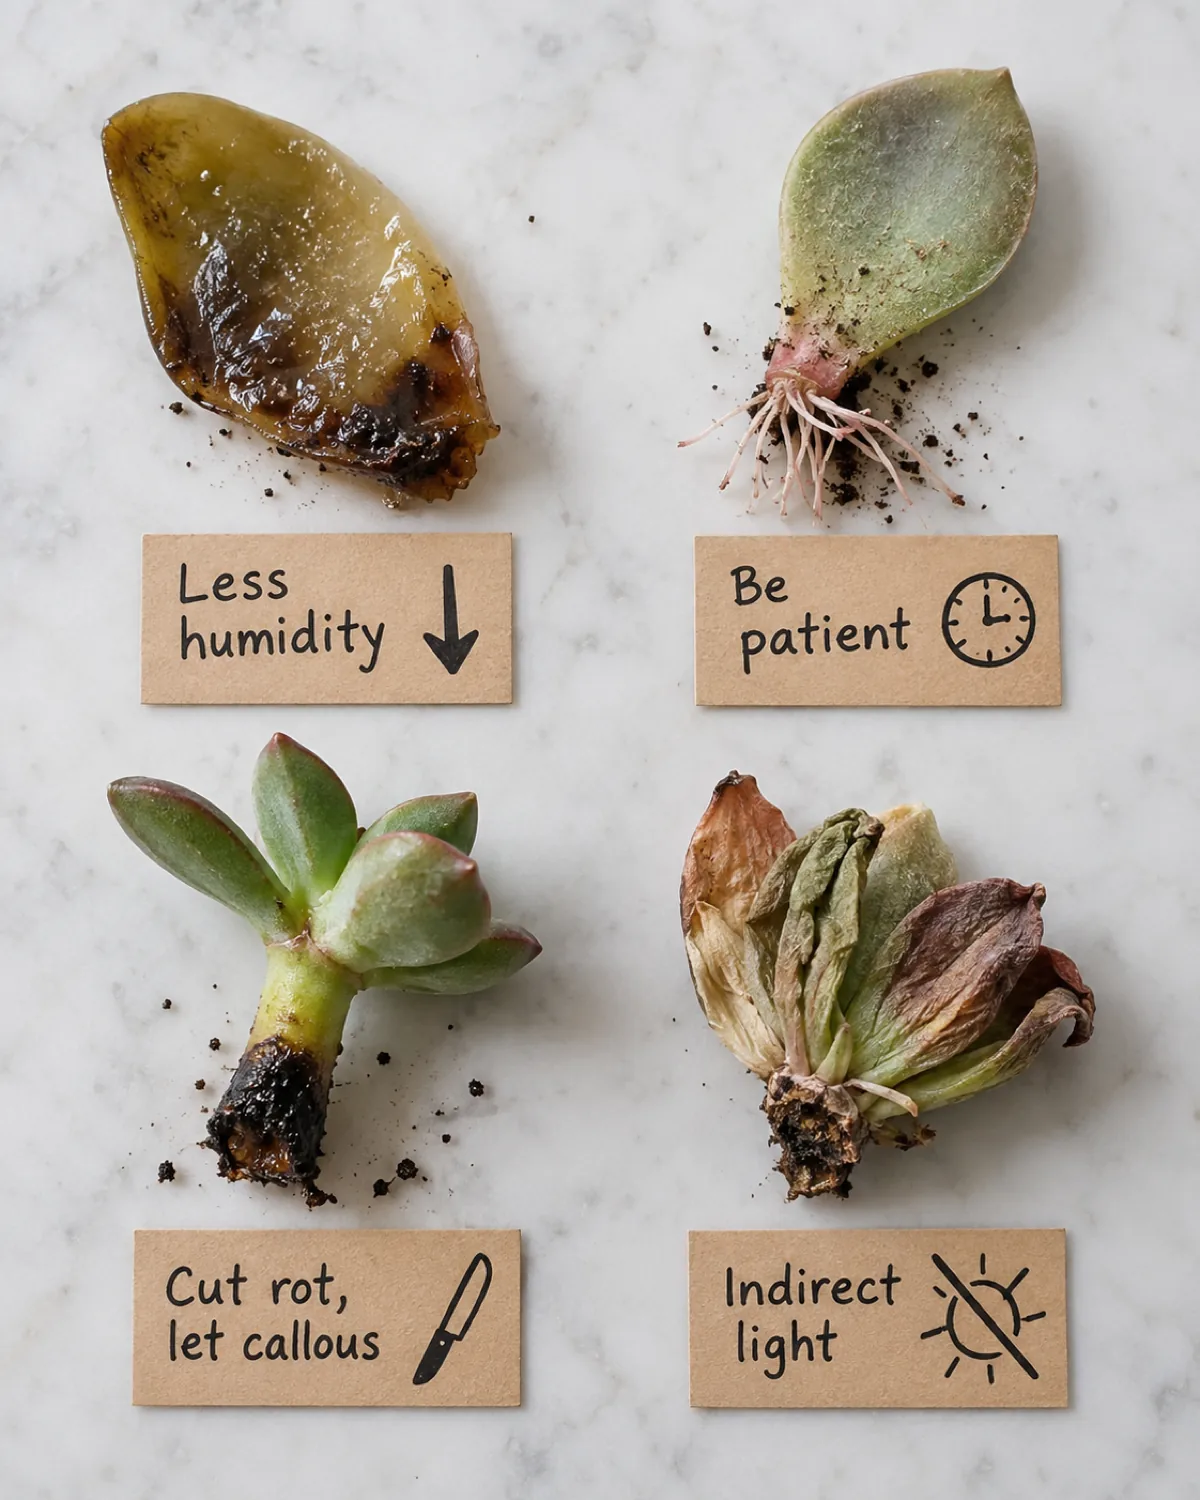
Even with good technique, some propagations fail. The fix for every failure below is the same in one respect: diagnose what went wrong and start a new batch rather than trying to save the failing one.
Mushy translucent callous — too much humidity. The callousing environment was too damp. Fix: callous in a room with good air circulation and humidity below 50 percent. A kitchen counter near a window works better than a bathroom shelf.
Roots but no rosette after eight weeks. This happens more often with thicker-leaved species like pachyveria. The leaf has enough stored energy to produce roots but stalls before generating a rosette.
- Fix: give it more time. Some species take 12 weeks to show a rosette after roots appear
- If the mother leaf is still plump, the process is ongoing
- Move to slightly brighter light to encourage shoot initiation
Black base on a stem cutting — rot from early watering. Water reached the cut before a callous fully sealed. The tissue turned black and mushy from the bottom up.
- Fix: cut above the rot line if healthy tissue remains, re-callous for a full week, and start over in a drier mix
- Prevention: always callous stem cuttings longer than you think necessary — five to seven days minimum
Offset wilting after separation. The newly potted pup got too much direct sun before its damaged roots could recover. Transpiration exceeded water uptake.
- Fix: move to bright shade for two weeks, mist the soil lightly, and let roots recover
- Prevention: treat separated offsets like fresh cuttings for the first two weeks — indirect light only
Complete batch failure in winter. Low light, cool temperatures, and longer drying times in heated indoor air all conspire against winter propagation. If an entire tray of leaves shrivels without rooting, the season is the most likely cause.
- Fix: wait until March and try again
- If you must propagate in winter, a grow light on a 12-hour timer and a heat mat set to 70°F improve the odds significantly
Bookmark This
Every succulent propagation method at a glance
- 1Why Succulents Are EasiestMeristematic cells in every leaf and stem mean no nodes, no rooting hormone, and no water propagation needed.
- 2Best TimingSpring through early summer doubles your success rate thanks to higher auxin levels and warm dry air.
- 3Leaf Propagation StepsClean twist, callous 2-5 days, lay flat on dry gritty soil, mist every 2-3 days, wait 2-8 weeks for roots.
- 4Why Leaves FailIncomplete pull, early watering, burying the leaf, or giving up before week four. Plump and firm means still alive.
- 5Stem CuttingsCut below rosette, strip lower leaves, callous 3-7 days, plant in dry mix, first water at two weeks.
- 6BeheadingSevere etiolation fix. The rooted rosette grows compact and the stump sprouts multiple new heads.
- 7Offset SeparationWait for own roots and one-third mother size. Twist free, callous one day, pot small, water after one week.
- 8DivisionFor dense clumps. Tease root ball apart at natural separations, callous one day, water lightly after one week.
- 9The Right Soil50/50 succulent soil and perlite minimum. Smaller pots dry faster. Standard potting mix is too wet for propagations.
- 10Light and Water RulesBright indirect only. Mist leaf props, withhold water from cuttings. Mother leaf shriveling is normal nutrient transfer.
- 11TimelineLeaf roots at week 2-4, rosette at month 2-4, plantable at month 3-6. Stem cutting roots by week 3. Offsets fastest.
- 12Common FailuresMushy callous, rootless stall, black base rot, post-separation wilt, and winter batch failure — all fixable or preventable.
kultivy.com

Mara writes about indoor plants for people who want clear answers without the jargon. She has propagated more succulents than she can count, killed a few along the way, and keeps a rotating tray of leaf propagations on her kitchen windowsill at all times. More at Kultivy.