An orchid is the houseplant most people receive as a gift — and assume they've killed when the last flower drops. The leaves stay green. Nothing happens for a year. The orchid isn't dead.
It's an epiphyte: a plant that clings to tree branches, absorbing moisture through thick aerial roots, never touching soil. That single fact explains why orchid care runs opposite to every other houseplant on this site.
This guide covers light, root-based watering, reblooming triggers, bark medium, repotting, aerial roots, fertilizing, and common problems.
Orchids are easier than their reputation suggests — once you stop treating them like a regular potted plant. The thirteen sections below cover epiphyte basics, root-based watering, reblooming, and everything else that keeps a Phalaenopsis thriving for years.
What makes orchids different from every other houseplant
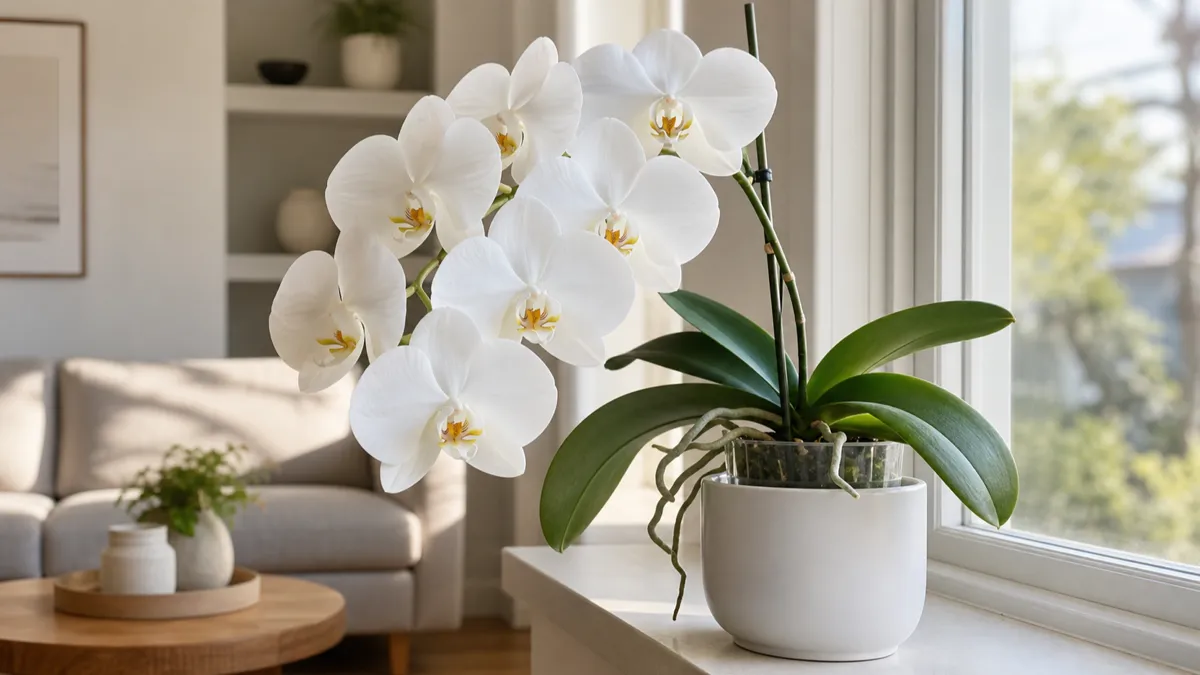
Orchids are epiphytes. In the wild, a Phalaenopsis doesn't grow in the ground — it clings to tree branches in tropical forests, wrapping thick roots around bark, absorbing rain and humidity from the air. Those roots are coated in velamen, a spongy silver-white tissue that soaks up moisture on contact and turns bright green when saturated.
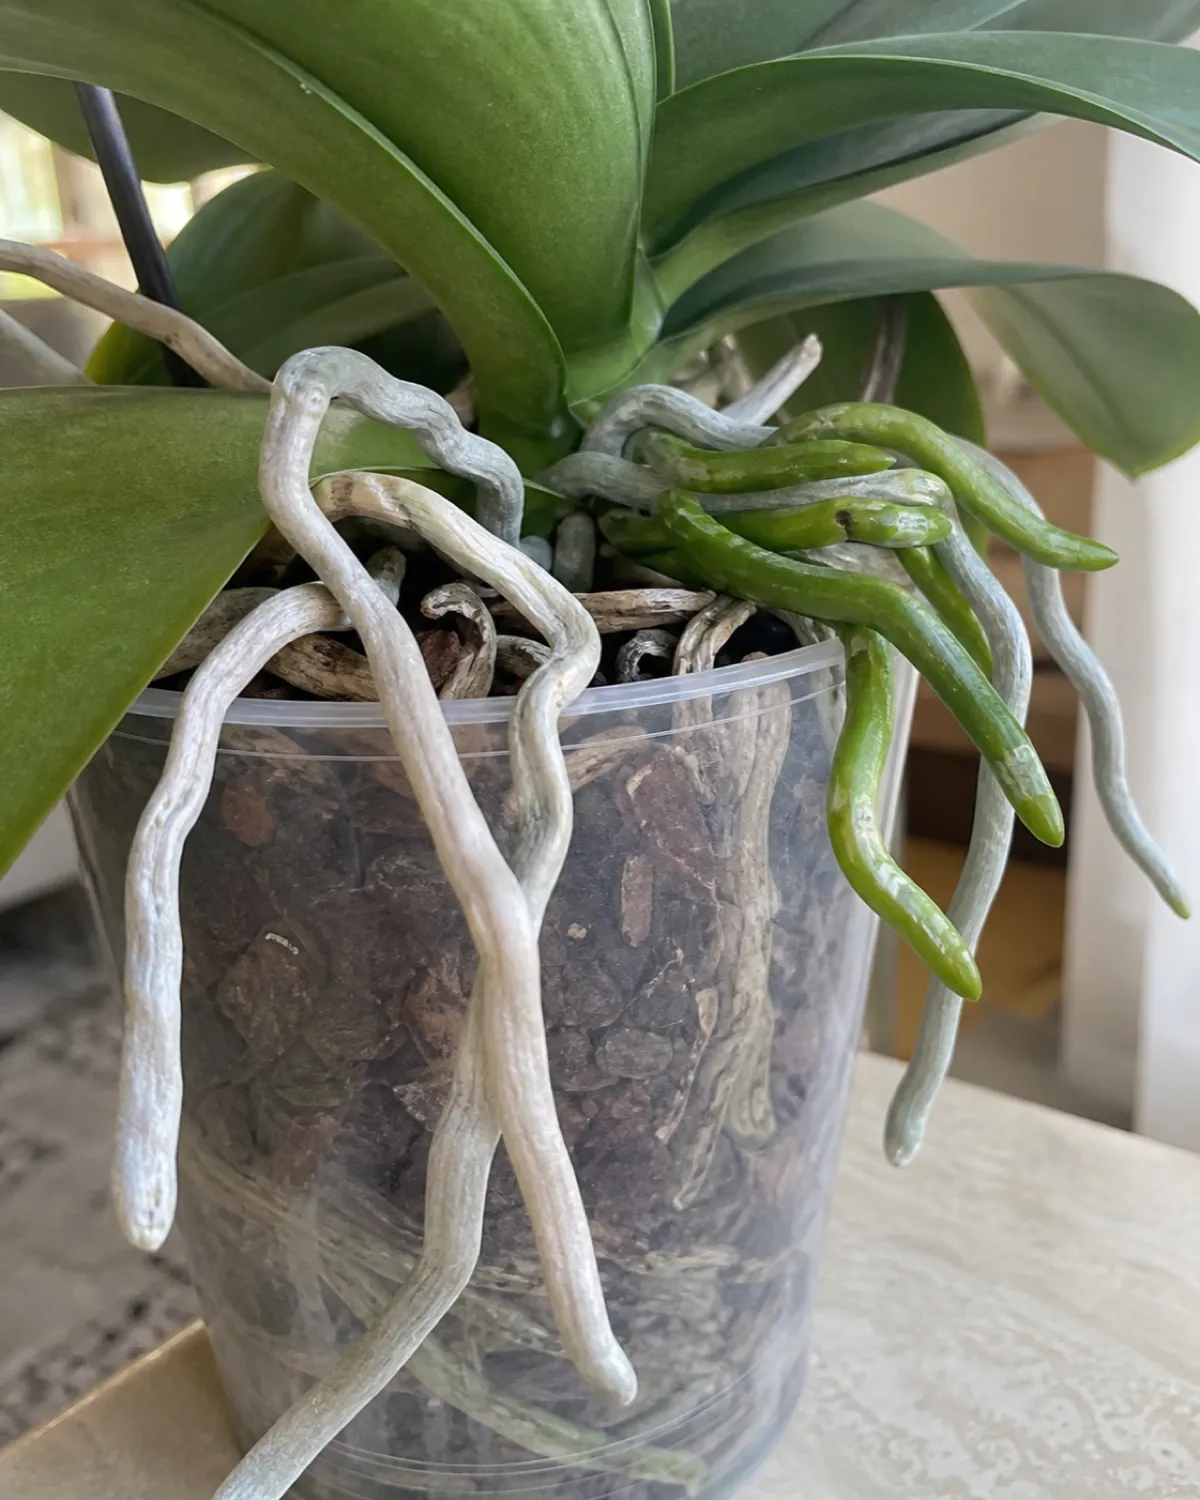
This means everything about orchid care runs opposite to most houseplants: no soil, ever. Watering by root color instead of soil moisture. A clear pot so you can actually see what the roots are doing. And a potting medium made of bark chunks that mimics the airflow around a tree branch.
Phalaenopsis — the moth orchid, the one with broad arching flower sprays that grocery stores and garden centers sell by the millions — is the genus to start with. It tolerates average home conditions, blooms for months, and genuinely rewards basic care once you stop treating it like a potted fern.
- Epiphytes that cling to tree branches — roots absorb moisture from air, never sit in soil.
- Velamen-coated roots turn green when wet, silver when dry — a built-in moisture meter.
- Phalaenopsis (moth orchid) is the beginner genus — grocery-store available, months-long bloom.
Light: bright but never direct
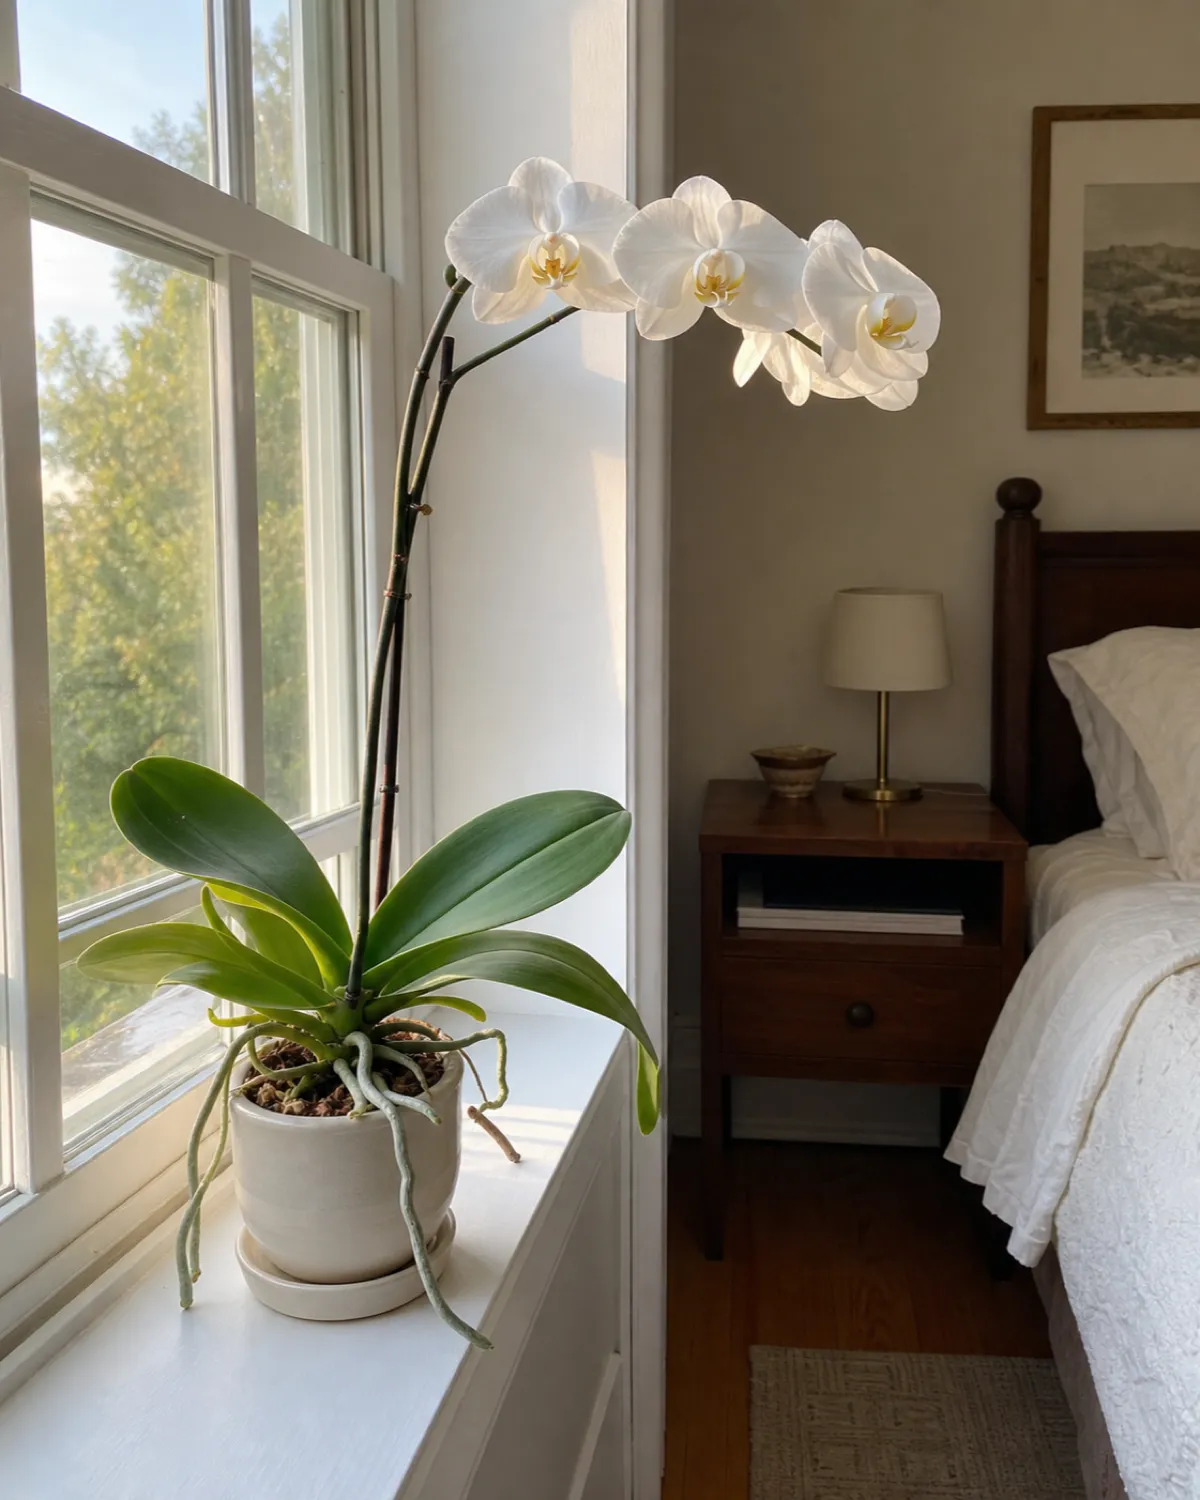
Orchids want bright, indirect light. An east-facing window is ideal — gentle morning sun without the scorching afternoon intensity. A north-facing window works if it's unobstructed and receives consistent ambient brightness. South and west windows work too, as long as a sheer curtain diffuses the direct rays.
Direct afternoon sun burns orchid leaves. Watch for yellow patches or bleached, papery spots — that's sunburn, and the damaged tissue won't recover. The leaf stays scarred but the plant pushes new growth from the center.
Here's the counterintuitive part: a Phalaenopsis with deep, dark forest-green leaves is actually getting too little light. Healthy leaves are a medium olive green with a slight yellow-gold cast. Dark, lush leaves mean the plant is producing extra chlorophyll to compensate — surviving, but it won't bloom.
For more on reading light signals across species, that guide covers the window-direction cheat sheet and the shadow test.
- Bright indirect light — east-facing window is ideal for Phalaenopsis.
- Direct afternoon sun causes yellow patches and bleached spots on leaves.
- Medium olive-green leaves signal healthy light — dark green means not enough.
How to water an orchid (the roots tell you everything)
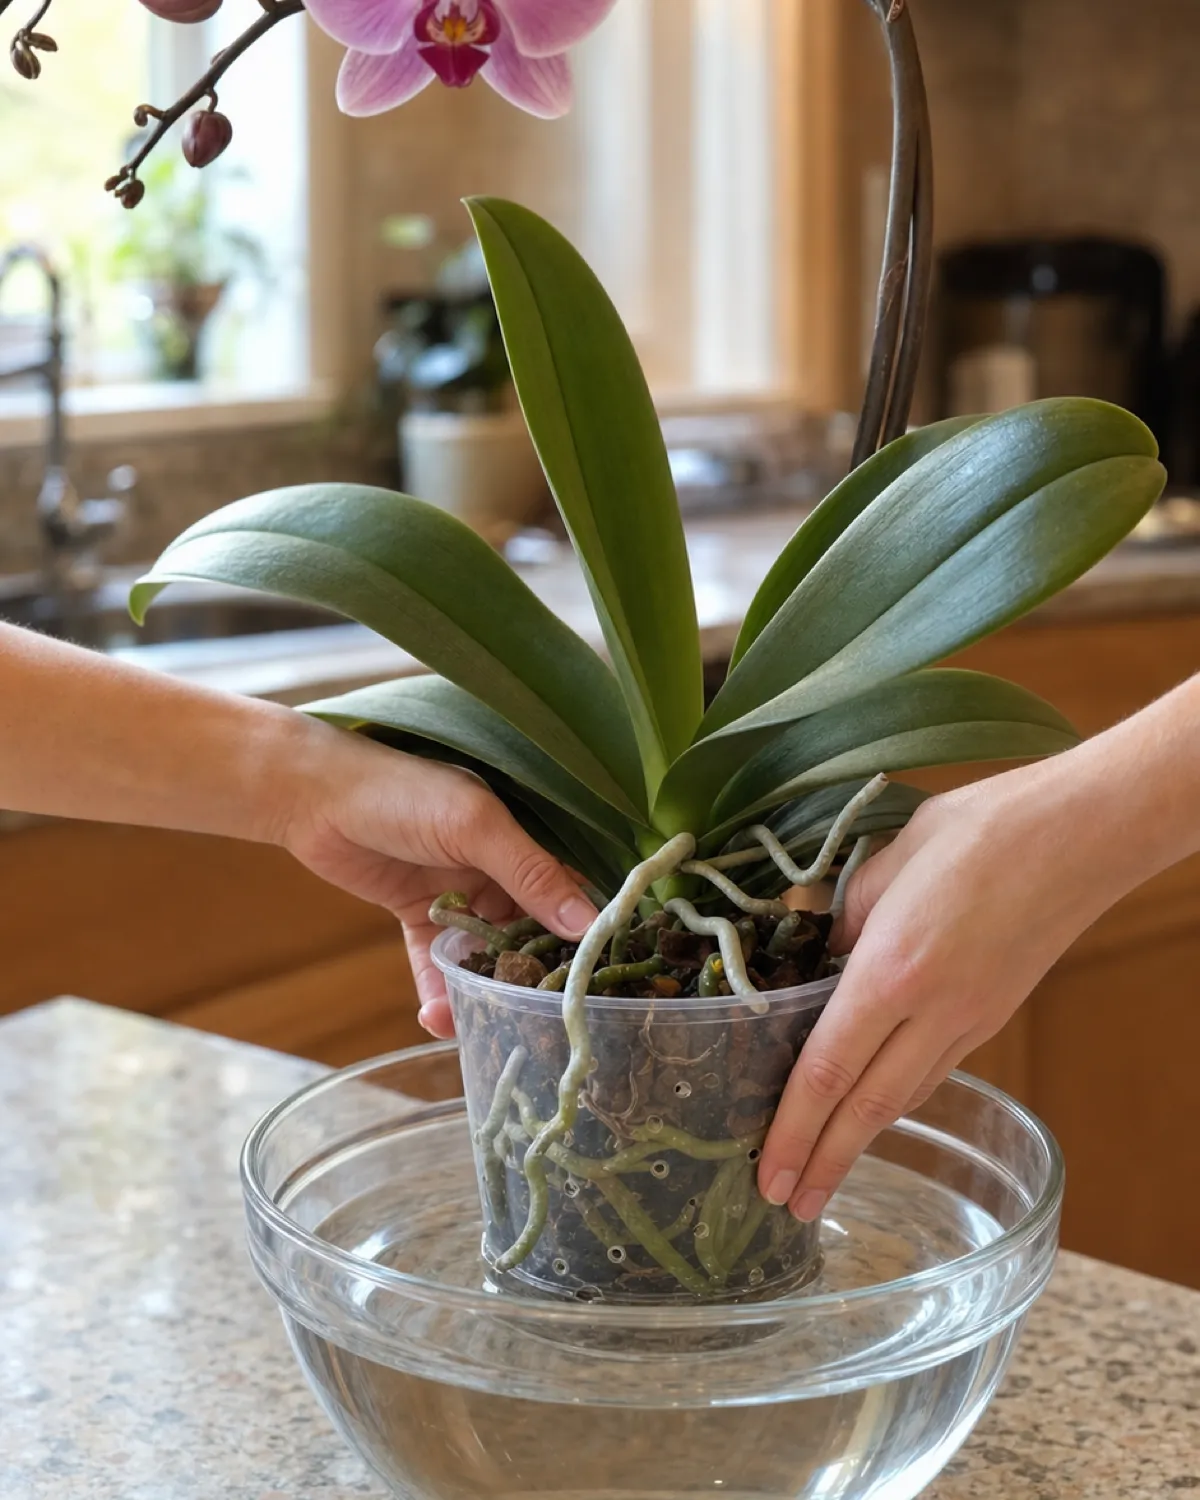
Forget watering schedules. The roots are the only reliable guide: look through the clear pot and read their color. Silver or white roots mean the plant is thirsty. Green roots mean it has enough moisture. Water when most roots have gone silver — usually every 7 to 10 days in summer, every 10 to 14 in winter, but the interval varies wildly by humidity, bark freshness, and pot size.
The best method is soaking. Set the entire pot in a bowl of room-temperature water for 10 to 15 minutes. The bark absorbs moisture, the roots turn green, and you lift the pot out to drain completely. Never leave an orchid sitting in standing water — the roots need air between soakings.
Alternatively, run lukewarm water through the bark at the sink for 30 seconds, letting it drain freely from the bottom. Either method works.
The ice-cube method (two or three cubes set on the bark weekly) works as a slow-release approach for beginners who tend to overwater, but it's not ideal long-term. Orchids are tropical plants that prefer room-temperature water, and ice against roots can cause localized cold damage over time.
One rule is absolute: never let water pool in the crown, the central point where the leaves meet. Standing water in the crown causes bacterial rot that can kill the plant in days.
- Silver roots = thirsty, green roots = hydrated — the clear pot is your moisture meter.
- Soak in room-temperature water for 10-15 minutes then drain completely.
- Never let water pool in the crown — crown rot kills orchids fast.
Phalaenopsis orchids are genuinely easy — but only if you're willing to learn a few rules that contradict everything you know about houseplant care.
Why your orchid's flowers fell off (and what to do with the spike)
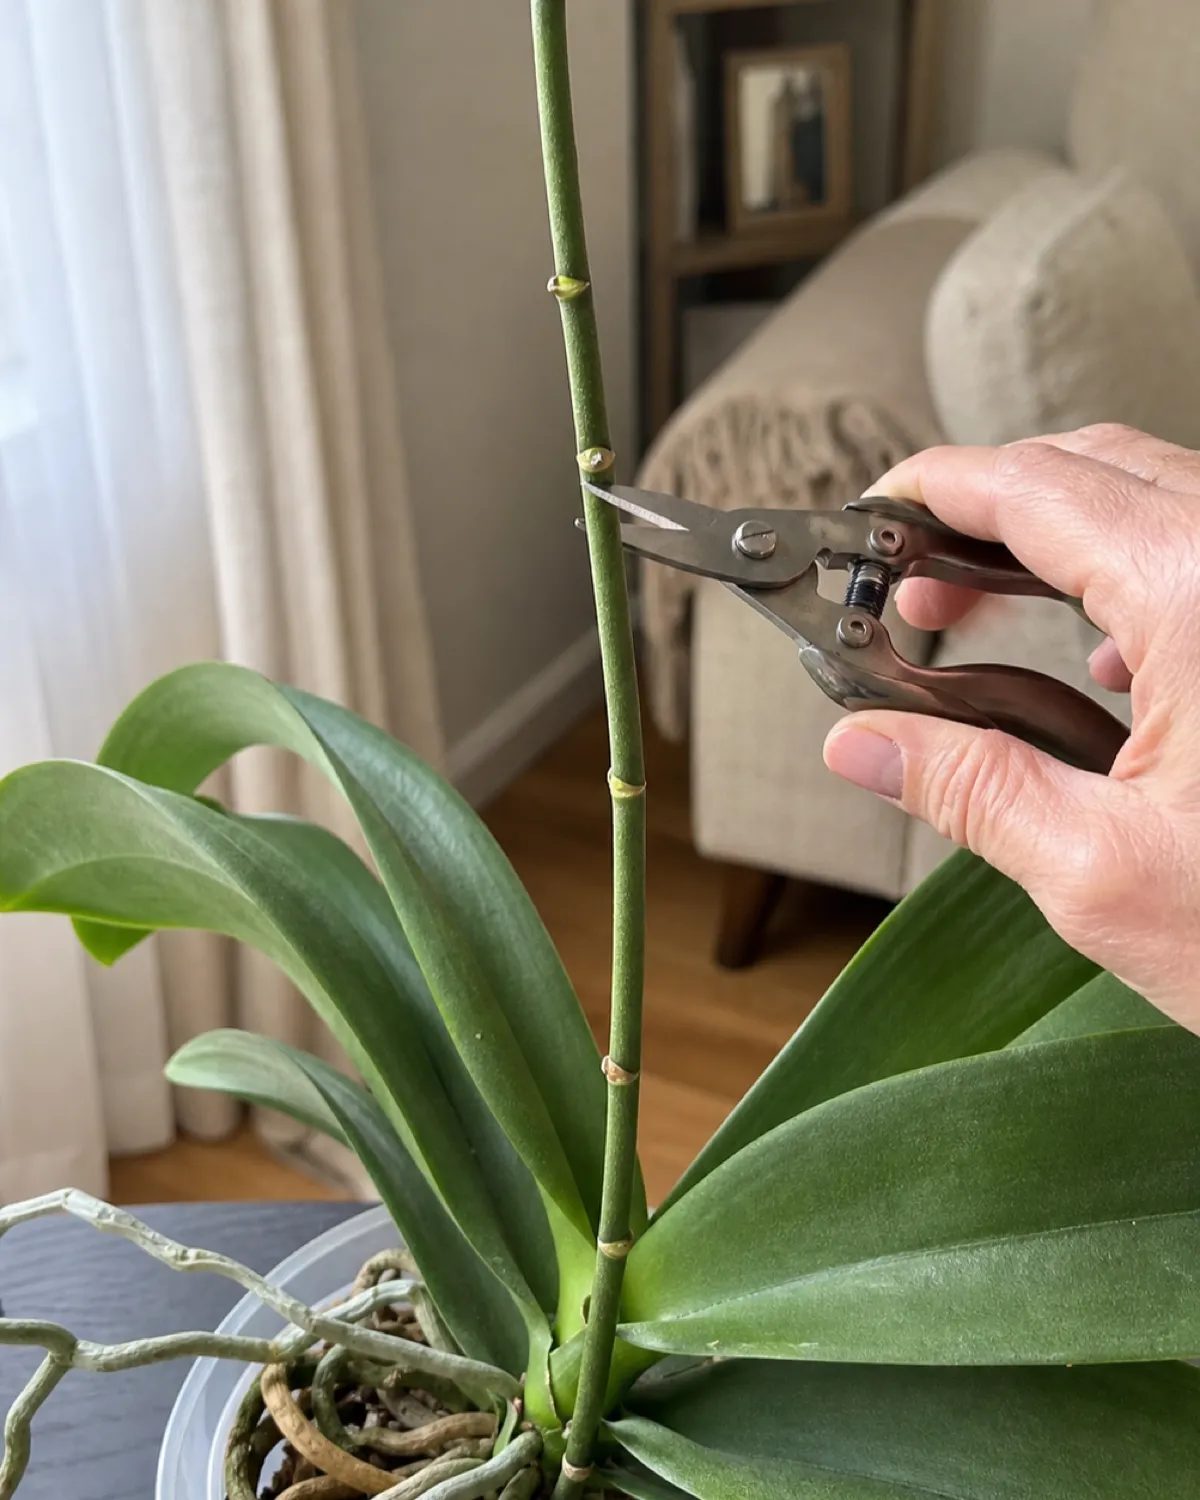
Flowers dropping after two to three months is not a sign of failure — it's the natural end of a bloom cycle. Every Phalaenopsis goes through this. The flower spike (inflorescence) stays behind, and what you do with it determines what happens next.
Option one: cut to a node. Find a visible node — a small bump or horizontal line on the green spike, usually about halfway down — and cut just above it with sterilized scissors. The spike may branch from that node and produce a secondary bloom within 8 to 12 weeks. This works best on young, vigorous plants with firm, green spikes.
Option two: cut to the base. If the spike has turned brown or yellow, or if the plant looks tired (limp or wrinkled leaves), cut the spike all the way down to the base. The plant redirects energy into root and leaf growth, building strength for a fuller bloom next cycle. This takes longer — usually 6 to 12 months — but produces stronger flower spikes.
For a first rebloom attempt, cutting to a node is worth trying. If it doesn't branch within 8 weeks and the spike starts drying, cut it to the base and wait.
- Flowers dropping after 2-3 months is normal — the bloom cycle has ended.
- Cut to a node for a faster secondary bloom — 8-12 weeks if the spike stays green.
- Cut to the base for a stronger next bloom — 6-12 months, but fuller flower spray.
How to trigger reblooming
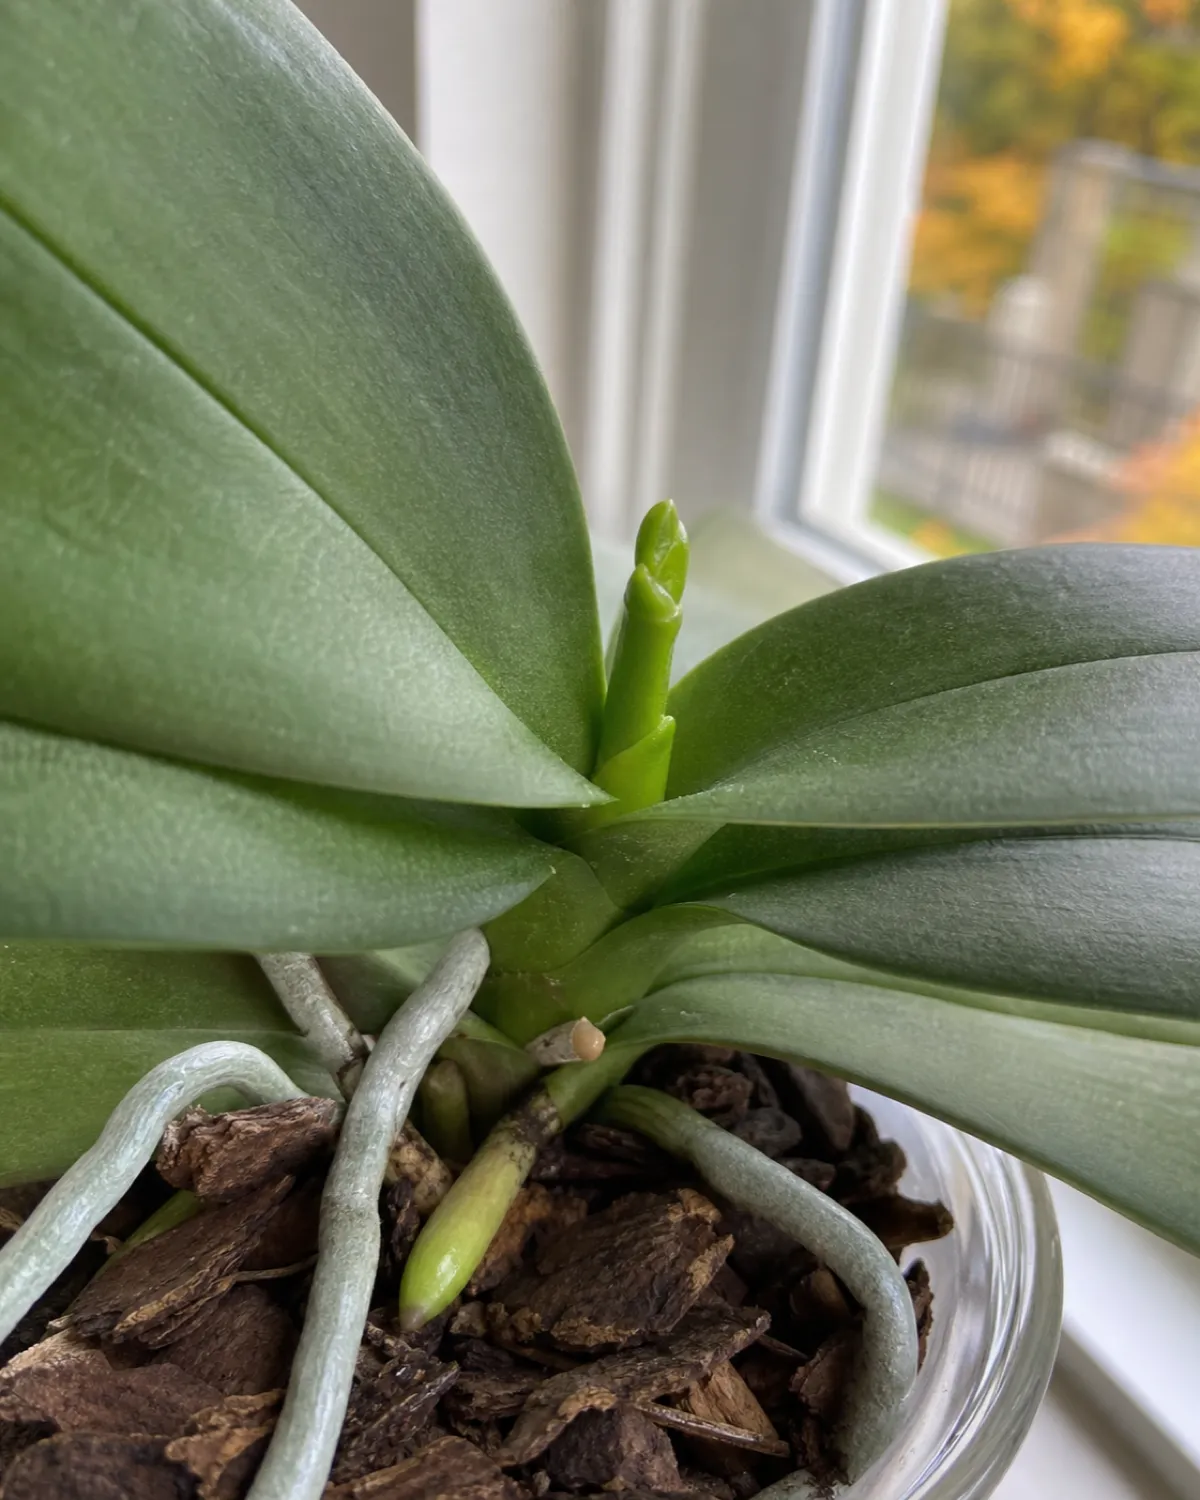
This is the piece most orchid guides bury under generic advice. Phalaenopsis needs a temperature drop to trigger a new flower spike. Specifically: a difference of about 15°F (8-10°C) between daytime and nighttime temperatures, sustained for four to six weeks.
In practice, that means putting the orchid near a window in early fall, when outdoor temperatures cool at night. Daytime around 75-80°F (24-27°C), nights dropping to 60-65°F (16-18°C). You don't need a greenhouse or a special room — an unheated bedroom window or a spot near a sliding glass door does the job.
Once you see a new spike emerging — a smooth, pointed green nub pushing upward from between the lowest leaves, shinier and more angular than a root tip — the temperature drop has worked. Move the orchid back to its normal bright spot and resume regular care. The spike takes 2-3 months to grow, branch, and open its first buds.
Without this temperature trigger, a healthy Phalaenopsis can produce green leaves and roots indefinitely without ever blooming again. The plant isn't sick — it just hasn't received the seasonal signal.
- 15°F day-night temperature difference for 4-6 weeks triggers a new flower spike.
- Early fall near a window provides the natural temperature swing most homes need.
- New spike = smooth green nub from the leaf base — shinier and pointer than a root tip.
Potting medium: bark, not soil
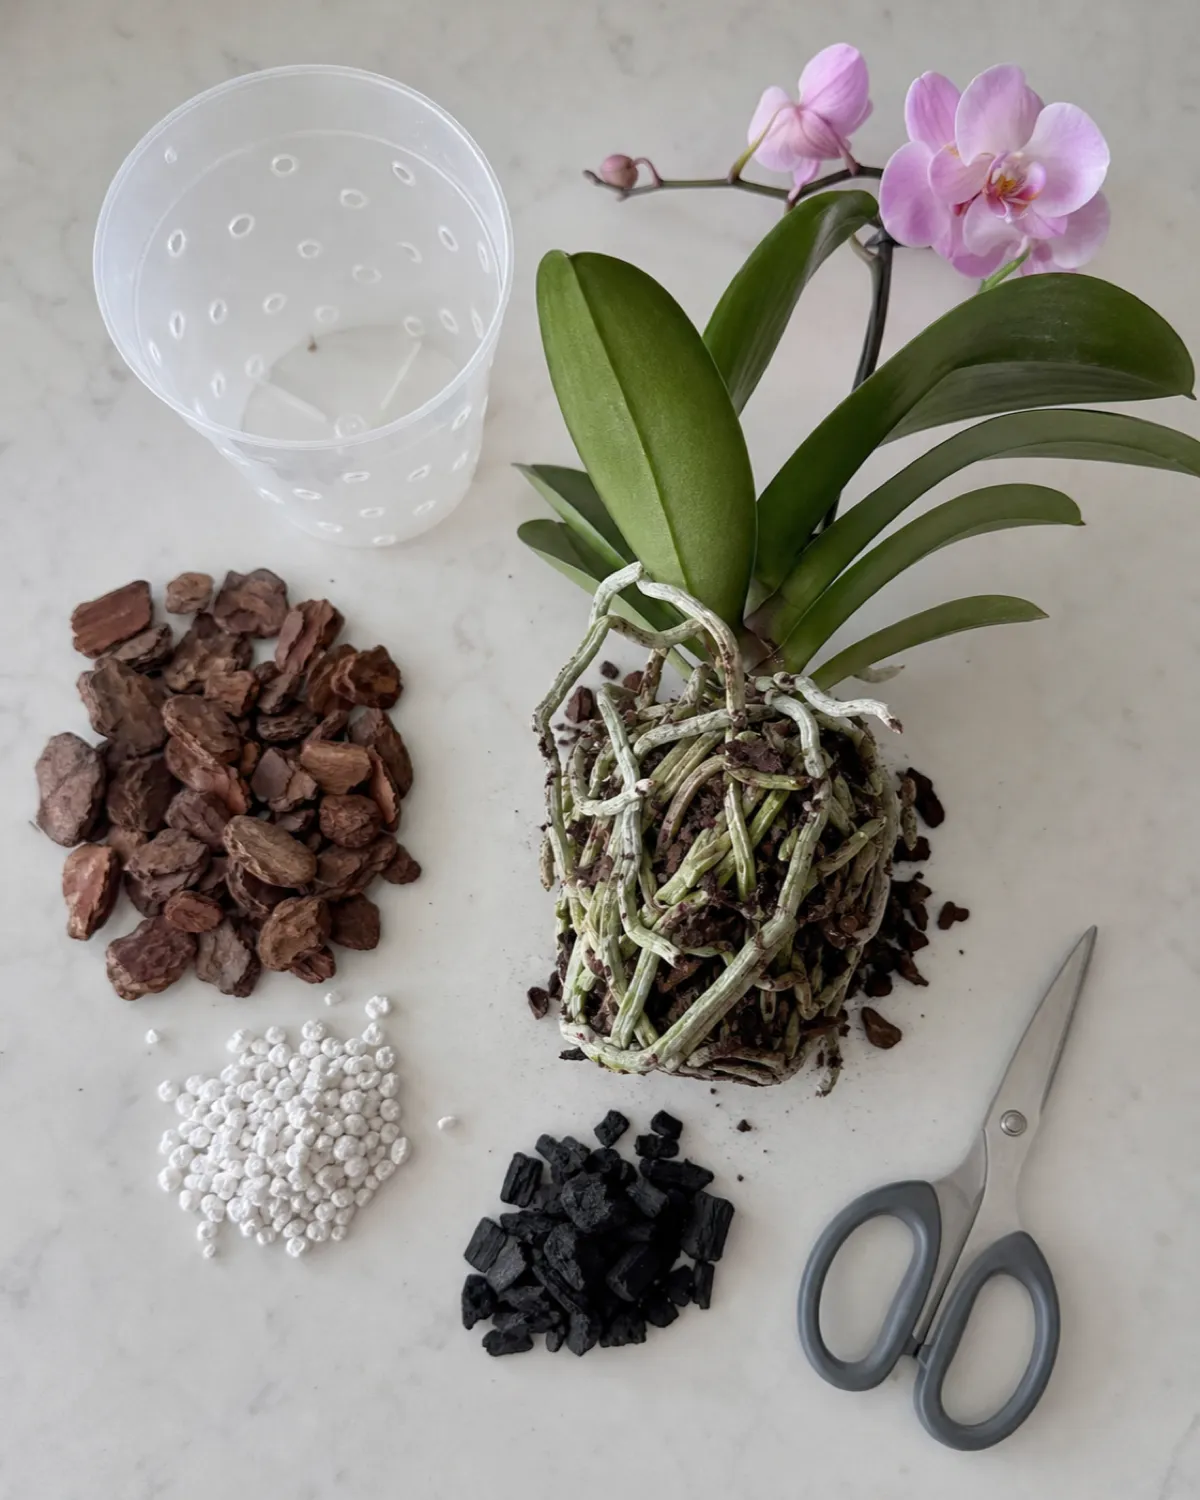
Never put an orchid in potting soil. Soil holds moisture against the roots for days, and epiphytic roots that sit in wet conditions rot within weeks. This is the single most common reason grocery-store orchids die — people repot them into regular soil because that's what every other plant uses.
Orchid potting mix is made of chunky fir bark pieces, sometimes blended with perlite, horticultural charcoal, or a small amount of sphagnum moss. The bark drains almost instantly while holding just enough moisture in its porous structure to keep roots hydrated between waterings. Air circulates freely around the roots, mimicking the conditions on a tree branch.
The trade-off: bark breaks down. Over 12 to 24 months, the chunky pieces decompose into a soggy, compacted mass that starts holding too much water — exactly the opposite of what you want. This decomposition is why orchids need repotting on a regular schedule, even when the roots haven't outgrown the pot.
Pre-mixed orchid bark is widely available, but you can make your own: roughly 60% medium-grade fir bark, 20% perlite, 20% charcoal. The goal is a mix that water runs through in seconds.
- Never pot an orchid in regular soil — the roots suffocate and rot.
- Chunky fir bark with perlite and charcoal drains fast and lets air reach roots.
- Bark decomposes in 12-24 months — repotting is about medium freshness, not just root space.
Repotting: every 1-2 years, after blooming
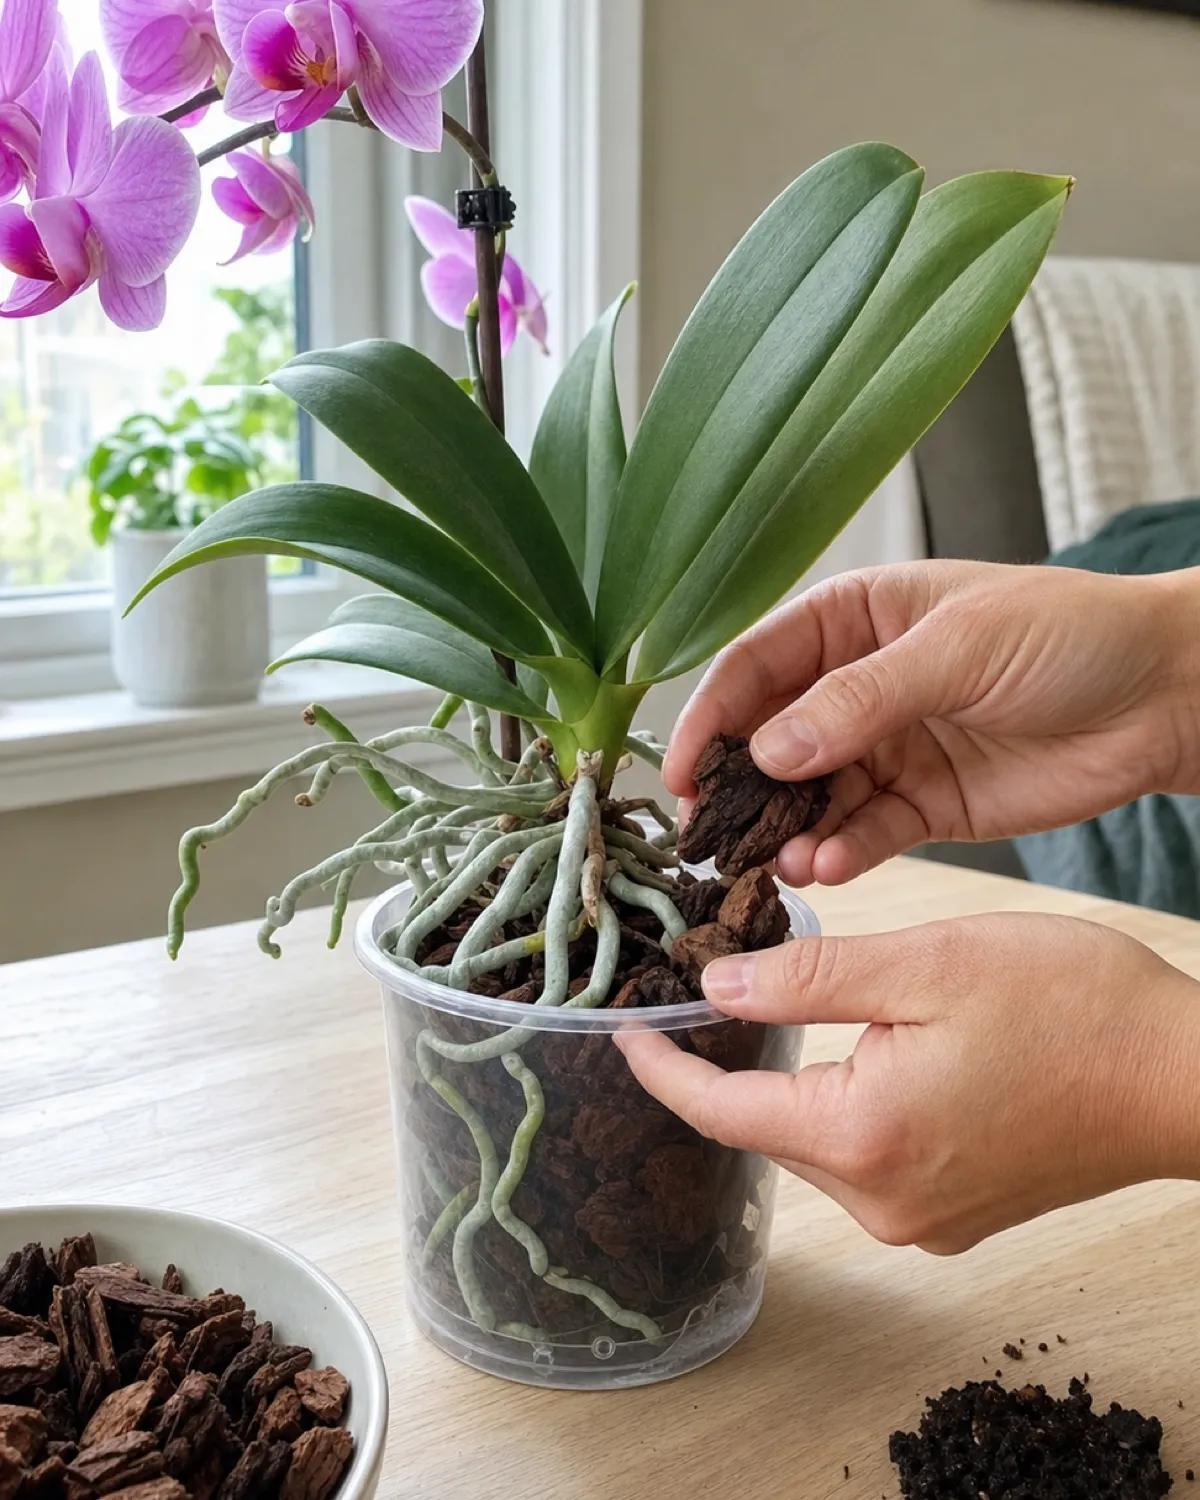
Repot when the bark has broken down into mushy fragments that no longer drain well, or when roots are so dense they've pushed the plant up out of the pot. The timing is usually every one to two years. Always repot after blooming ends — never during an active bloom cycle, because the disruption can cause the plant to drop remaining buds.
Use a clear plastic pot with multiple drainage holes. The transparency isn't aesthetic — it lets you monitor root health and color without disturbing the plant. Slide the orchid out, shake off the old bark, and inspect every root. Healthy roots are plump, firm, and silver or green. Dead roots are brown, hollow when squeezed, or mushy. Trim all dead roots with sterilized scissors.
Place the plant in the new pot and pack fresh bark loosely around the roots. Don't compress it — the goal is airflow, not anchor support. A chopstick helps work bark into gaps without packing it tight.
For a broader look at repotting techniques across species, that guide covers the general diagnostic signals. Orchid repotting is its own discipline because of the bark medium and root pruning.
Water lightly after repotting and skip fertilizer for two weeks to let any root cuts heal.
- Repot after blooming, every 1-2 years — timing follows bark decomposition, not root crowding.
- Clear plastic pot with drainage — lets you monitor root color without disturbing the plant.
- Trim brown, hollow, mushy roots — pack fresh bark loosely, don't compress.
Aerial roots: leave them alone
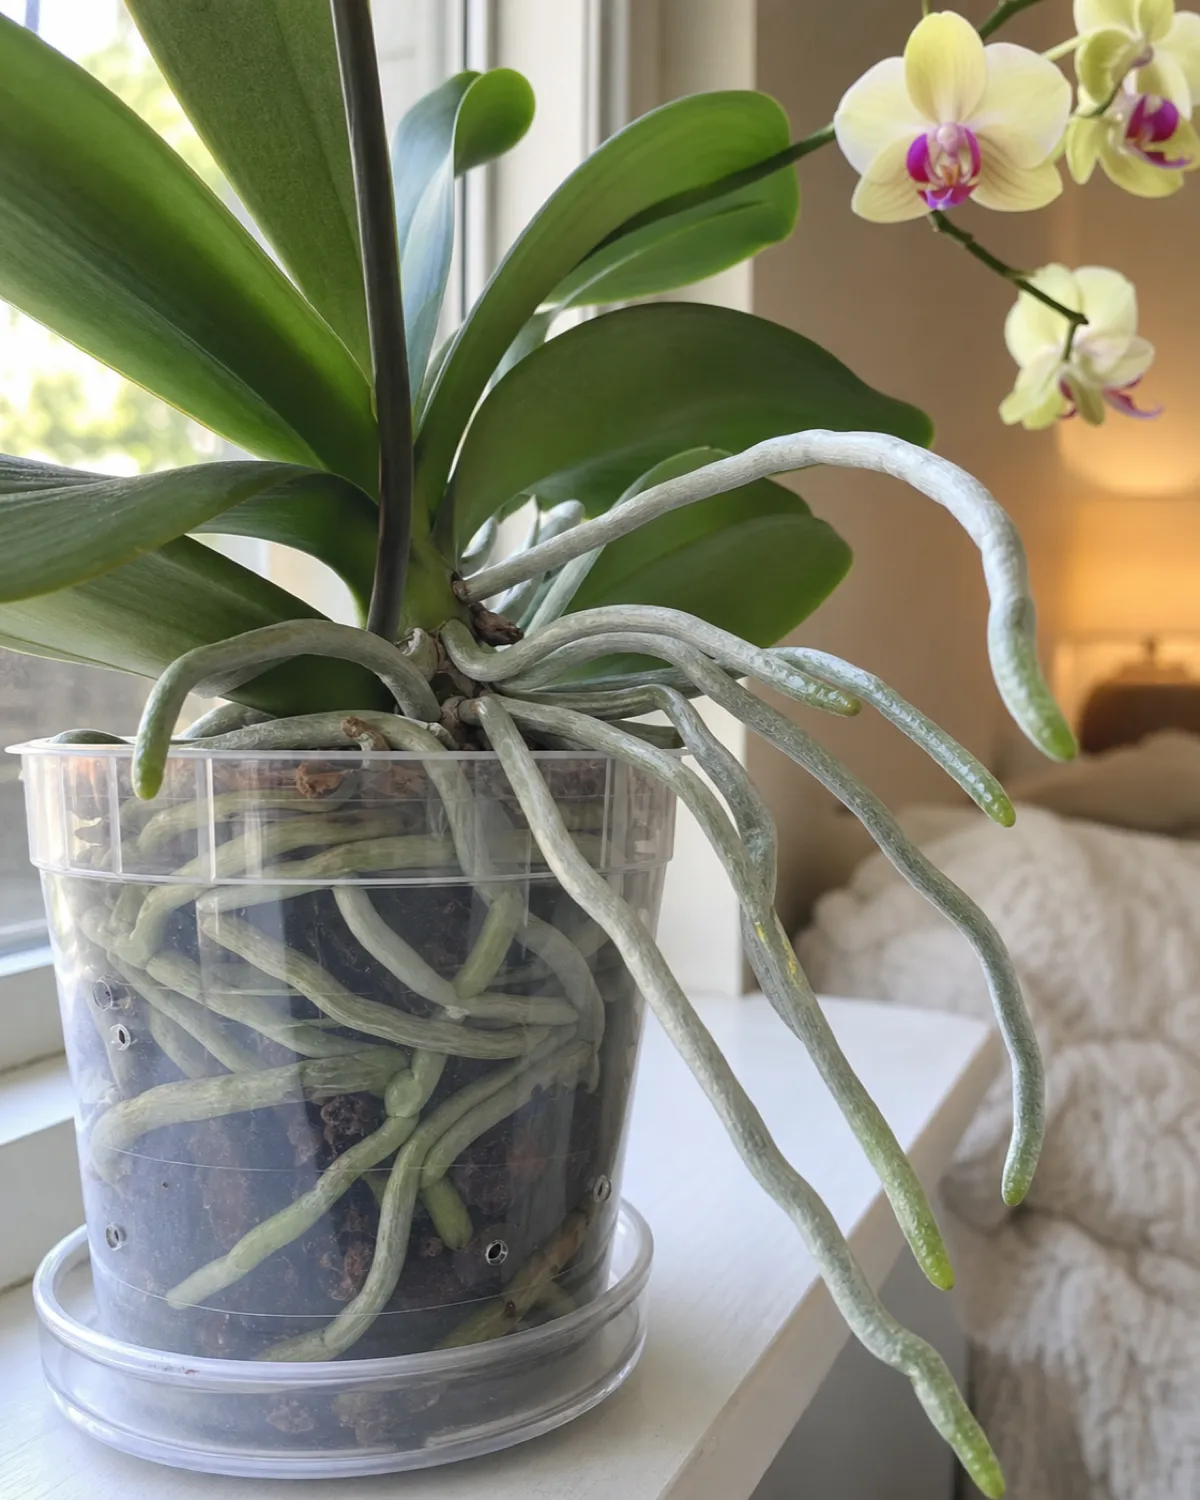
Thick roots growing out over the pot rim, arching into the air, crawling along the shelf — this is completely normal and actually a sign of a healthy, well-established orchid. These aerial roots are doing exactly what they would in the wild: reaching out to grab a tree branch and absorb moisture from the surrounding air.
Never cut healthy aerial roots. Never try to stuff them back into the pot. They're photosynthetic (the velamen turns green in light) and they contribute to the plant's overall moisture and nutrient intake. Pushing them into bark can crack or damage them, and cutting them removes a functioning organ.
If the aerial roots become dry and papery — light brown and wrinkly instead of plump and silver — the ambient humidity is low. A light misting or a pebble tray nearby helps, but papery aerial roots aren't dangerous. They're cosmetic, not critical, as long as the roots inside the pot are healthy.
The only reason to trim an aerial root is if it's completely dead: shriveled, hollow, and brown all the way through. Even then, cut conservatively.
- Aerial roots over the pot rim are healthy and normal — don't cut or stuff them back.
- They're photosynthetic — velamen turns green in light and absorbs moisture from air.
- Papery dry aerial roots signal low humidity — not dangerous if in-pot roots are healthy.
Fertilizing: weakly, weekly
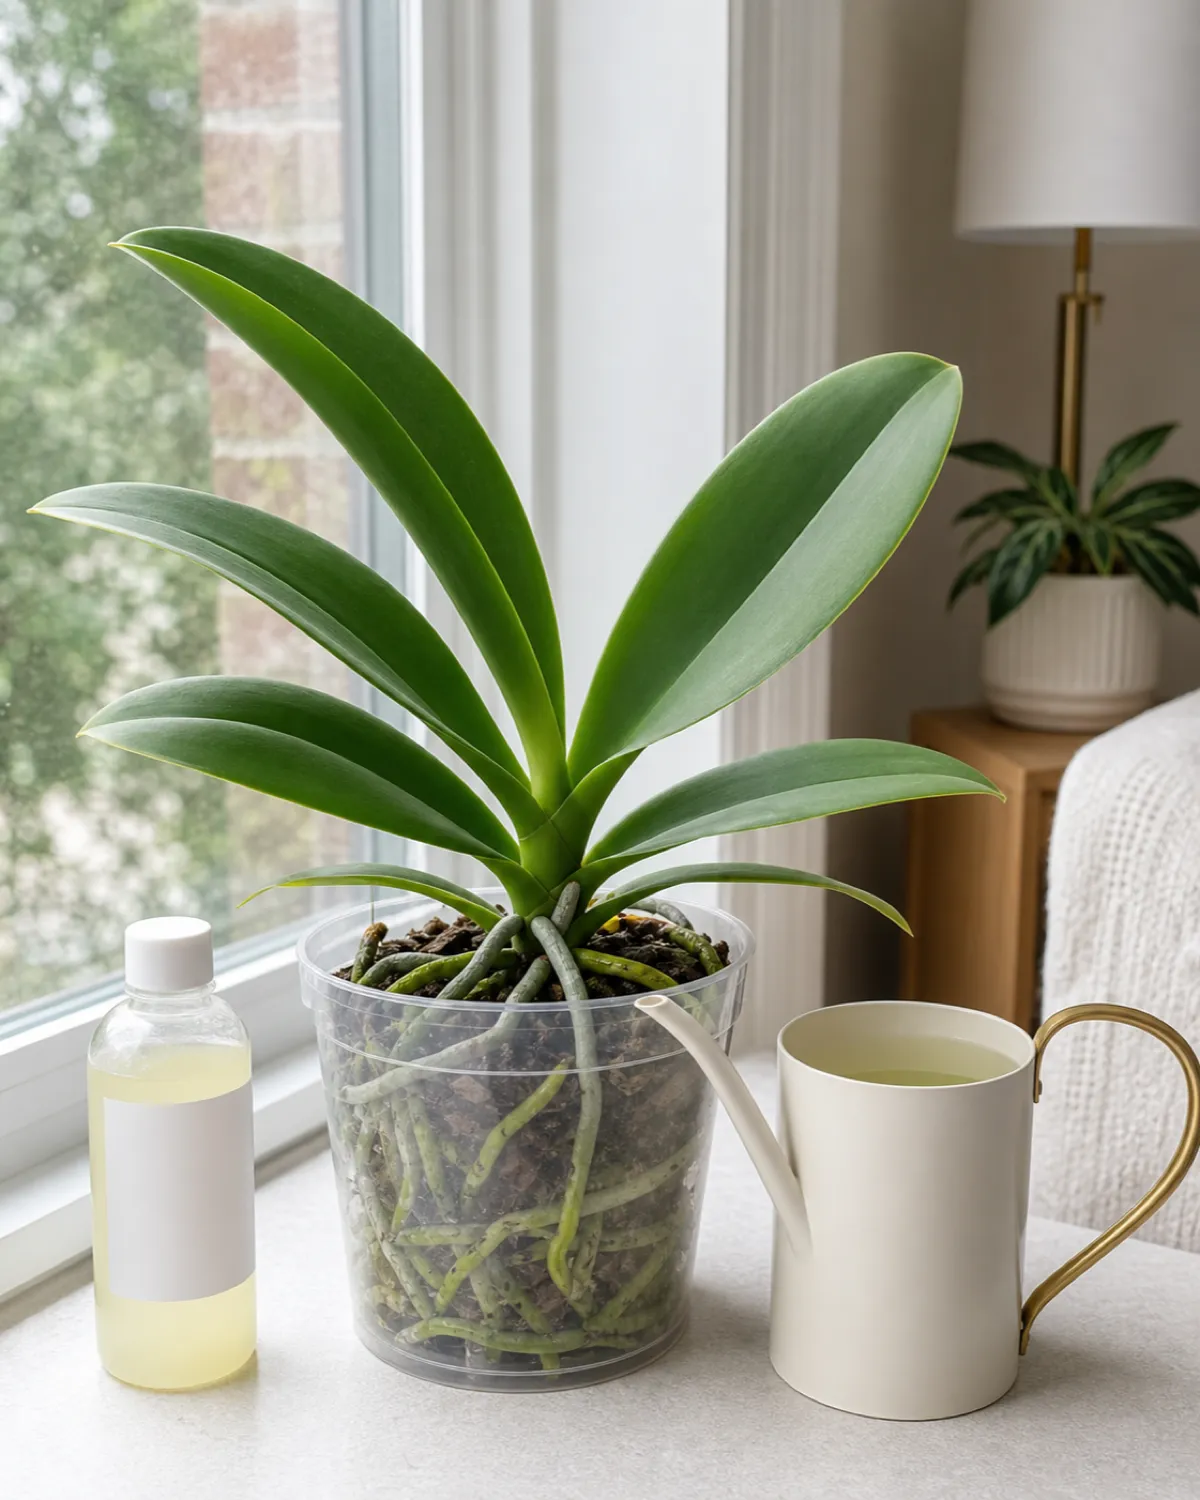
The classic orchid grower's mantra — weakly, weekly — means consistent light feeding beats occasional strong doses. Use an orchid-specific fertilizer or a balanced liquid fertilizer (20-20-20) diluted to one-quarter strength. Feed every one to two weeks during active growth (spring through summer), when the plant is producing new leaves or roots.
Stop feeding during bloom. The flowers are already set; fertilizer doesn't prolong them and excess salts stress the roots. Stop feeding during the fall cool-down period when you're trying to trigger a spike — the plant should be resting, not pushing vegetative growth.
Once a month, flush the bark with plain water (no fertilizer) to wash out accumulated mineral salts. Bark doesn't buffer salts the way soil does, so buildup happens faster and can burn root tips — visible as brown, dried tips on otherwise healthy roots.
For the broader fertilizing framework across species, that guide covers NPK ratios and the weakly-weekly dilution strategy that orchid growers pioneered.
- Quarter-strength fertilizer every 1-2 weeks during active growth (spring-summer).
- Stop feeding during bloom and fall cool-down — rest periods matter.
- Flush with plain water monthly — bark doesn't buffer salts like soil does.
Humidity and temperature for indoor orchids
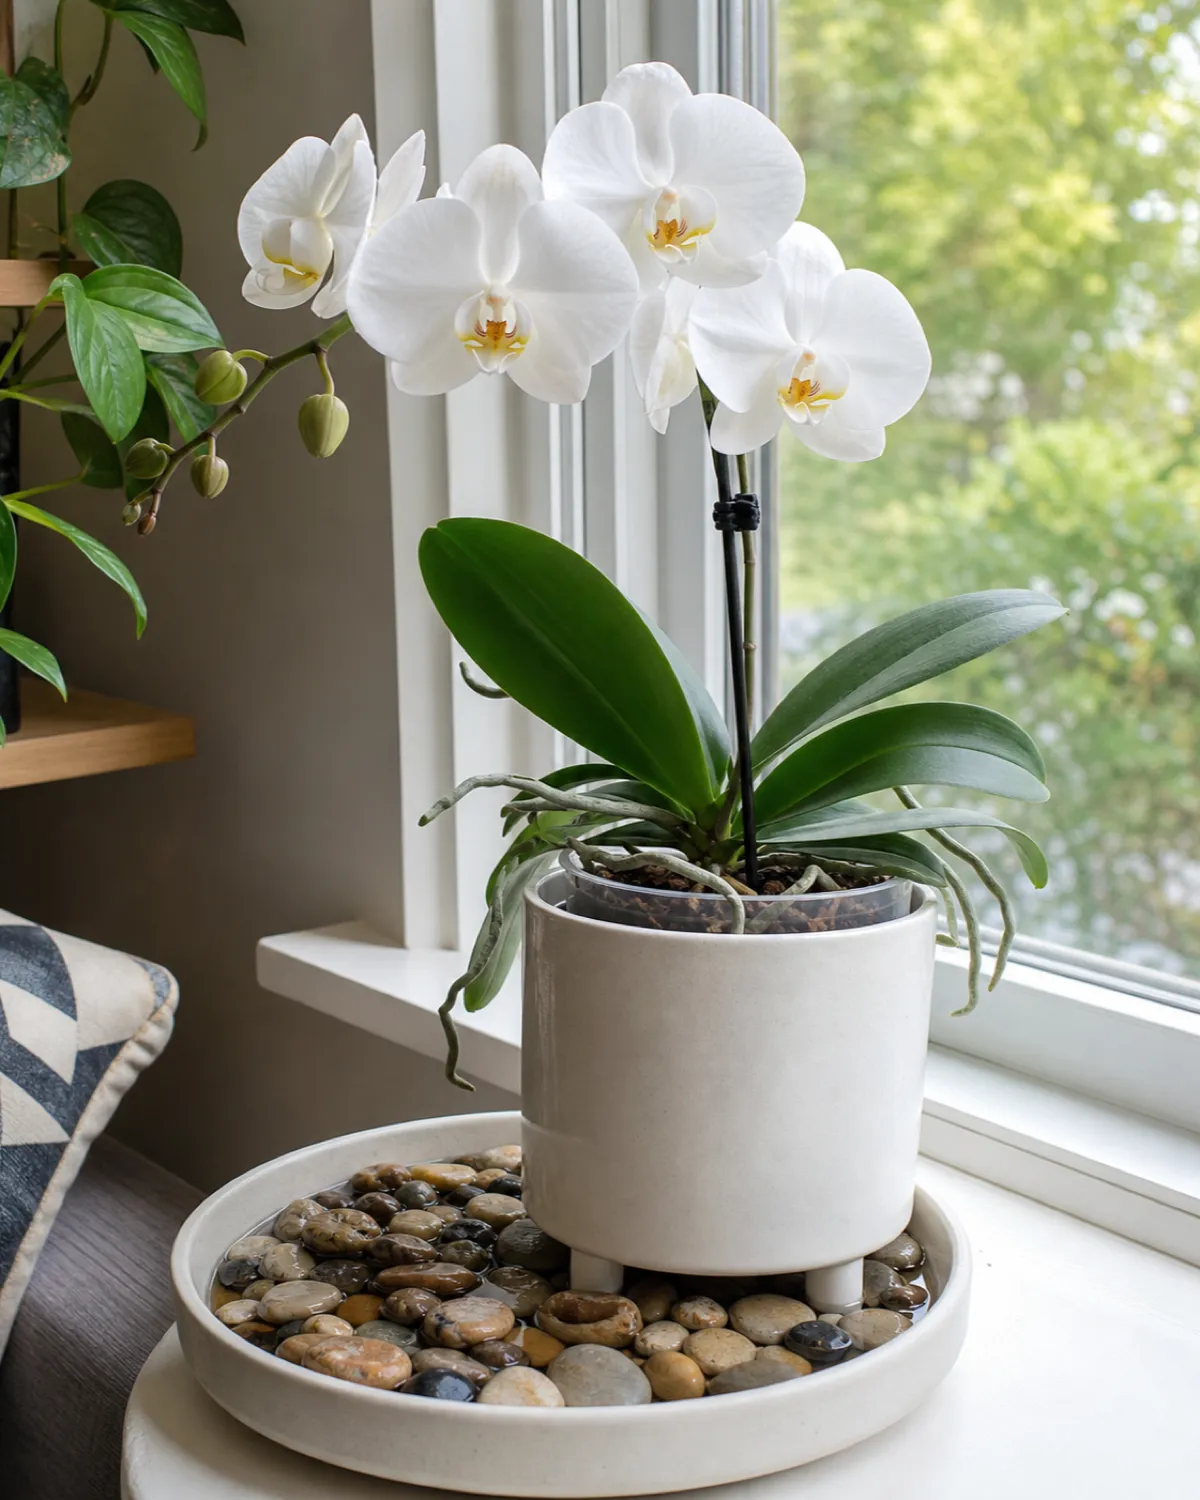
Phalaenopsis thrives in normal household conditions. Daytime temperatures of 65-80°F (18-27°C) and humidity of 40-60% are within range for most homes without modification. You don't need a terrarium, a humidity dome, or a bathroom placement — those are myths from a time when people conflated Phalaenopsis care with the needs of much fussier orchid genera.
If your air is very dry — winter heating can drop humidity below 30% — a pebble tray helps. Fill a shallow tray with pebbles and water so the pot sits above the water line. Evaporation around the pot raises local humidity without wetting the roots or crown. A humidifier in the room works too, but position it away from the plant — cold mist directly on leaves invites fungal spots.
Good air circulation matters more than exact humidity numbers. Stagnant, humid air around orchid leaves is the setup for bacterial and fungal infections. A gentle fan on low in the same room, or simply not crowding the plant against a wall, provides enough airflow to keep the leaves dry and healthy.
- Normal household temperature and humidity work fine — 65-80°F, 40-60% humidity.
- Pebble tray for dry winter air — pot above water line, evaporation raises local humidity.
- Air circulation prevents fungal issues — a gentle fan or open placement beats stagnant humidity.
Common orchid problems: yellow leaves, limp leaves, root rot
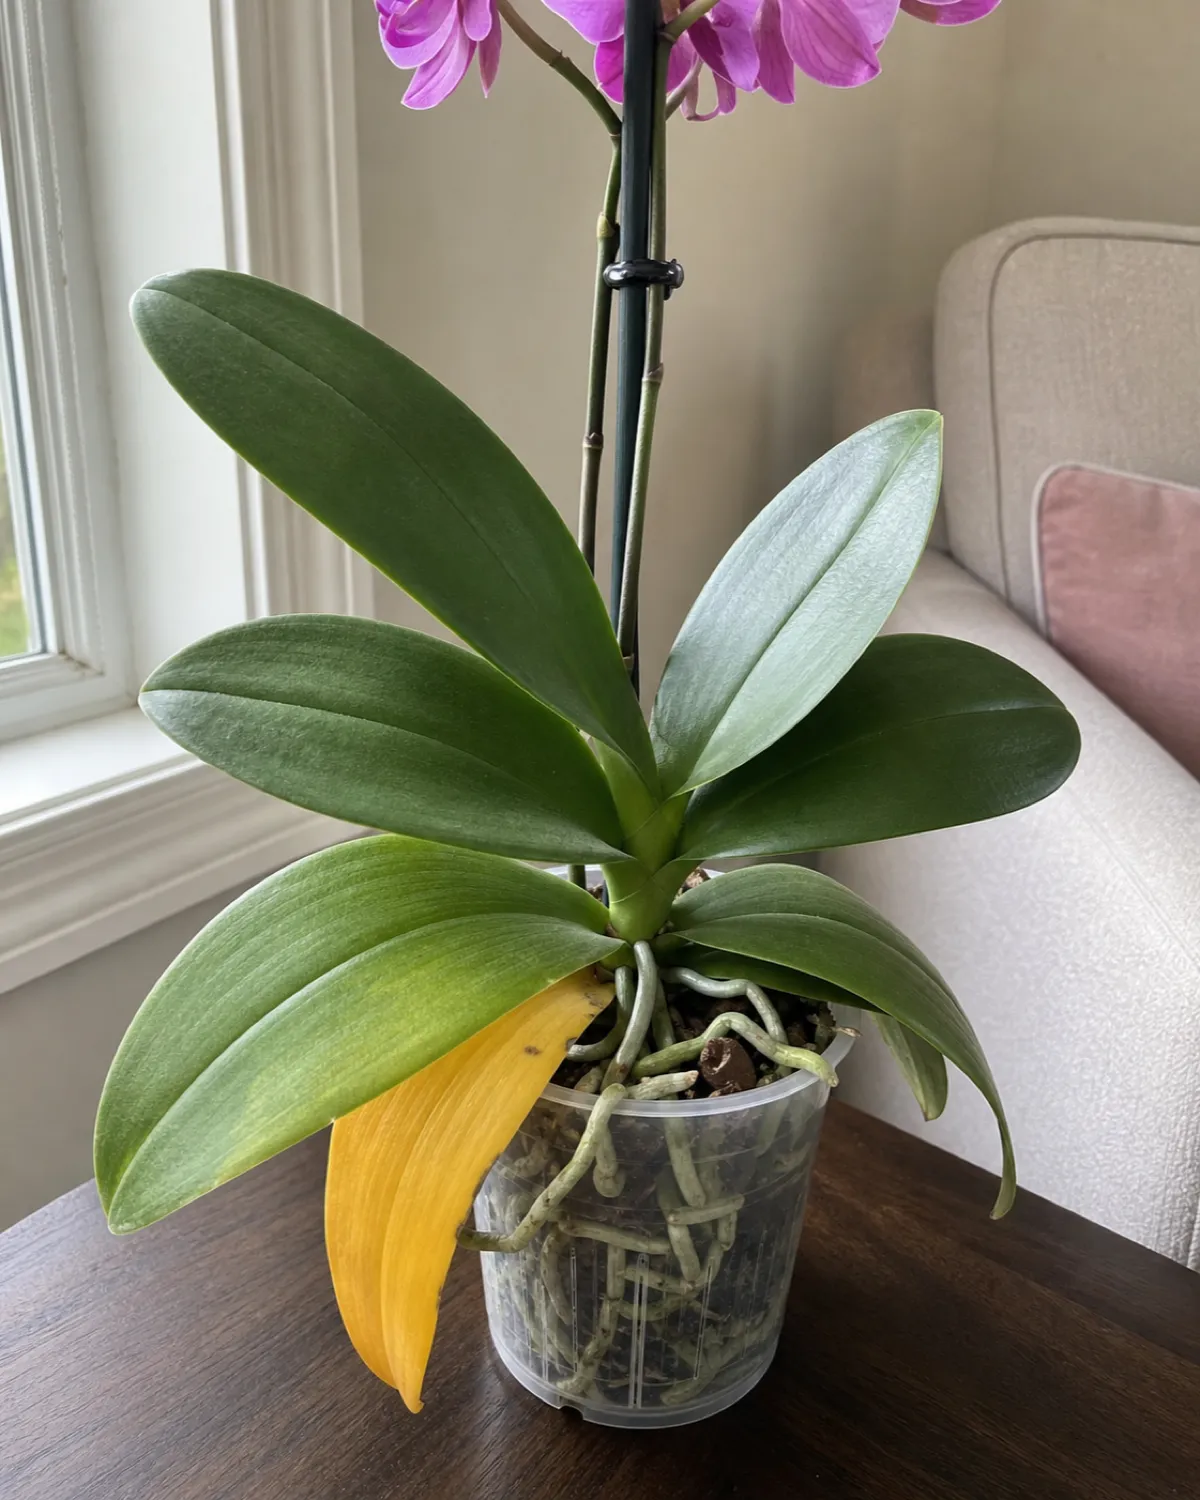
A single bottom leaf turning yellow and dropping is normal aging — old leaves die off naturally, one at a time, starting from the lowest. The plant usually pushes a new leaf from the crown simultaneously. This is not a problem.
Multiple leaves yellowing at once points to overwatering, root rot, or too much direct sun. Check the roots: if they're brown and mushy instead of plump and silver-green, you're overwatering. Repot into fresh bark, trim all dead roots, and reduce watering frequency.
Limp, wrinkled, leathery leaves that flop over instead of holding firm are dehydrated — but the cause might be underwatering or root rot. A plant with rotten roots can't absorb water even when the bark is wet, so the leaves dehydrate despite frequent watering.
The diagnostic is always the roots: plump roots plus limp leaves means give it a soak. Mushy roots plus limp leaves means the root system has failed and you need to trim and repot.
Black or brown spots on leaves indicate bacterial or fungal infection. Cut out the affected area with a sterile blade, seal the cut with cinnamon (a natural fungicide), and improve air circulation. Isolate the plant from others until new growth appears clean.
- One bottom leaf yellowing = normal aging — it drops as a new leaf grows from the crown.
- Multiple yellow leaves or limp leaves = check the roots — brown mushy roots mean rot.
- Black spots = infection — cut out, seal with cinnamon, improve air circulation.
Is my orchid dead? How to tell
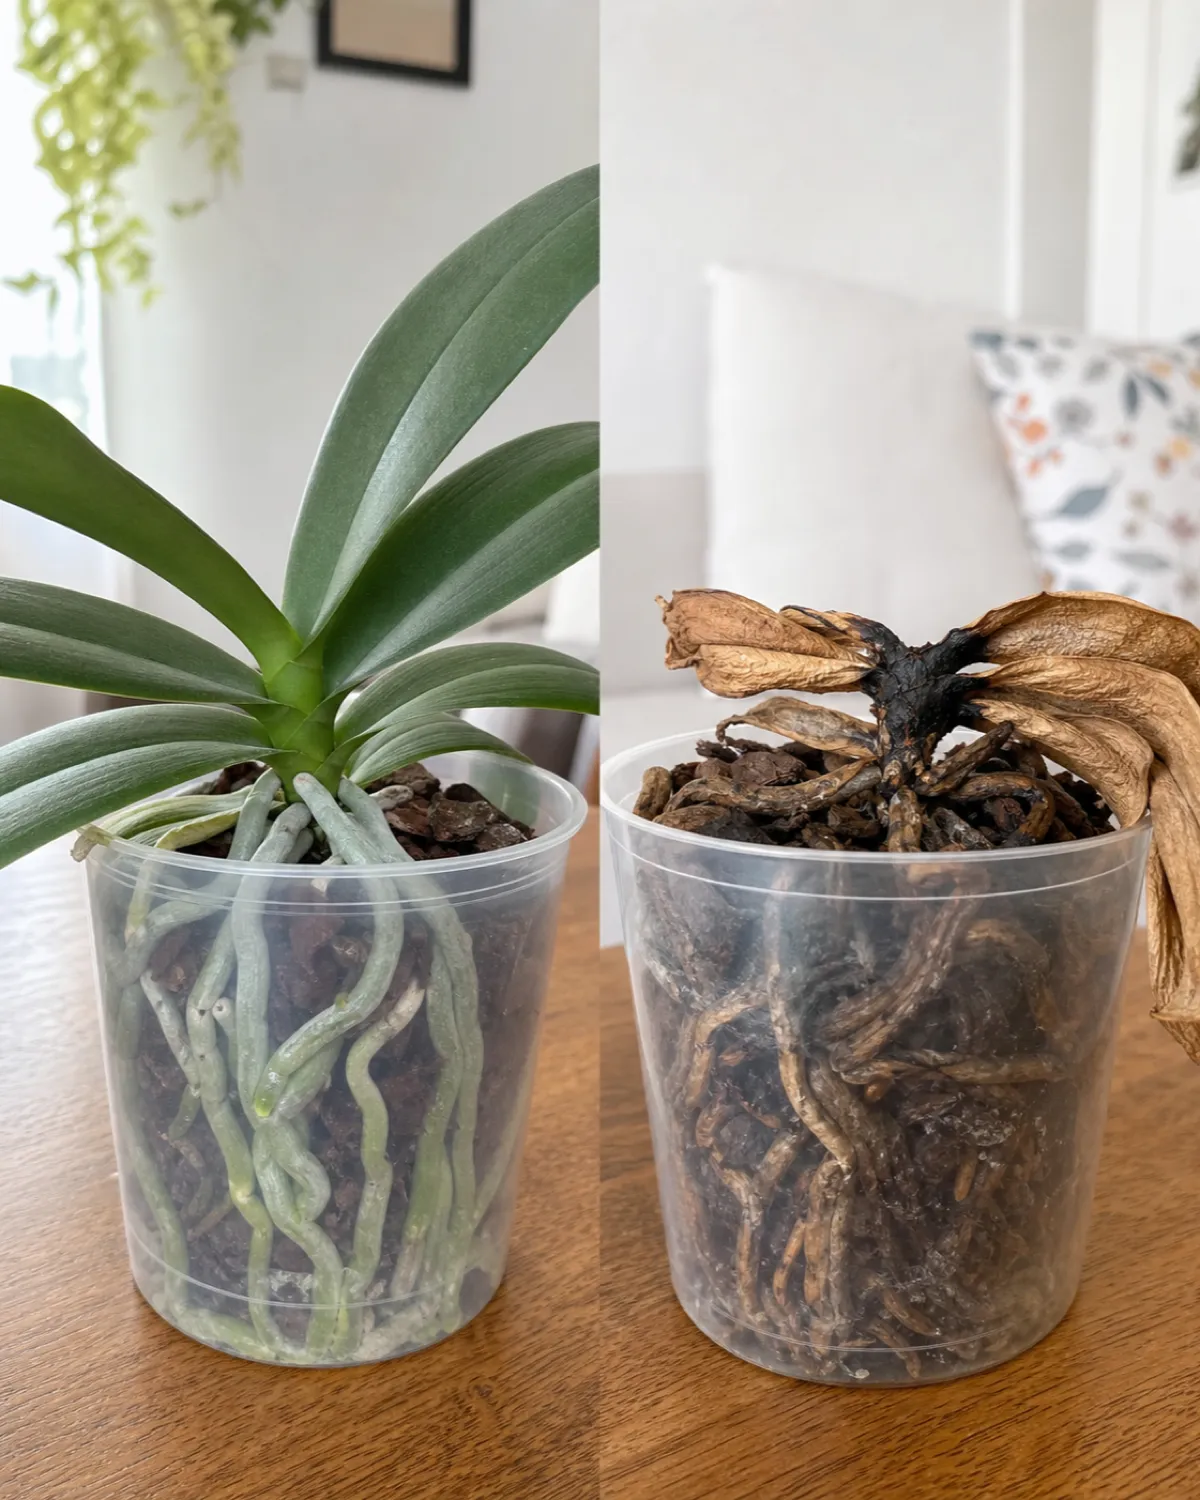
An orchid with no flowers and only green leaves is not dead. It's between bloom cycles. A Phalaenopsis can sit in this leafy, flowerless state for a year or more between blooms, and it's perfectly healthy the entire time — it just needs the temperature trigger described in section five to initiate a new spike.
An orchid with firm leaves and plump roots in a clear pot is healthy, full stop, regardless of whether it has flowered recently. The leaves are the energy factory; the roots are the water supply. As long as both are intact, the plant is alive and capable of blooming again.
It is genuinely dead if:
- All roots are brown, mushy, and hollow when gently squeezed — no firm plump roots remain.
- The crown (the central growing point) is black and soft — this is irreversible crown rot.
- No green tissue remains anywhere — the stem between the leaves is brown and dry.
A dehydrated orchid — limp leaves but some firm roots remaining — is often salvageable. Trim dead roots, repot in fresh bark, place in a humid spot (a clear plastic bag loosely draped over the pot creates a humidity tent), and wait. Recovery takes weeks to months, but new roots and a new leaf emerging from the crown mean it's coming back.
- No flowers + green leaves + plump roots = alive and resting — not dead.
- Dead means: all roots brown and mushy, crown black, no green tissue — irreversible.
- Dehydrated but some firm roots? Salvageable — humidity tent, patience, watch for new growth.
Beyond Phalaenopsis: other beginner orchids
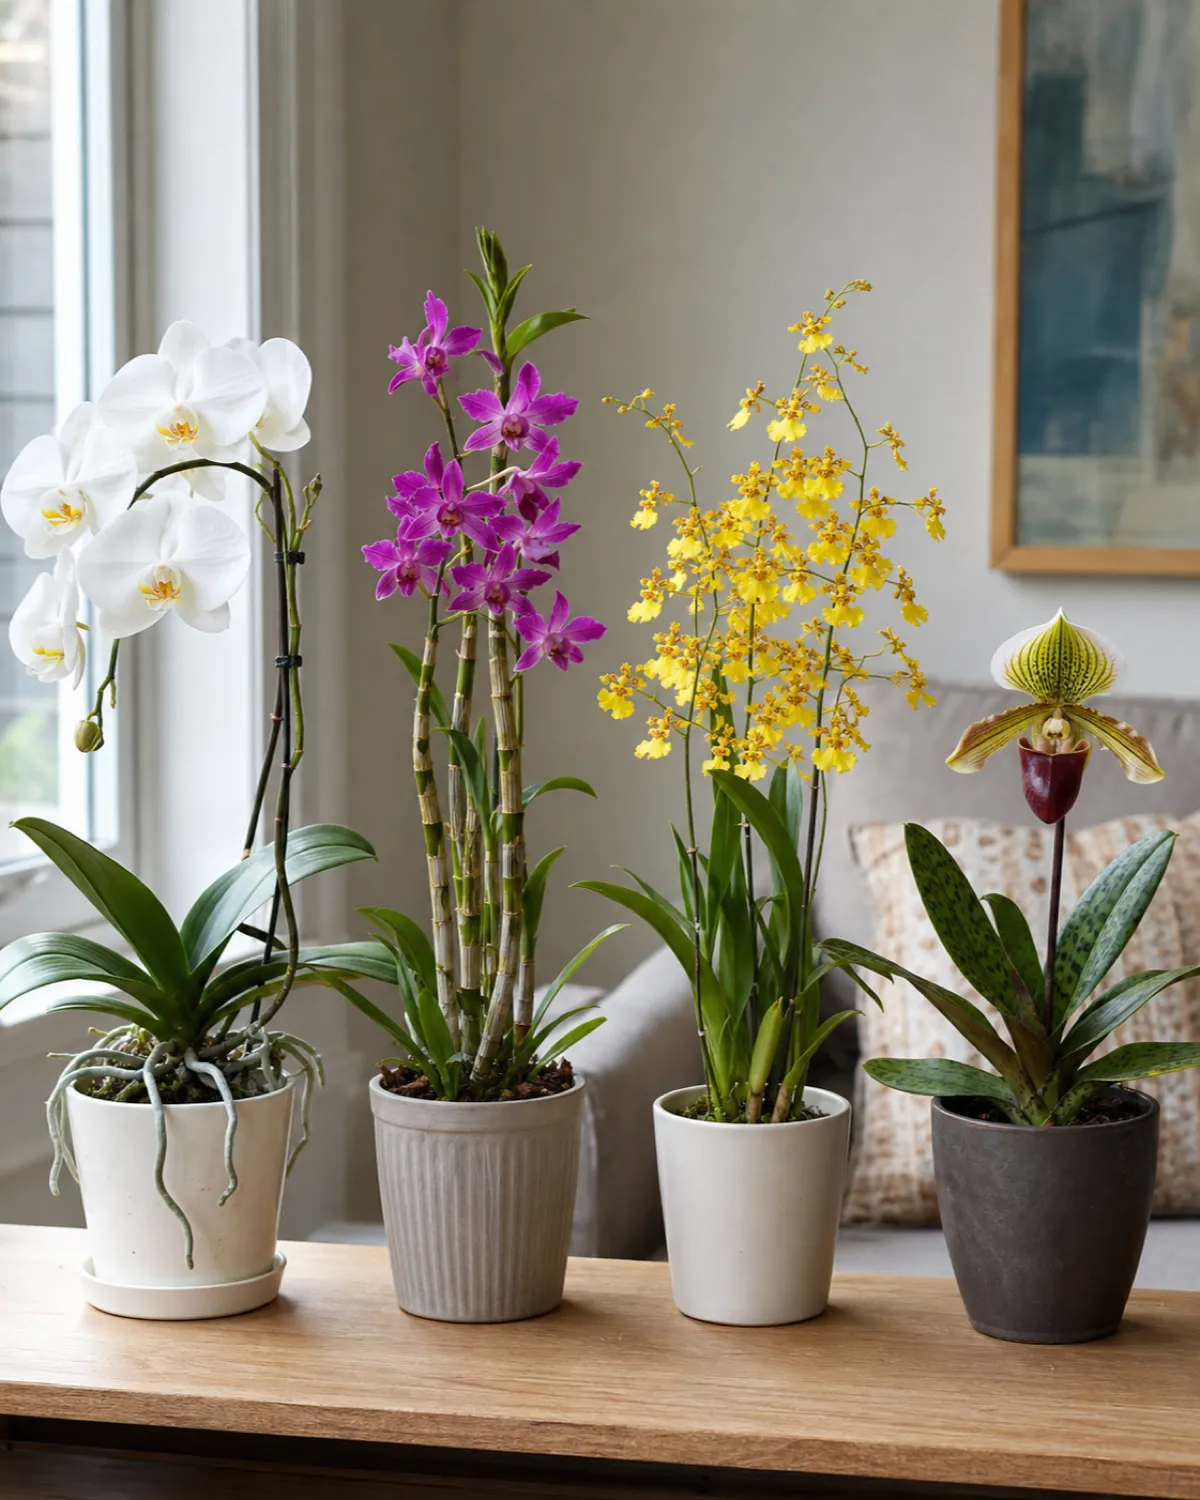
Phalaenopsis (moth orchid) is the one this guide covers — broad, rounded petals in an arching spray, the longest bloom time of any orchid genus (often 3+ months), the most forgiving of household conditions, and the most widely available. Start here.
Dendrobium grows on upright cane-like stems, producing clusters of smaller flowers along the length of the cane. It needs more light than Phalaenopsis (some direct morning sun is fine) and a drier, cooler winter rest period to trigger blooming. Easier than its exotic appearance suggests.
Oncidium (dancing lady orchid) produces sprays of dozens of small, yellow or brown-spotted flowers that look like tiny dancers mid-leap. Some varieties are fragrant — the chocolate orchid (Oncidium Sharry Baby) smells genuinely like chocolate. Slightly more light than Phalaenopsis and prefers a bit more air movement.
Paphiopedilum (lady slipper orchid) has a distinctive pouch-shaped single bloom that lasts 6-8 weeks. It's the lowest-light orchid — tolerating conditions that would leave a Phalaenopsis in permanent vegetative mode. A good choice for north-facing windows.
Cattleya is the classic corsage orchid — large, fragrant flowers in vivid colors. Needs the brightest light of any common orchid (bright indirect to some direct), distinct dry periods between waterings, and more dramatic temperature swings than Phalaenopsis. Rewarding but less forgiving.
All follow the same core rules: bark, not soil. Root-based watering. Good air circulation. They differ in light intensity, temperature preferences, and rest-period requirements.
- Dendrobium for cane-style structure and winter rest blooming — more light, drier winter.
- Paphiopedilum for low-light windows — tolerates conditions too dim for Phalaenopsis.
- All orchids share bark medium, root-based watering, air circulation — they differ in light and rest.
Orchid Care: The Quick Reference
- 1Epiphyte — not a regular potted plantGrows on tree branches in the wild, roots absorb moisture from air through velamen.
- 2Bright indirect light, no direct afternoon sunEast-facing window is ideal — medium olive-green leaves signal healthy light levels.
- 3Water when roots turn silverSoak 10-15 minutes then drain completely — never let water sit in the crown.
- 4Flowers dropping is normalCut spike to a node for faster rebloom, or to the base for a stronger next cycle.
- 5Cool nights trigger reblooming15°F day-night drop for 4-6 weeks in early fall — a windowsill does it.
- 6Bark, never soilChunky fir bark with perlite and charcoal — decomposes in 12-24 months.
- 7Repot after blooming in fresh barkClear plastic pot, trim dead roots, pack bark loosely — every 1-2 years.
- 8Don't cut aerial rootsThey're photosynthetic and healthy — papery ones just mean low humidity.
- 9Weakly, weekly fertilizingQuarter-strength during growth, stop during bloom and fall cool-down.
- 10Normal household conditions work65-80°F, 40-60% humidity — pebble tray if winter air is very dry.
- 11Roots are the diagnosticPlump and silver = healthy — brown and mushy = rot, repot immediately.
- 12No flowers ≠ deadGreen leaves and firm roots = alive and waiting for a temperature trigger.
- 13Start with Phalaenopsis, branch out laterPaphiopedilum for low light, Dendrobium for cane drama, Cattleya for fragrance.
kultivy.com

Mara Quinn edits Kultivy, where she shares houseplant care, propagation, beginner-friendly plant picks, and plant-styling ideas for anyone who wants their indoor plants to actually thrive. Every guide is image-led and reviewed for clarity, usefulness, image accuracy, and Pinterest-to-page alignment before it goes live. Visit the About page.