A staghorn fern doesn't sit in a pot on a shelf. It hangs on a board, drinks through its roots when you dunk it in a bucket, and grows two completely different types of fronds.
One frond type shields the root ball. The other reaches out like antlers hunting for light.
Platycerium bifurcatum — the species sold in most plant shops — is one of the more forgiving ferns once you understand how an epiphyte works. This guide covers 15 essentials from mounting to propagation.
From the two-frond system to board mounting, soaking technique, propagation by pups, and the mistakes that kill staghorns indoors. Jump to what you need.
- 1What Makes Staghorns Different
- 2Shield & Antler Fronds
- 3Mounting on a Board
- 4Hanging Basket Option
- 5Soaking Technique
- 6Light Requirements
- 7Humidity & Airflow
- 8Temperature & Feeding
- 9Propagating by Pups
- 10Spore Propagation
- 11Brown Shield Fronds
- 12Common Pests
- 13Rot & Overwatering
- 14Stalled Growth
- 15Other Varieties
What Makes Staghorn Ferns Different from Every Other Houseplant
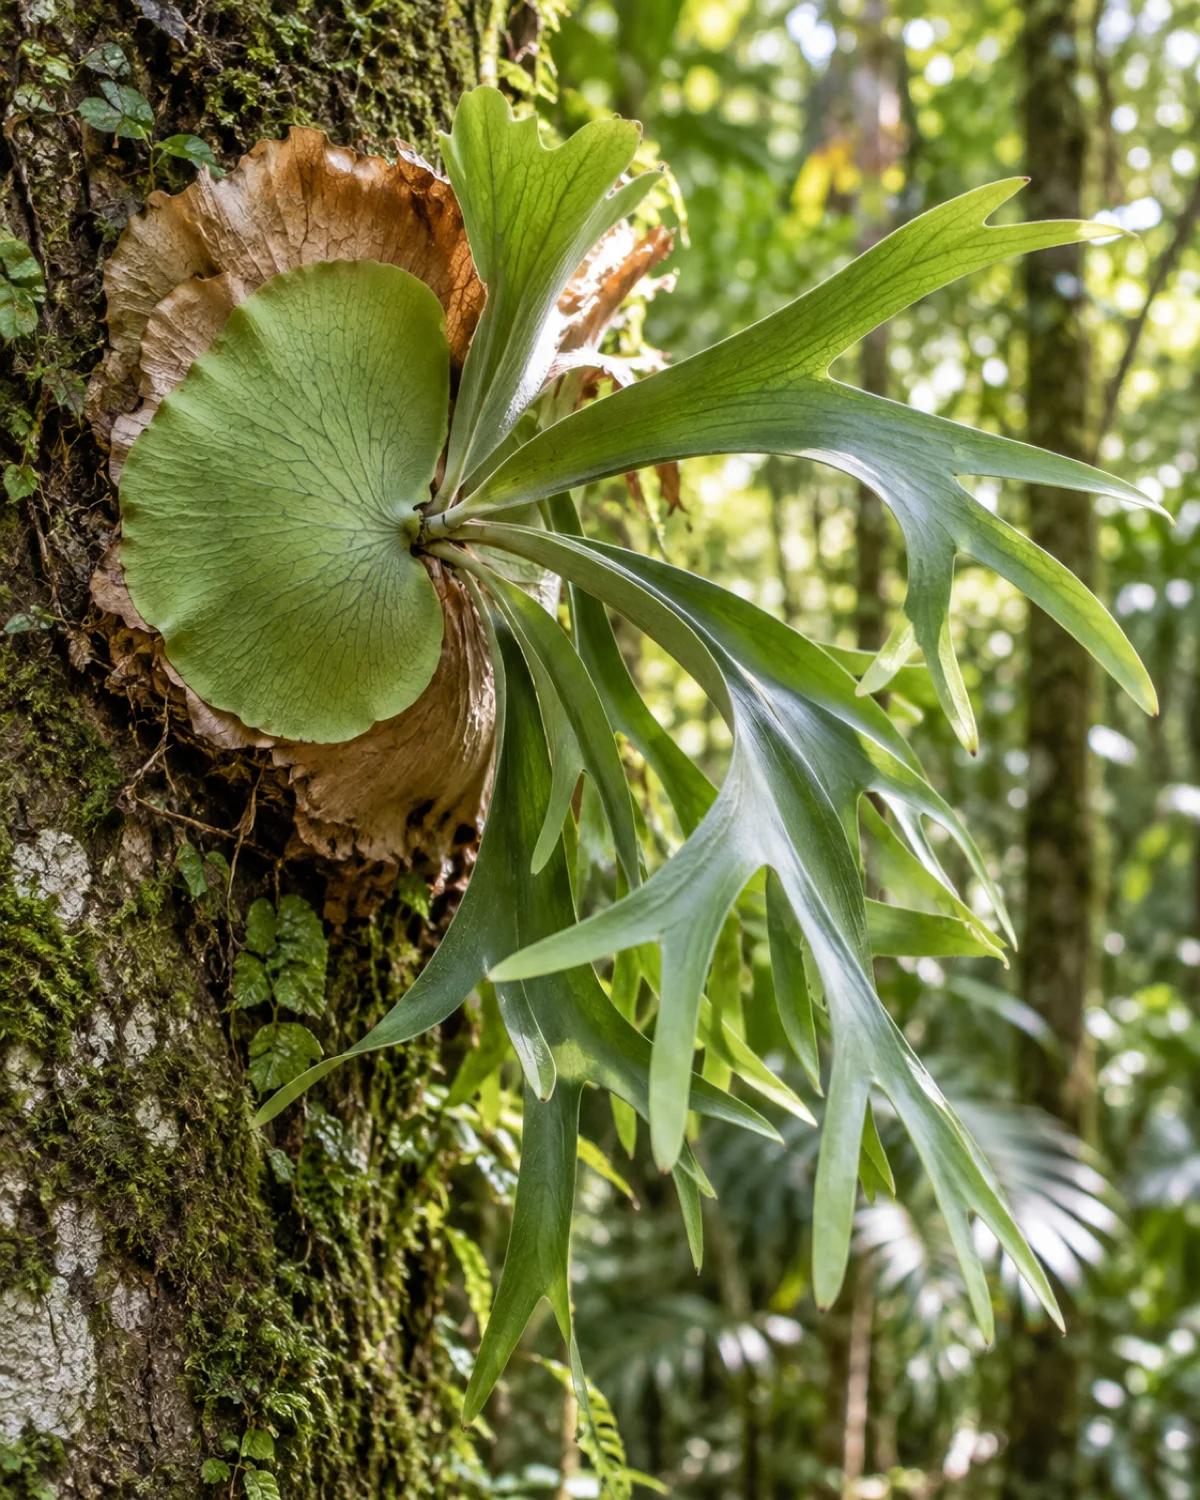
Most houseplants grow in pots filled with soil. A staghorn fern grows on a tree. In its native habitat — the tropical forests of Australia, Southeast Asia, and Africa — Platycerium bifurcatum anchors itself to a tree trunk, wraps its roots around the bark, and absorbs water and nutrients from rain runoff and decomposing leaf litter that collects behind its fronds.
This is what epiphyte means: a plant that grows on another plant without parasitizing it. The tree is scaffolding, not food.
- Family: Polypodiaceae, the largest family of ferns
- Native habitat: tropical and subtropical forests of Australia, Southeast Asia, South America, and Africa
- Growth habit: epiphytic — grows on trees, rocks, or any surface it can anchor to
- Indoor adaptation: mounted on a board, hung in a wire basket, or occasionally grown in a very chunky bark mix in a pot
Understanding the epiphytic habit changes every care decision. Watering means soaking, not pouring. Soil means sphagnum moss, not potting mix. Feeding means dissolving fertilizer in the soak water, not top-dressing granules. Every section that follows connects back to this single fact: a staghorn fern is not a ground plant.
Shield Fronds and Antler Fronds — Reading the Two Growth Systems
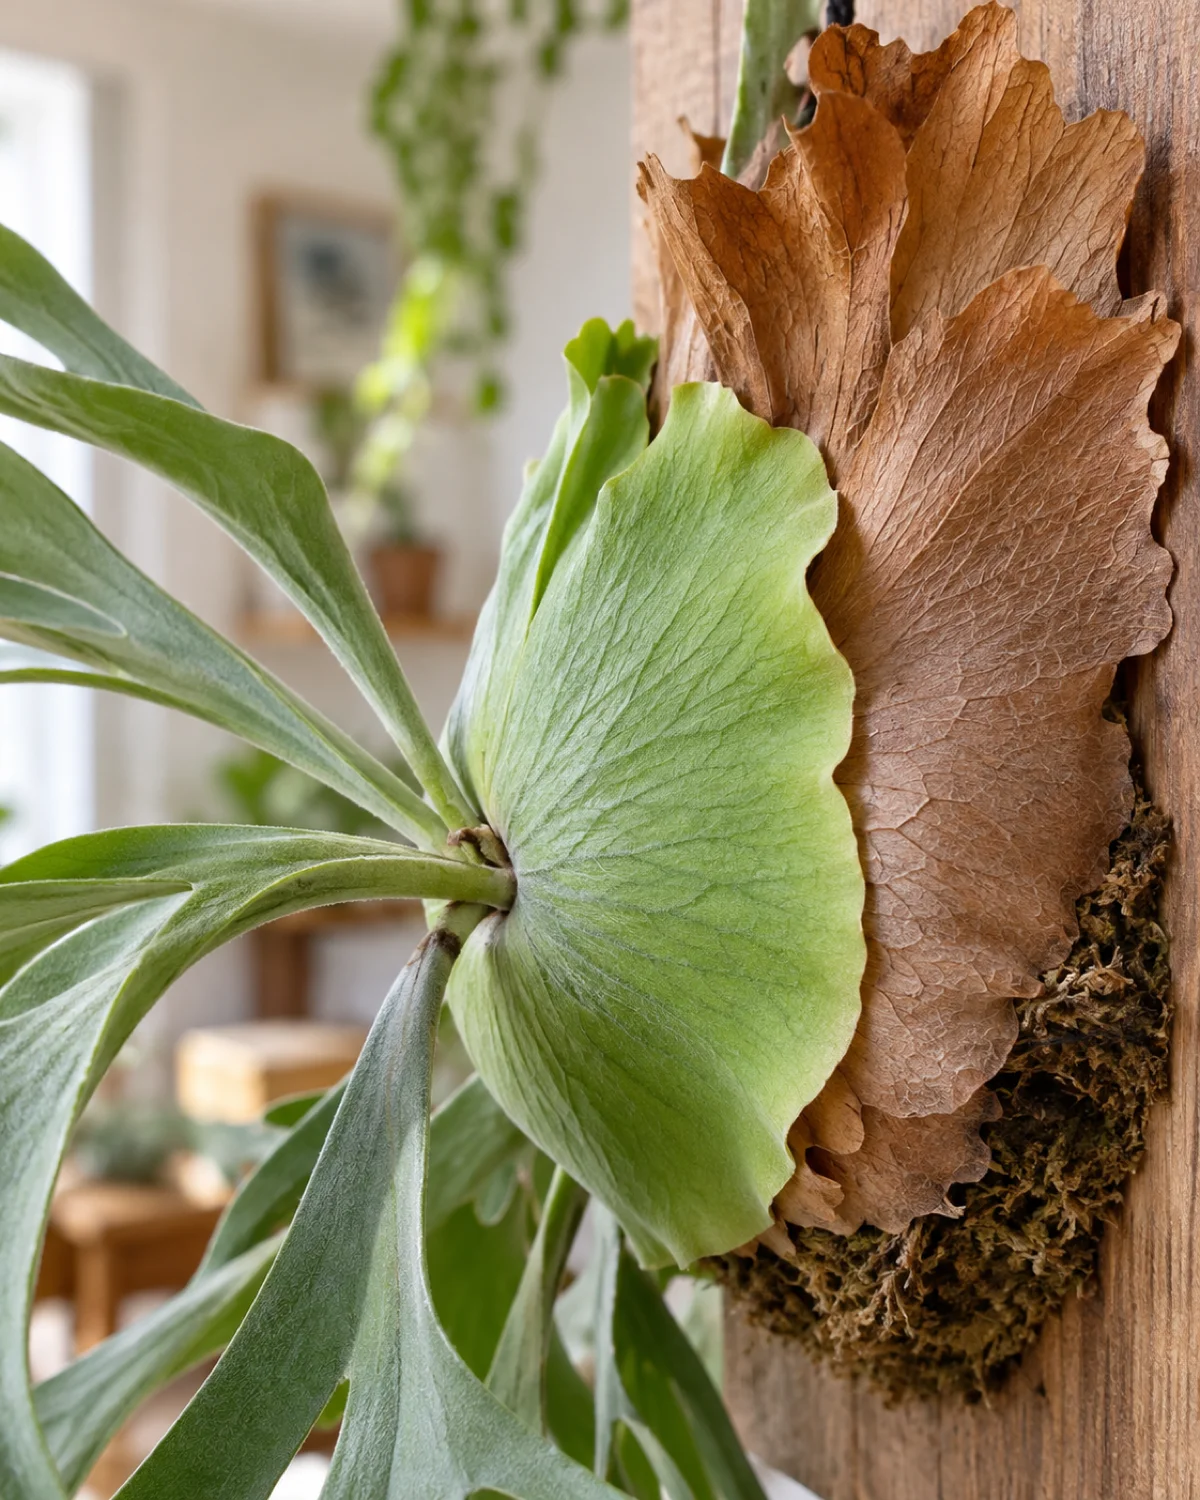
A staghorn fern produces two completely different types of fronds, and confusing them is the fastest way to make a care mistake that damages the plant.
Shield fronds (also called basal fronds) are the flat, round, plate-like fronds that press tightly against the mount or tree. They start out green and eventually turn brown and papery. This is normal — not a sign of disease. The brown shield fronds form a protective shell around the root ball, trapping moisture and decomposing organic matter that feeds the plant.
Antler fronds (also called fertile fronds) are the long, forked, branching fronds that reach outward and give the plant its common name. These are the fronds that photosynthesize most actively, and their undersides carry the brown fuzzy patches of sporangia that produce spores.
- Shield fronds: flat, round, pressed against mount — protect roots, trap moisture, turn brown naturally
- Antler fronds: forked, reaching outward — main photosynthesis organs, carry spore patches on undersides
- Growth pattern: new fronds emerge from the center of the root ball, unfurling slowly over days
- Critical rule: never remove brown shield fronds — they are not dead, they are working
Get these three right and a staghorn fern will thrive for years on your wall, regardless of your experience level.
Mounting a Staghorn Fern on a Board Step by Step
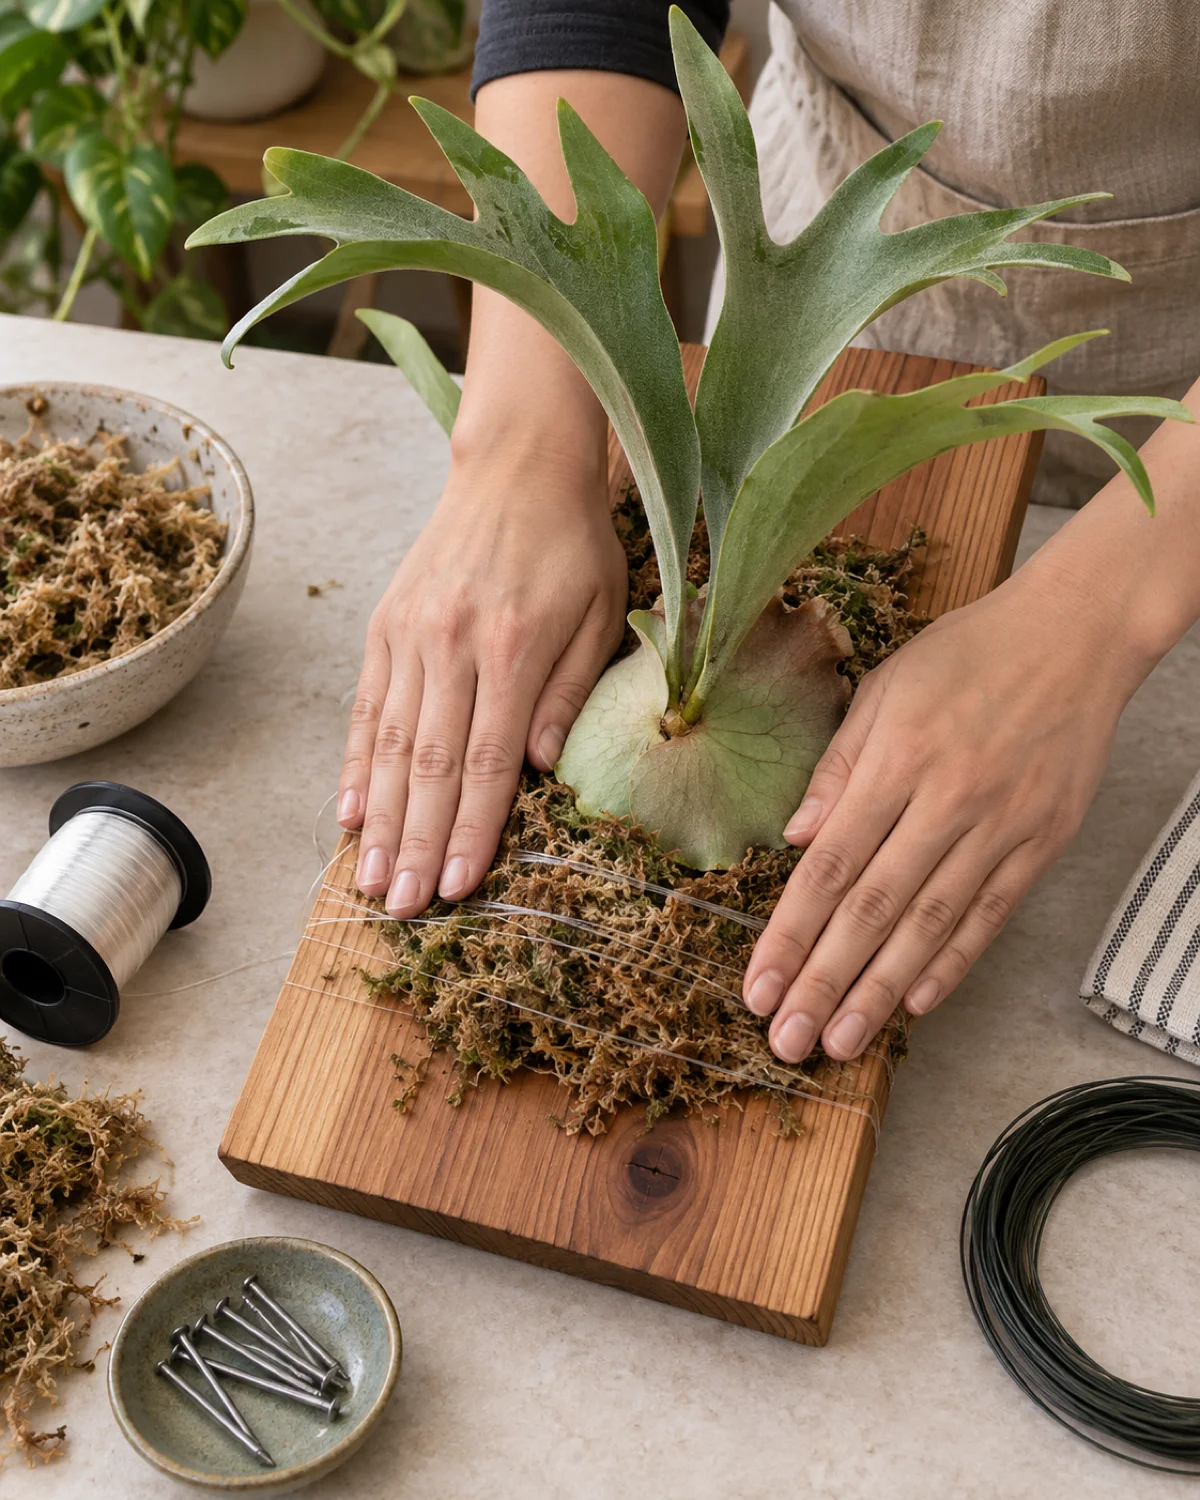
Mounting is the most natural way to grow a staghorn fern indoors because it mimics how the plant lives on a tree. The process is straightforward once you have the right materials.
You need a board (cedar or redwood resists moisture best, but any untreated hardwood works), a mound of pre-soaked sphagnum moss, fishing line or stainless steel wire, a few nails or screws, and a picture-hanging bracket rated for the weight.
- Soak the sphagnum moss for thirty minutes in a bowl of water until it is thoroughly saturated — dry moss repels water initially
- Create a moss mound on the center of the board about two inches thick — this is the root bed
- Position the fern with its shield fronds against the moss mound, root ball centered
- Wrap fishing line or wire around the board and over the shield fronds in a criss-cross pattern, securing the plant without cutting into the fronds — tuck loose ends behind the board
- Add a hanging bracket on the back rated for at least twice the wet weight of the finished mount
The fishing line becomes invisible as the shield fronds grow over it. Within six months, the plant anchors itself to the moss and the line serves as backup rather than primary support.
A mounted staghorn fern is heavier wet than dry. Weigh it after a soak to choose the right wall anchor — a large mature specimen can weigh ten pounds or more when fully saturated.
Growing in a Hanging Basket Instead of a Board
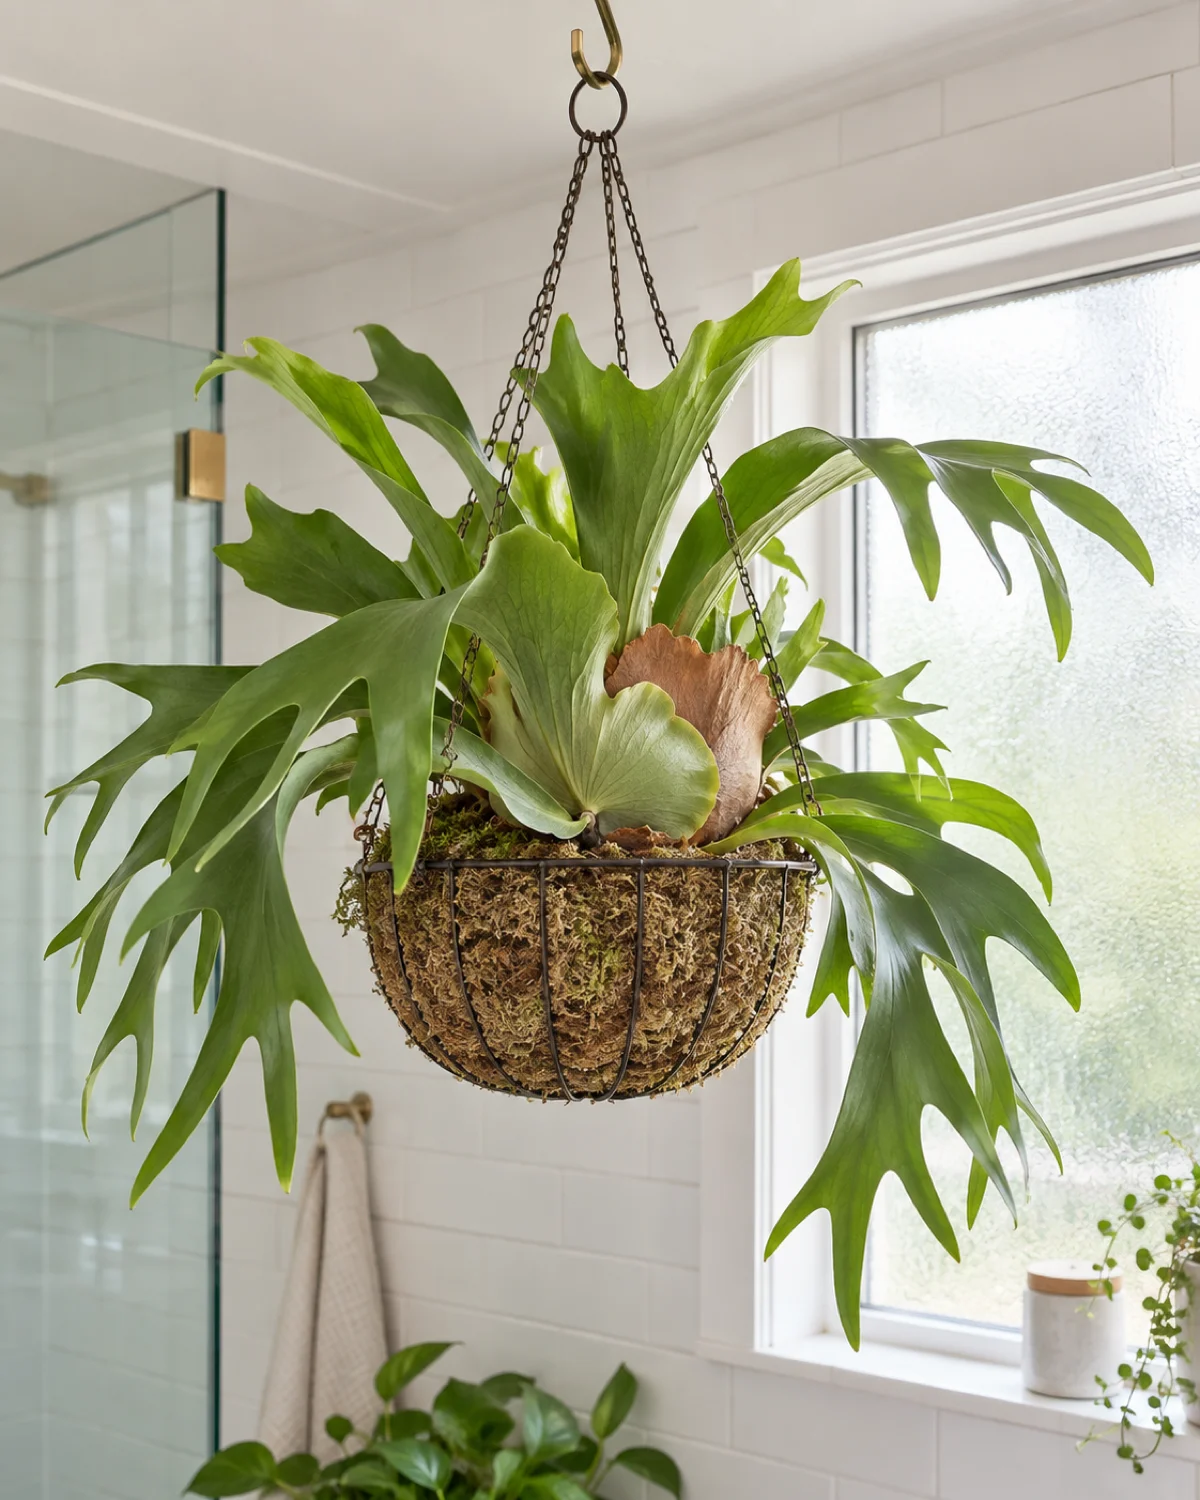
Not every situation calls for a board mount. A wire hanging basket lined with sphagnum moss is an excellent alternative, especially for young plants, renters who cannot drill into walls, or specimens that have grown too heavy for a comfortable board size.
The basket approach gives the roots more sphagnum volume to grow into, which means less frequent soaking than a thin board mount. It also allows air circulation from all sides, reducing the risk of rot at the back of the root ball — a common problem with board mounts hung flat against a wall.
- Use an open wire basket (not a solid plastic pot) — air circulation around the roots is critical for an epiphyte
- Line the basket with a thick layer of sphagnum moss, at least two inches on all sides
- Nestle the fern into the center so the shield fronds wrap around the moss
- Hang from a ceiling hook rated for the wet weight — check the rating, not the dry weight
Both methods grow healthy staghorns. The best choice depends on your wall situation, the plant's size, and how often you want to water.
The Soaking Technique — How to Water a Mounted Staghorn
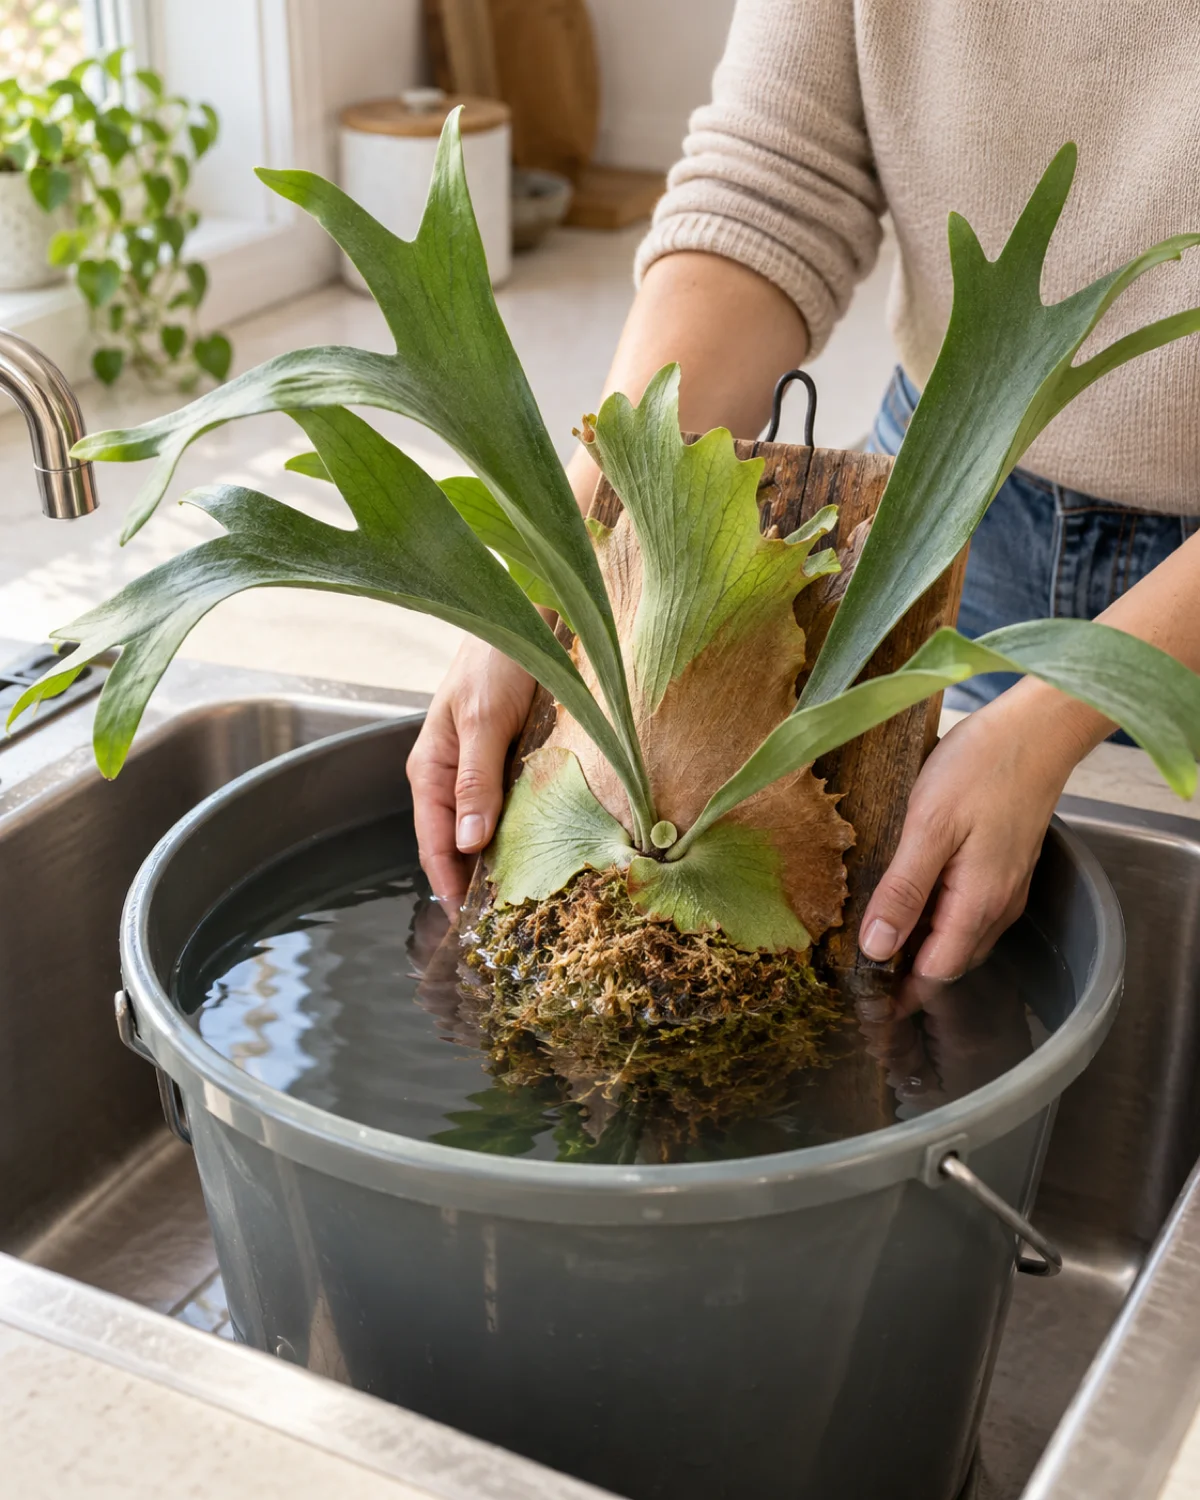
Watering a staghorn fern is nothing like watering a potted plant. You do not pour water over it. You soak the entire root ball by submerging it in a container of room-temperature water.
Remove the mount from the wall. Lower it root-ball-down into a bucket, basin, or sink filled with enough water to cover the sphagnum moss. Leave it submerged for fifteen to twenty minutes. The moss absorbs water like a sponge — you will see air bubbles rising from the root ball during the first few minutes as water replaces air in the moss fibers.
After soaking, lift the mount out and hold it over the sink until it stops dripping — usually five to ten minutes. Rehang it only when the dripping has stopped, or the wall behind the mount stays wet and develops mold over time.
- Summer frequency: soak once every five to seven days — more often in hot, dry rooms
- Winter frequency: soak once every ten to fourteen days — growth slows and the moss stays damp longer
- How to tell it needs water: the sphagnum moss feels dry and lightweight when you lift the mount; the antler fronds start to droop and feel slightly limp
- What to avoid: misting the fronds instead of soaking (delivers almost no water to the roots), using cold water (shocks the root system), leaving the mount submerged overnight (suffocates roots)
The soak-and-dry cycle mimics tropical rain followed by periods of air exposure, which is exactly what an epiphytic fern experiences in the wild.
Light Requirements — Bright Indirect with an East-Window Sweet Spot
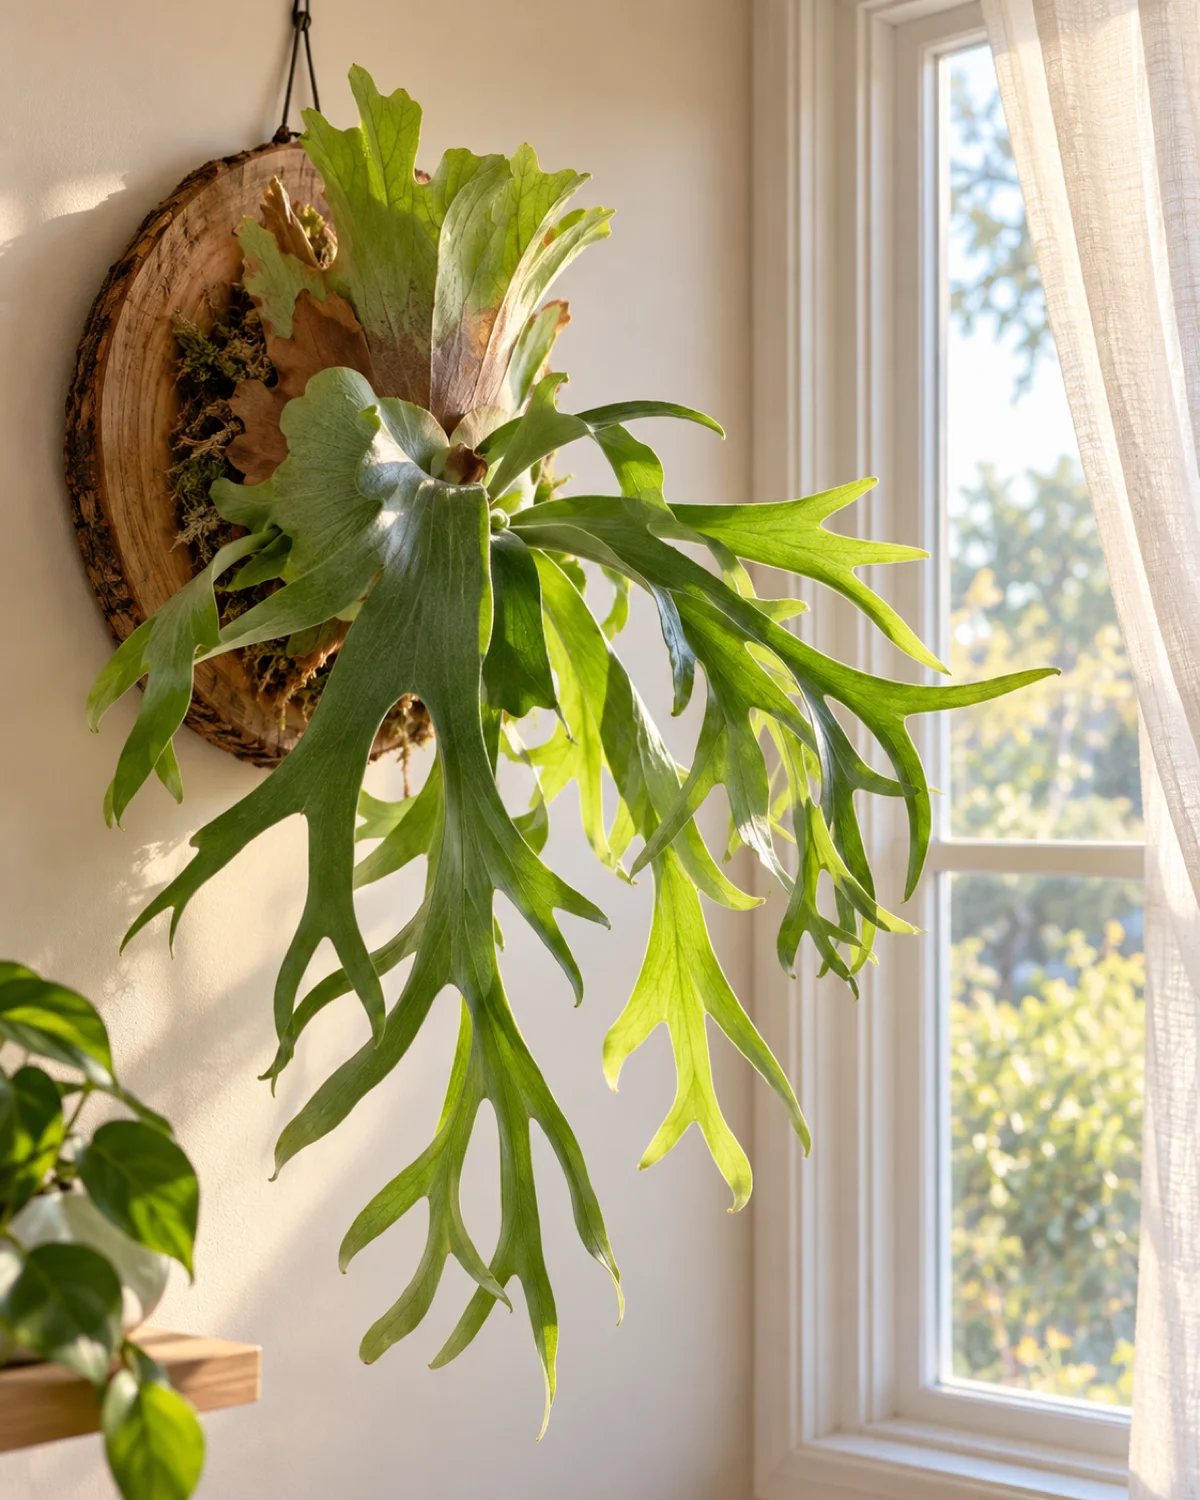
In the forest canopy, a staghorn fern receives dappled light filtered through the leaves above. Indoors, the closest equivalent is bright indirect light — the kind you get near an east-facing window or a few feet back from a south-facing window with a sheer curtain.
Direct afternoon sun is too intense. It burns the tips of the antler fronds, turning them brown and papery in a way that looks nothing like the natural browning of shield fronds. Burned antler tips are permanently damaged and will not recover — the plant must grow new fronds to replace them.
Too little light produces its own set of problems. The antler fronds grow long and limp instead of forked and upright, reaching desperately toward whatever light source is available. Growth slows to nearly nothing, and the plant stops producing new shield fronds entirely.
- Ideal placement: east-facing window (morning sun is gentle enough for direct exposure) or two to four feet from a south-facing window with a sheer curtain
- Acceptable: north-facing window with good ambient light, west-facing window with afternoon shade from a curtain
- Signs of too much light: burned brown tips on antler fronds, bleached or yellowish color
- Signs of too little light: limp, droopy antler fronds, no new growth, elongated weak fronds
Humidity and Air Circulation — The Epiphyte Balancing Act
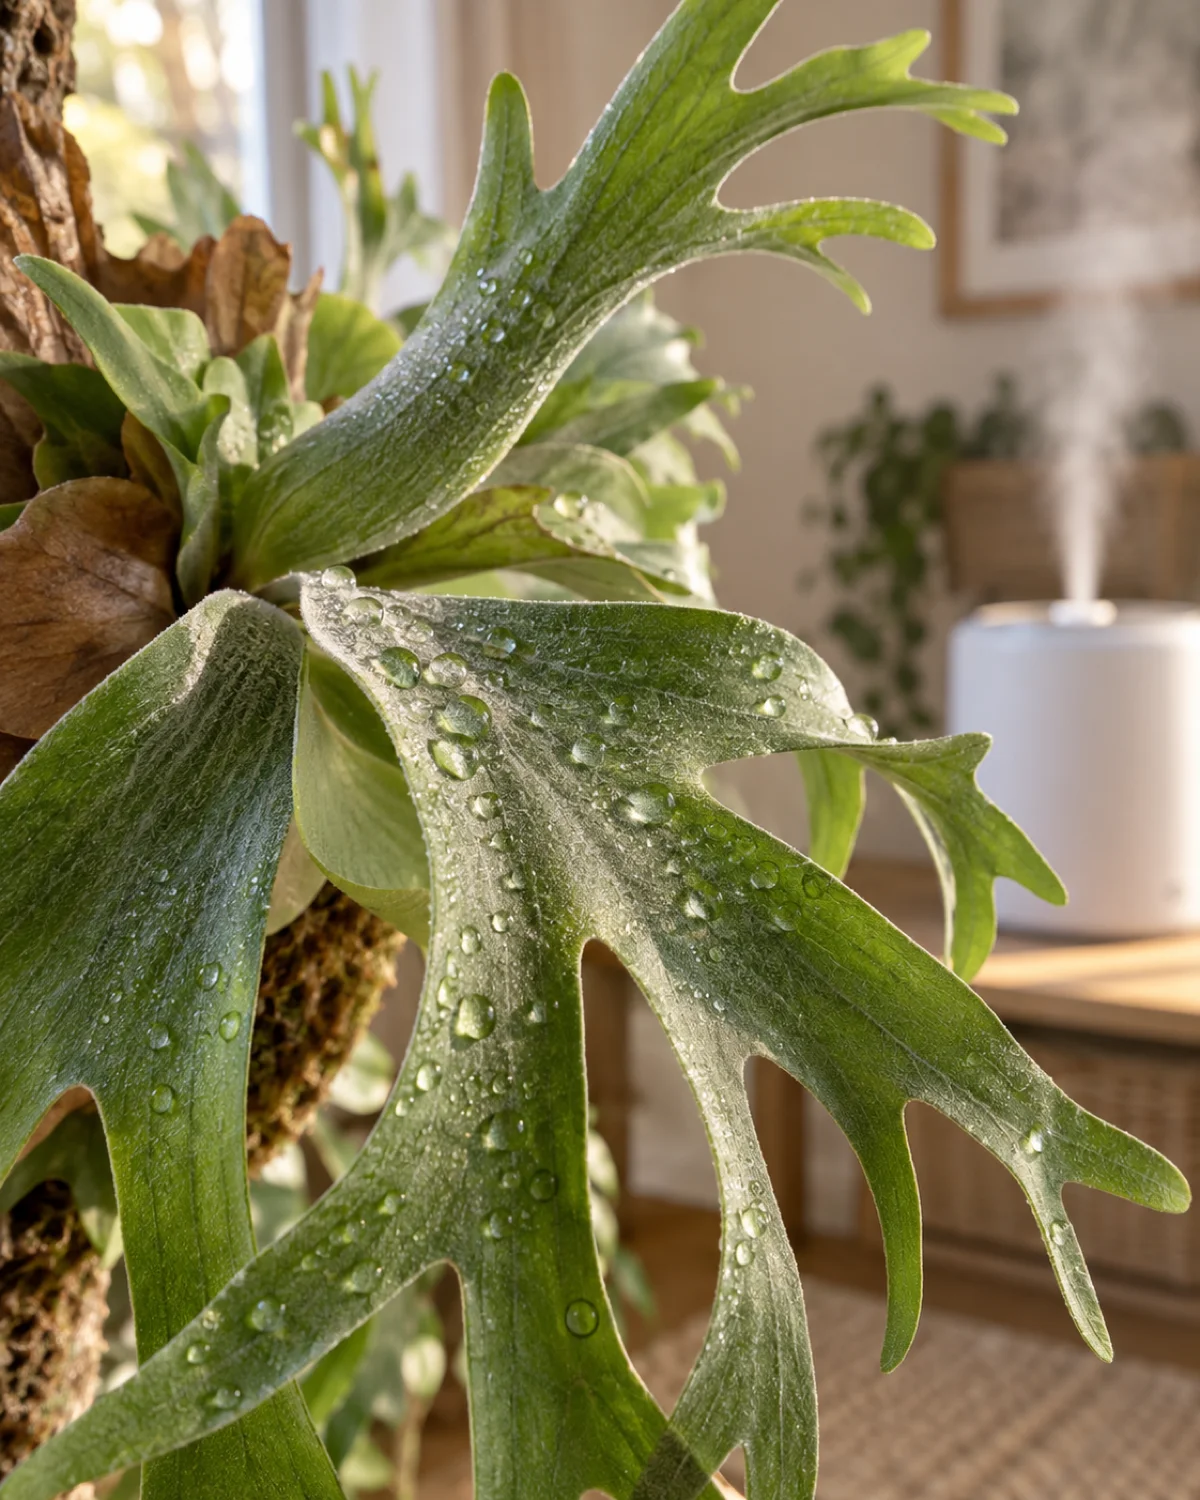
Staghorn ferns want humidity between 50 and 70 percent. Below 40 percent, the frond tips dry out and turn crispy. The challenge is delivering that humidity without creating the stagnant wet conditions that cause rot.
A humidifier placed near the plant — not pointed directly at it — is the most reliable approach. It raises the ambient humidity in the area without wetting the frond surfaces. A pebble tray filled with water placed below a hanging basket achieves the same effect on a smaller scale.
Misting is the most common humidity advice for staghorn ferns, and it is the advice most likely to cause problems. Misting wets the shield fronds and the crevices between them, creating standing moisture in a zone with poor air circulation. Fungal infections start here.
- Target humidity: 50–70% measured with a hygrometer, not guessed
- Best method: humidifier set two to three feet from the plant, or a bathroom with natural light where showers raise ambient humidity daily
- Acceptable method: pebble tray beneath the plant — water evaporates upward, raising humidity without wetting fronds
- Avoid: direct misting of shield fronds, placing the plant in a closed terrarium (no air circulation), hanging near a kitchen range (heat plus grease)
Air circulation is the other half of the equation. Good airflow prevents fungal issues even when humidity is high. A gentle fan in the room, an open window in mild weather, or simply placing the plant where air moves naturally through the room is enough.
Temperature Range and the Cold Draft Kill Zone

Staghorn ferns are tropical plants that want consistent warmth. The comfortable range is 60 to 80 degrees Fahrenheit, with an ideal sweet spot around 70 to 75 degrees — essentially normal room temperature in most homes.
Cold is the enemy. Temperatures below 50 degrees Fahrenheit cause visible damage within hours — the frond tips blacken and the tissue softens.
- Comfortable range: 60–80°F (16–27°C)
- Ideal: 70–75°F (21–24°C)
- Danger zone: below 50°F (10°C) — frond tips blacken, tissue damage within hours
- Common cold sources indoors: air conditioning vents, single-pane windows in winter, exterior doorways, unheated rooms
If the cold exposure lasts more than a night, the damage can kill the entire plant. Keep staghorns away from single-pane windows in winter, exterior doors that open to cold air, and air conditioning vents that blow cold streams directly onto the fronds. Heat above 90 degrees Fahrenheit is tolerable if humidity stays high, but dry heat above 85 degrees accelerates moisture loss from the moss mount.
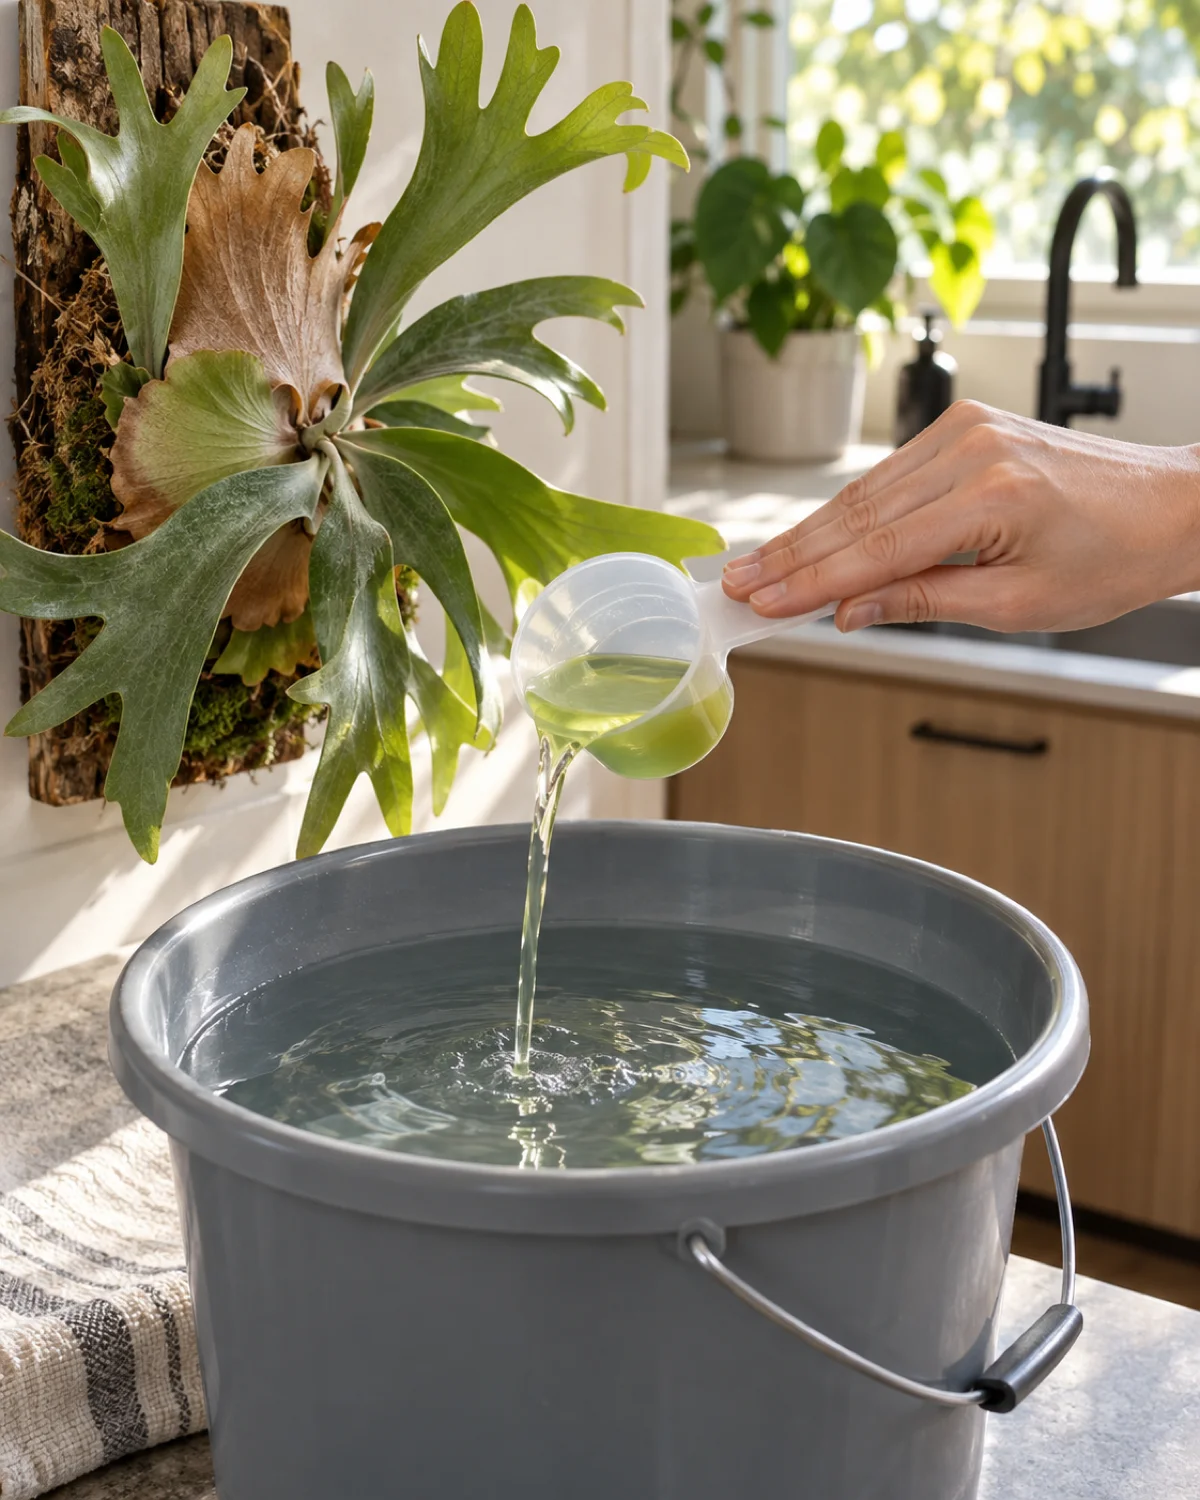
A staghorn fern has no soil to hold nutrients. In the wild, it feeds on decomposing leaf litter that accumulates behind the shield fronds and on minerals dissolved in rainwater. Indoors, you replicate this by dissolving a diluted liquid fertilizer directly into the soak water.
Use a balanced formula — 20-20-20 or 10-10-10 — diluted to one-quarter of the label strength. Add it to the soak bucket once a month during the growing season, which runs from spring through early fall.
- Formula: balanced liquid fertilizer (20-20-20 or 10-10-10) at one-quarter strength
- Frequency: once a month, spring through early fall
- Method: dissolve in the soak water — the roots absorb nutrients during the soak
- Winter: stop feeding entirely — growth slows or stops, and unused nutrients build up as salt deposits on the moss
There is a popular claim that placing banana peels behind the shield fronds feeds the plant potassium. In practice, banana peels decompose slowly, attract fruit flies, and deliver negligible nutrients compared to a proper liquid feed. Skip them.
Propagating Staghorn Ferns by Dividing Pups
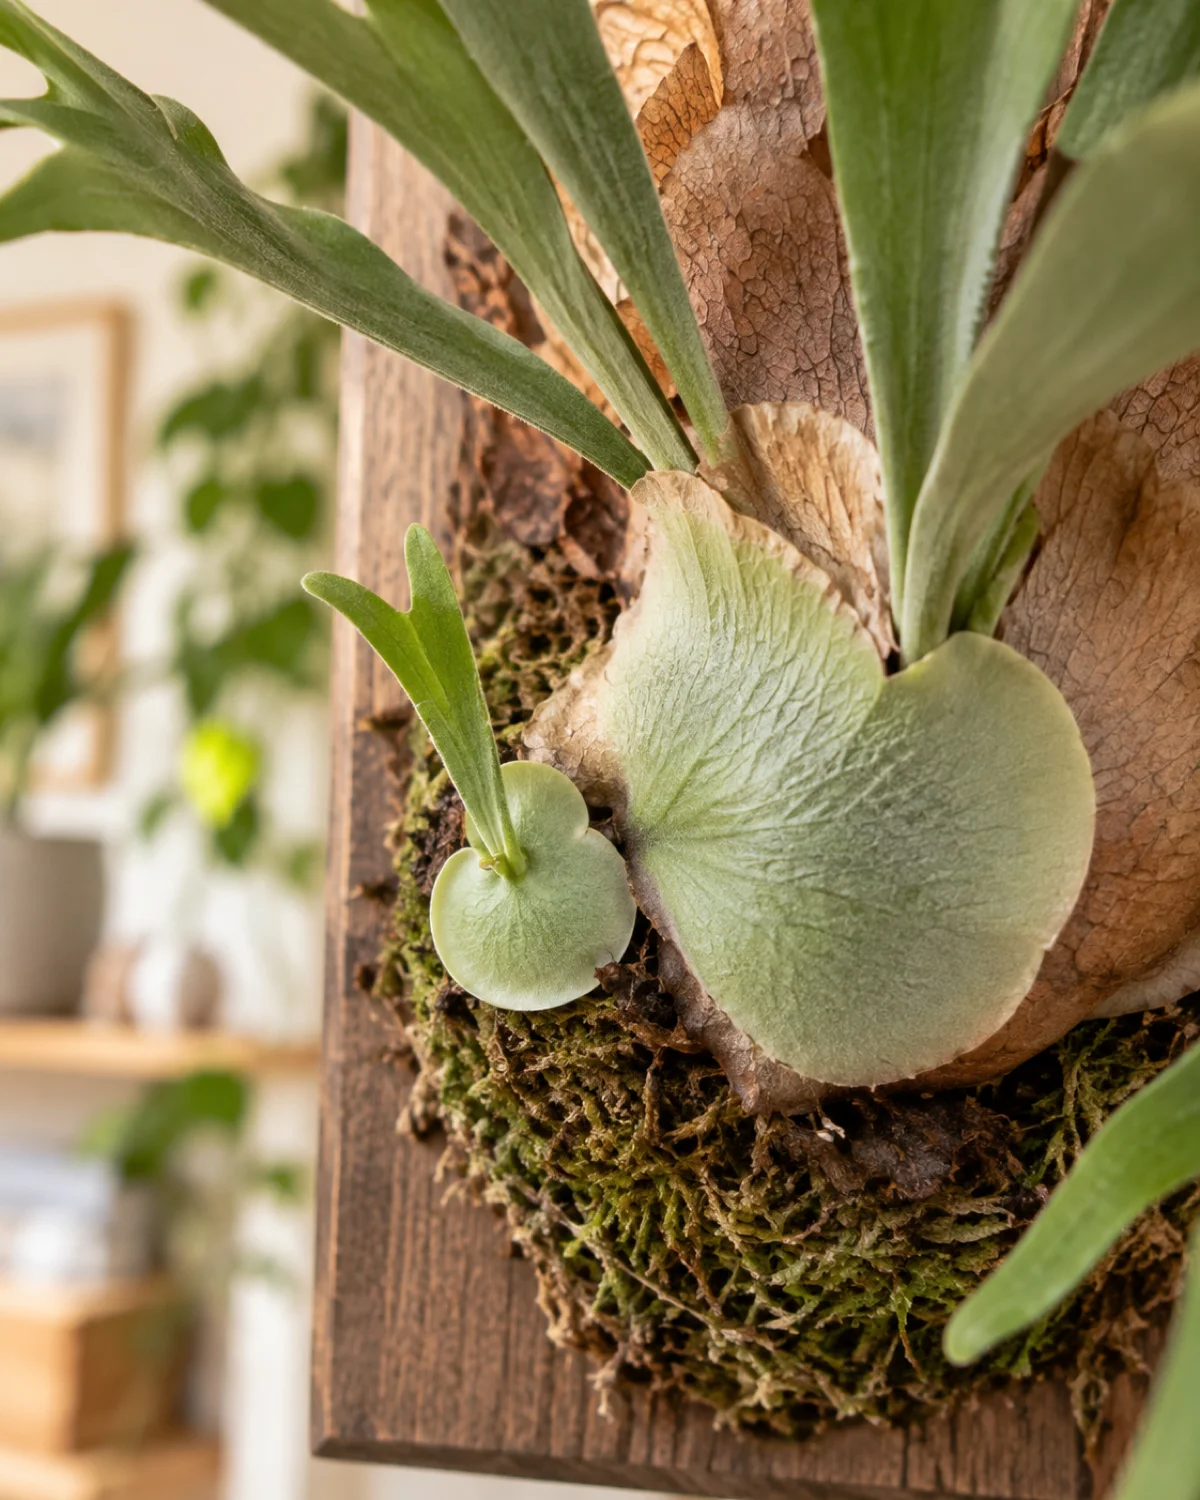
The most reliable way to propagate a staghorn fern is by dividing pups — small offsets that grow at the base of the parent plant. A mature staghorn produces pups naturally, and each pup eventually grows its own shield frond and antler fronds, becoming a genetically identical clone of the parent.
Wait until the pup has developed its own shield frond at least four inches across before separating it. A smaller pup lacks enough stored moisture and root tissue to survive on its own.
- When to divide: when the pup's shield frond is at least four inches in diameter
- How to remove: use a clean, sharp knife sterilized with rubbing alcohol — cut through the connection to the parent plant, keeping as much root tissue attached to the pup as possible
- After separation: mount the pup immediately on a small board or in a basket with fresh, pre-soaked sphagnum moss
- Initial care: keep the pup in a shaded spot with higher humidity for two to three weeks while roots establish — soak lightly every three to four days
- Success rate: very high — pups already have functioning roots and shield fronds, making this far more reliable than spore propagation
A parent plant that produces multiple pups in a cluster can look spectacular if you leave them attached. But eventually the cluster outgrows the mount, and dividing becomes necessary to prevent the whole mass from falling off the board.
Spore Propagation — The Slow but Fascinating Method
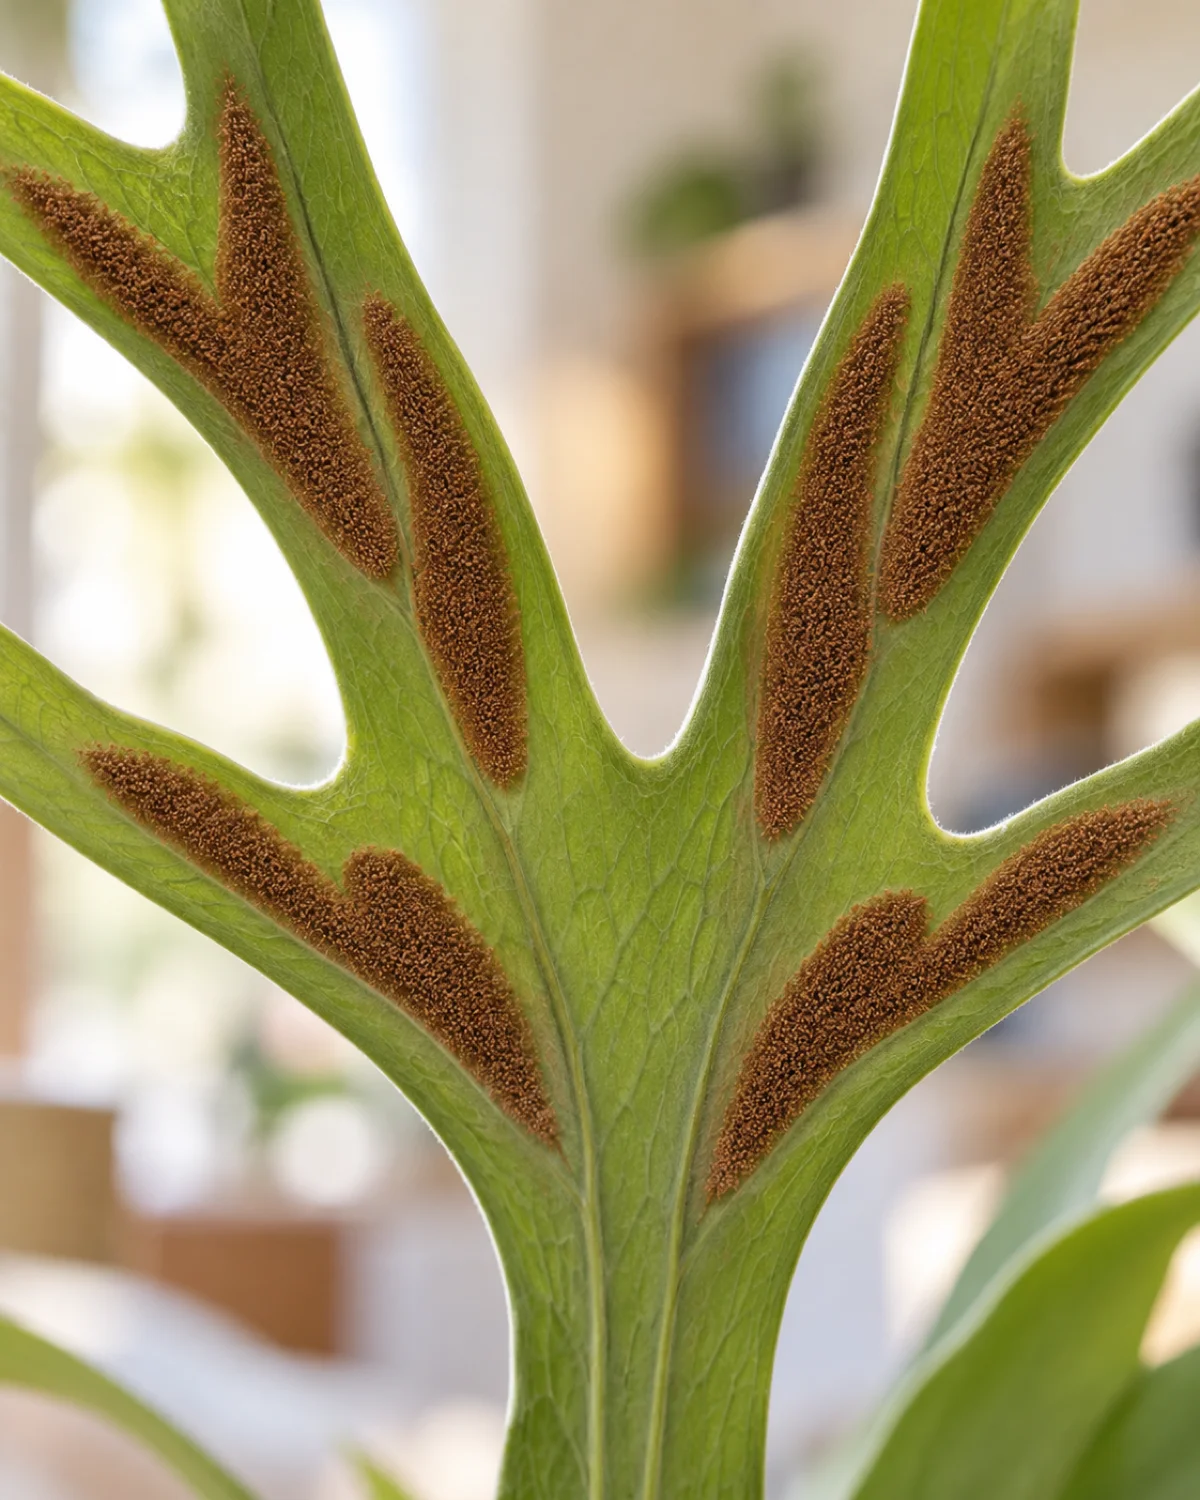
The brown fuzzy patches on the undersides of the antler fronds are not disease. They are sporangia — reproductive structures that produce millions of microscopic spores. This is how ferns reproduce in the wild, and you can do it at home, though the process takes patience measured in months rather than weeks.
To collect spores, cut a mature antler frond that has fully developed brown sporangia patches. Place it spore-side-down on a sheet of white paper in a dry room for a day or two. The spores — so fine they look like brown dust — fall onto the paper.
- Collecting: place a mature antler frond spore-side-down on paper for one to two days
- Sowing: sprinkle the spore dust onto the surface of moist peat or sphagnum in a shallow tray — do not cover the spores with soil
- Environment: cover the tray with clear plastic wrap to hold humidity near 100 percent, place in bright indirect light at 70–75°F
- Timeline: three to six months from sowing to visible green growth (a tiny heart-shaped structure called a prothallus appears first)
- Transplanting: once true fronds appear (they look like tiny versions of the adult plant), carefully transplant each plantlet into its own small pot or moss ball
Spore propagation is a project for the curious, not a practical method of getting more plants. One pup division in ten minutes produces a new plant faster than six months of spore cultivation. But if you have ever wanted to watch the entire fern life cycle happen on your kitchen counter, it is worth the wait.
Brown Shield Fronds Are Not Dead — Stop Removing Them
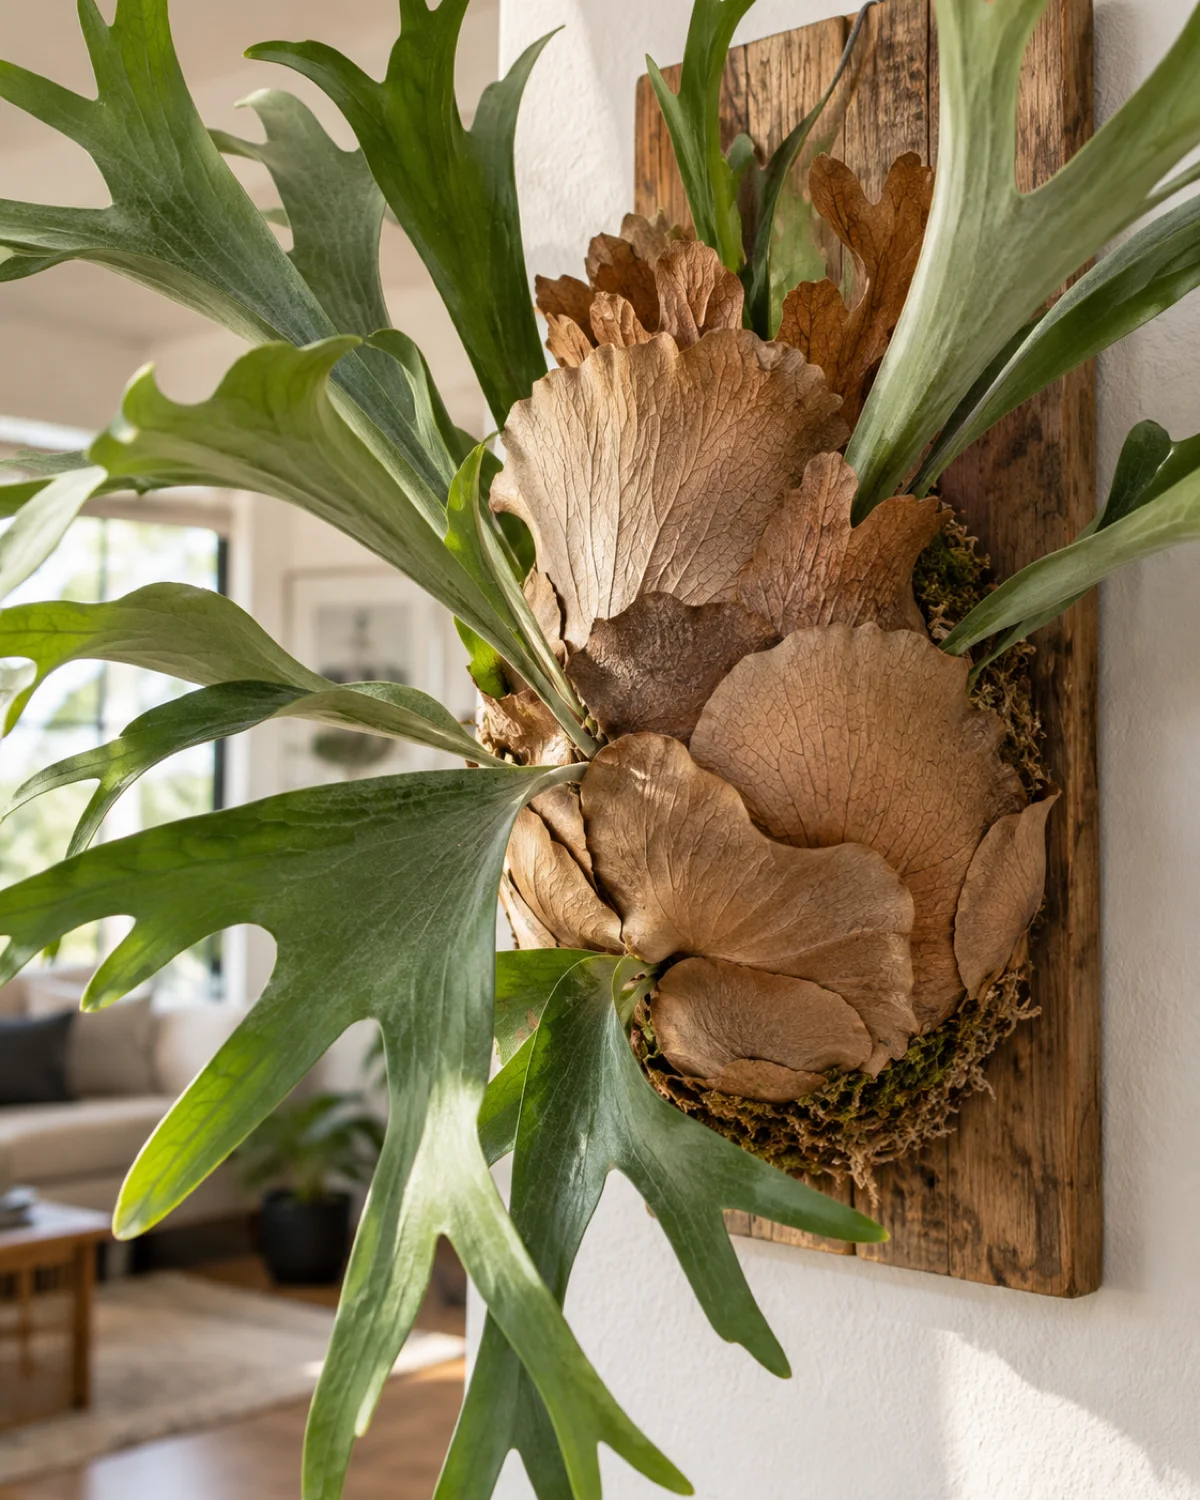
This is the single most common staghorn fern care mistake, and it is made with the best intentions. The shield fronds turn brown and papery, the owner assumes they are dead leaves, and they peel them off to make the plant look tidier.
Every brown shield frond you remove is a loss. Those dried fronds form a moisture-retaining, nutrient-storing, root-protecting shell around the base of the plant. They trap humidity against the root ball, slow evaporation from the sphagnum moss, and slowly decompose to release organic nutrients — the epiphyte equivalent of mulch.
- Why they turn brown: shield fronds are short-lived by design — they grow green, flatten against the mount, and then die back as new shield fronds grow over them, building up in layers over years
- What they do when brown: insulate roots from temperature swings, slow moisture loss, decompose slowly to release nutrients, physically protect the root ball
- What happens if you remove them: exposed roots dehydrate faster, the moss mount dries out between soaks more quickly, and the plant loses its nutrient reservoir
A healthy, well-established staghorn fern may have ten or more layers of brown shield fronds behind the current green ones. This is what a thriving specimen looks like — not a neglected one.
Common Pests — Scale, Mealybugs, and the Hidden Underside Problem
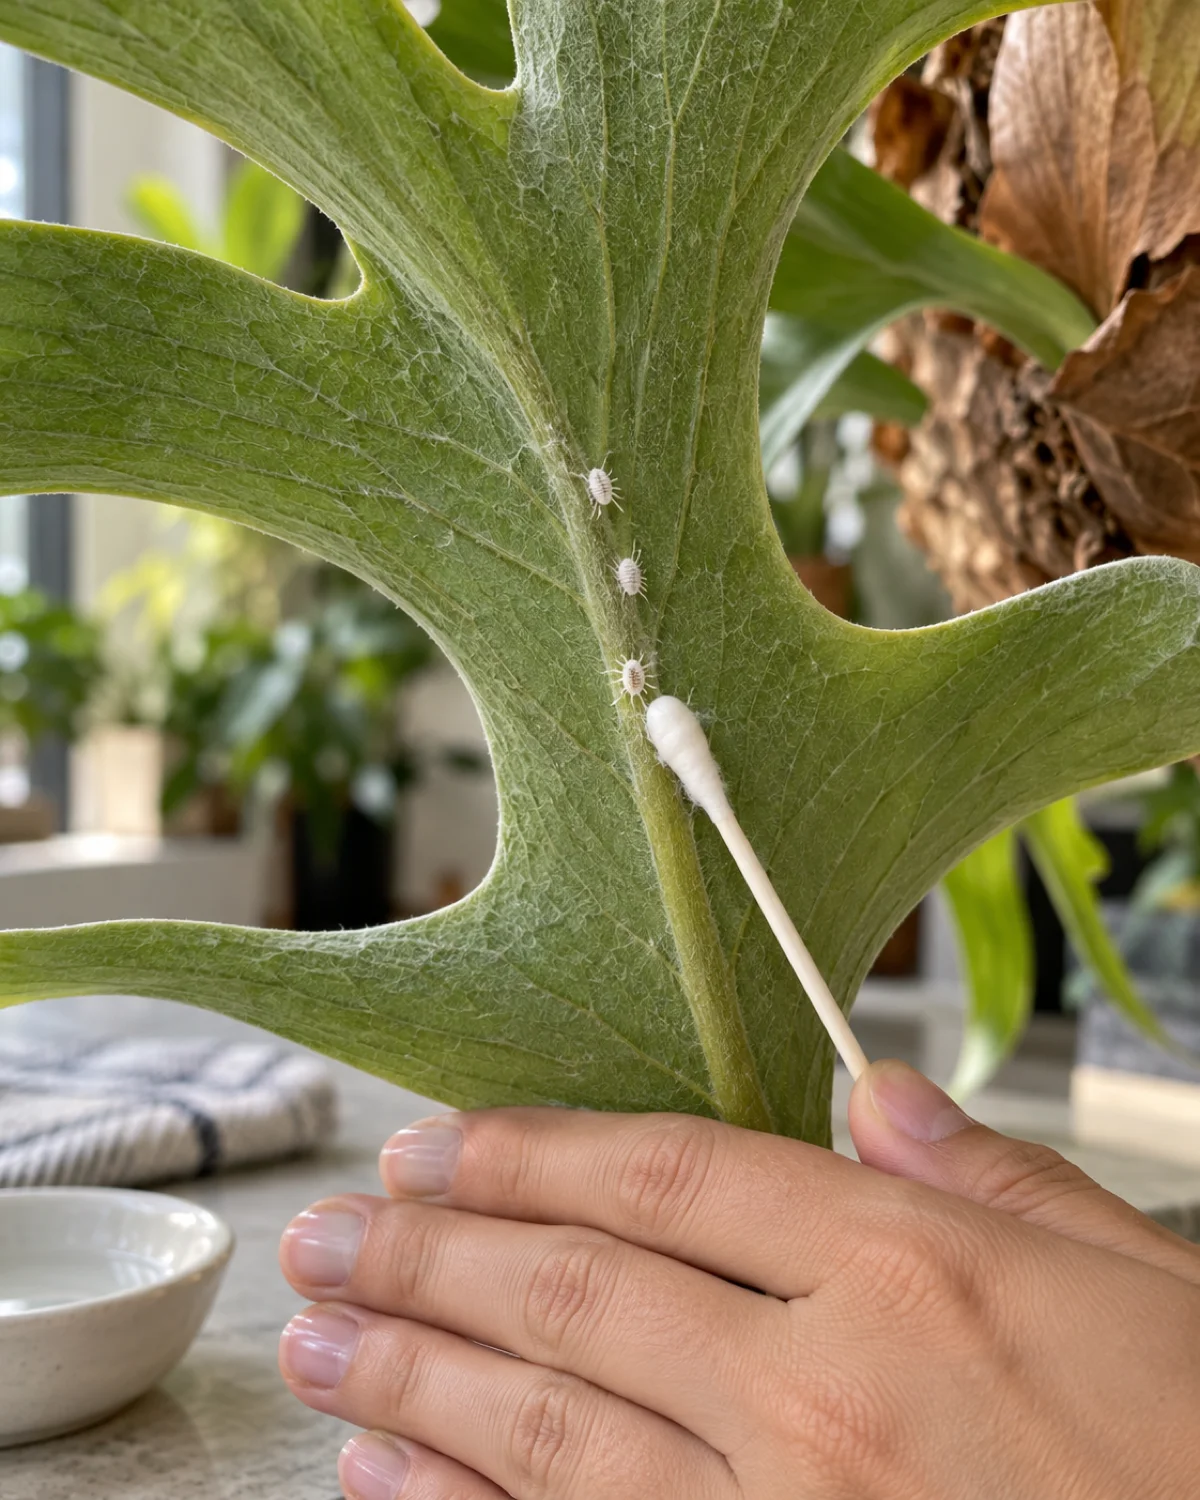
Staghorn ferns attract the same pests as other indoor plants — scale, mealybugs, and occasionally spider mites — but the layered structure of the shield fronds creates hiding spots that make infestations harder to detect early.
Scale insects appear as small brown bumps on the antler fronds, often clustered along the midrib or near the base where the frond meets the root ball. They are easy to confuse with sporangia at first glance, but sporangia are soft, fuzzy, and symmetrically placed, while scale is hard, slightly raised, and randomly scattered.
Mealybugs show up as white cottony masses in the crevices between shield frond layers and at the base of new growth. They are almost invisible until the colony grows large enough to produce visible white residue.
- Detection: inspect during every soak — gently lift shield frond edges and check frond undersides under good light
- Manual removal: dab individual pests with a cotton swab soaked in rubbing alcohol — this kills on contact
- Neem oil: spray diluted neem oil on antler fronds only — avoid soaking the shield fronds with oil, which can trap moisture and cause rot
- Systemic granules: do not use — there is no soil to hold them, and they cannot dissolve into a sphagnum mount effectively
- Prevention: quarantine new plants for two weeks before placing near your staghorn, and maintain good air circulation
Black Spots, Soft Bases, and Rot — When the Mount Stays Too Wet
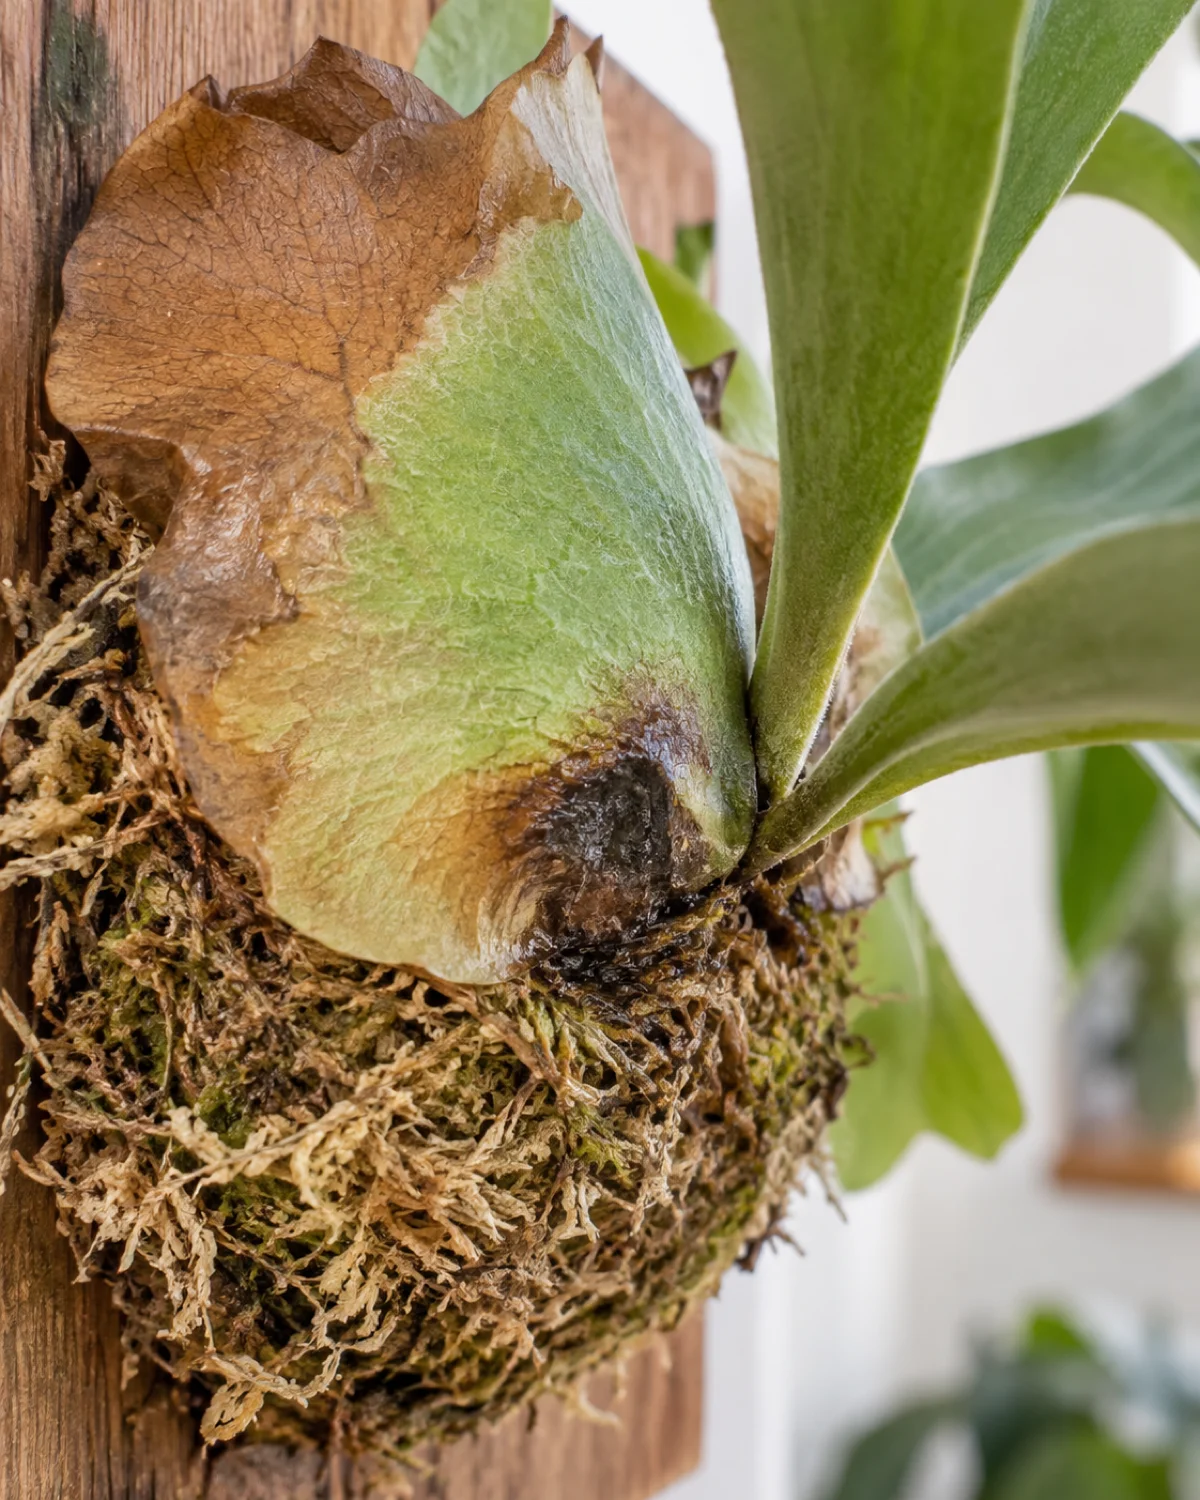
Rot is the most common killer of indoor staghorn ferns, and it almost always starts where the shield fronds meet the sphagnum moss — the wettest, darkest, most poorly ventilated zone on the entire plant.
The first sign is a blackened area at the base of the shield fronds. The tissue feels mushy when you press it gently. As the fungal infection spreads, the black area grows outward, the shield fronds separate from the root ball, and the plant eventually falls off the mount.
- Root cause: the sphagnum moss stays wet too long between soaks, either from soaking too frequently, not allowing the mount to drip-dry completely before rehanging, or poor air circulation behind the mount
- Early detection: press the base of the shield fronds during each soak — if any spot feels soft and smells musty, investigate immediately
- Rescue procedure: use a sterilized knife to cut away all blackened, mushy tissue until you reach firm, healthy tissue — dust the cuts with cinnamon (a natural antifungal) — remount on a fresh bed of dry sphagnum moss — let the plant dry for 24 hours before the first soak
- Prevention: always drip-dry completely before rehanging, hang the mount with a one-inch gap between the board and the wall for airflow, and reduce soaking frequency if the moss still feels damp when the next soak is due
A wall-mounted staghorn that hangs flat against a painted wall with no air gap behind it is a rot risk. Use spacer washers on the hanging bracket to create at least one inch of clearance.
Why Your Staghorn Fern Isn't Growing New Antler Fronds
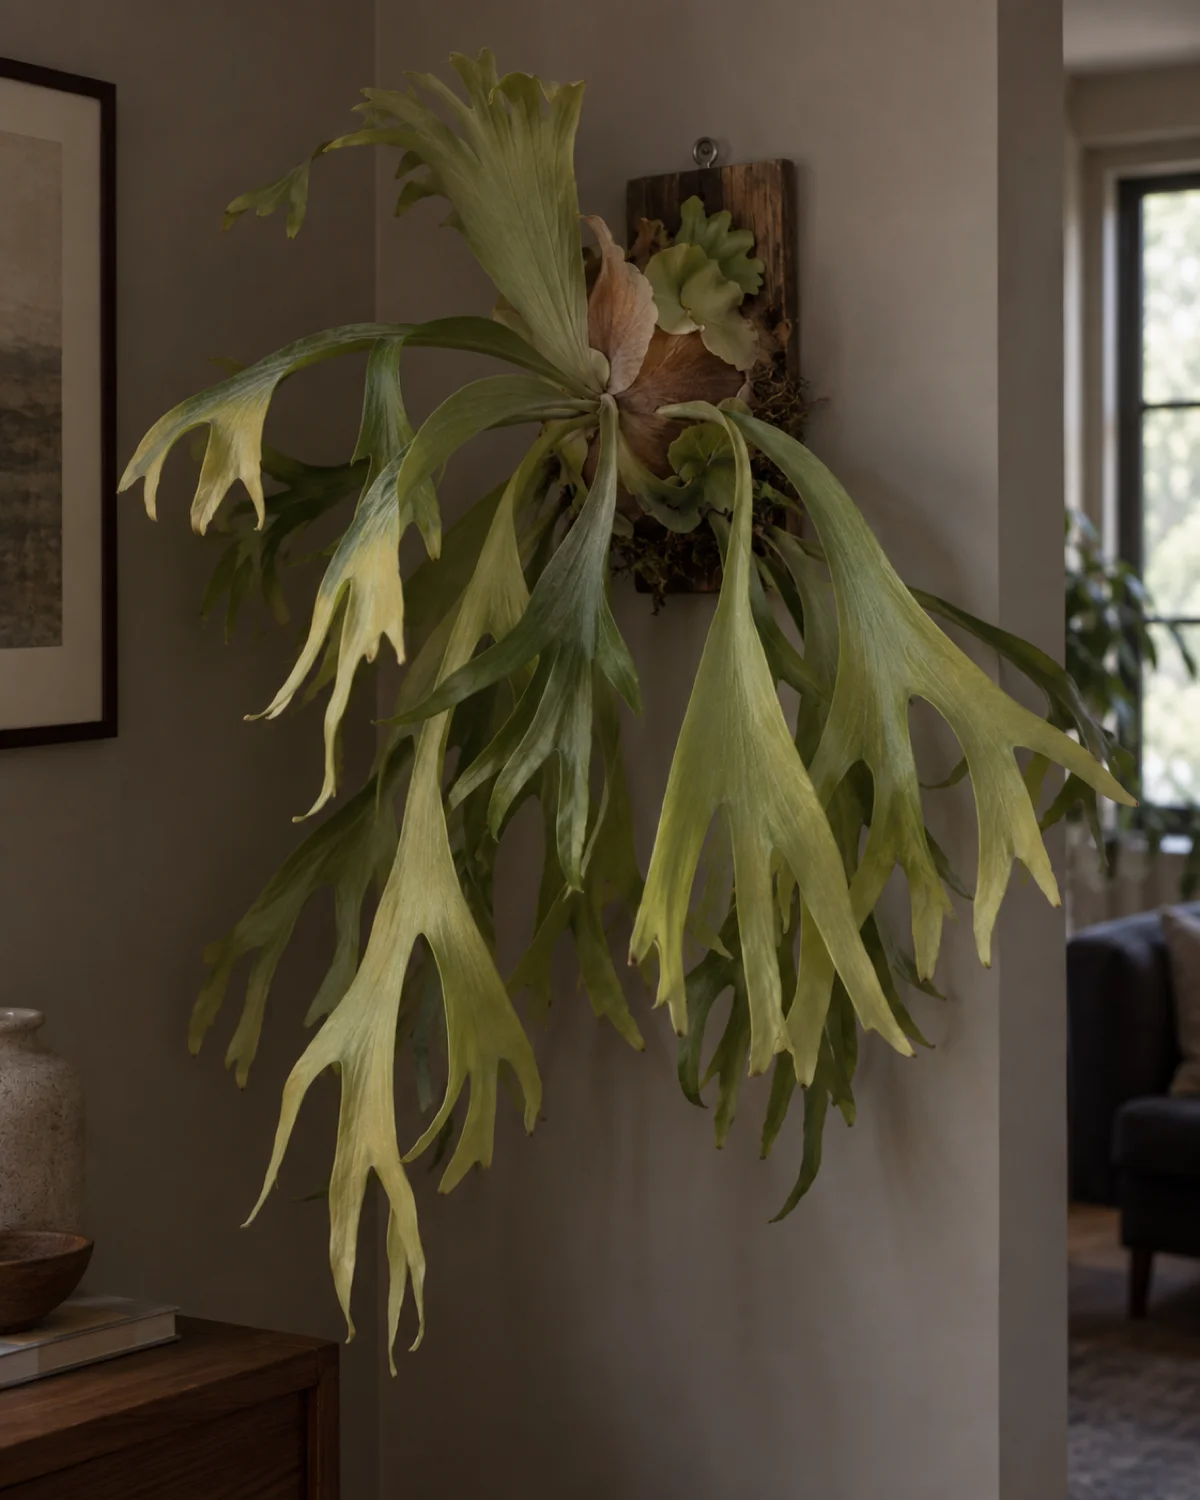
A staghorn fern that stops producing new fronds is not dying — it is telling you that one or more growing conditions need adjustment. The fix depends on which condition is limiting growth.
Insufficient light is the most common cause. A staghorn fern in a dim corner may survive for months without visible decline, but it will not actively grow. Moving it to brighter indirect light usually triggers new frond production within two to four weeks.
The second most common cause is a mount that the plant has outgrown. When the root ball fills every available space in the sphagnum moss, there is no room for new roots to establish, and the existing roots cannot absorb enough water and nutrients to fuel growth. The solution is remounting on a larger board with a fresh, deeper bed of sphagnum.
- Check light first: is the plant getting bright indirect light for at least six hours a day? If not, relocate
- Check the mount: has the root ball grown past the edges of the sphagnum mound? If the roots are exposed and wrapping around the board, it is time to remount
- Check the soak schedule: is the moss drying out completely between soaks in summer? An underwatered staghorn may conserve energy by halting frond production
- Seasonal dormancy: staghorns slow or stop growth in winter when light and temperature drop — this is normal and not a problem to solve
15 Staghorn Fern Care Essentials to Keep Your Mounted Fern Thriving
- 1Staghorn ferns are epiphytes that grow on trees, not in soilMount on a board or wire basket with sphagnum moss — standard potting mix suffocates the roots.
- 2Two frond types: shield fronds protect, antler fronds photosynthesizeShield fronds turn brown naturally. Antler fronds are the forked green ones that carry spores.
- 3Mount on cedar or redwood with sphagnum moss and fishing lineCriss-cross line over shield fronds, hang with a bracket rated for wet weight.
- 4Wire hanging baskets work for young plants and rentersMore moss volume means less frequent soaking. Needs a ceiling hook rated for wet weight.
- 5Soak the root ball in a bucket for 15–20 minutes to waterWeekly in summer, every 10–14 days in winter. Drip dry before rehanging.
- 6Bright indirect light — east window is the sweet spotDirect afternoon sun burns antler tips. Too little light causes limp, droopy fronds.
- 7Humidity 50–70% from a humidifier, not from misting frondsMisting wets shield fronds and causes rot. A nearby humidifier raises ambient moisture safely.
- 8Keep 60–80°F, avoid cold drafts, and feed monthly in the soak waterBelow 50°F blackens frond tips. Add ¼-strength balanced fertilizer to soak water spring through fall only.
- 9Propagate by dividing pups once they have a 4-inch shield frondCut with a sterilized blade, mount on fresh sphagnum immediately.
- 10Brown sporangia on antler fronds are spore factories, not diseaseSpores can be collected and sown, but pup division is far faster and more reliable.
- 11Never remove brown shield fronds — they insulate and feed the rootsPeeling them off is the number one care mistake. Leave every layer in place.
- 12Check behind shield fronds for scale and mealybugs during every soakDab pests with alcohol swabs. No systemic granules — there is no soil to hold them.
- 13Black mushy base means rot — cut away damaged tissue and remount on dry mossCaused by staying too wet too long. Ensure airflow gap behind the board.
- 14Stalled growth usually means insufficient light or an outgrown mountMove to brighter indirect light or remount on a larger board with fresh sphagnum.
- 15Beyond bifurcatum: superbum, ridleyi, elephantotis, and hilliiEach species has a different size, shape, and difficulty level for collectors.
kultivy.com
Staghorn Fern Varieties Worth Collecting Beyond Bifurcatum
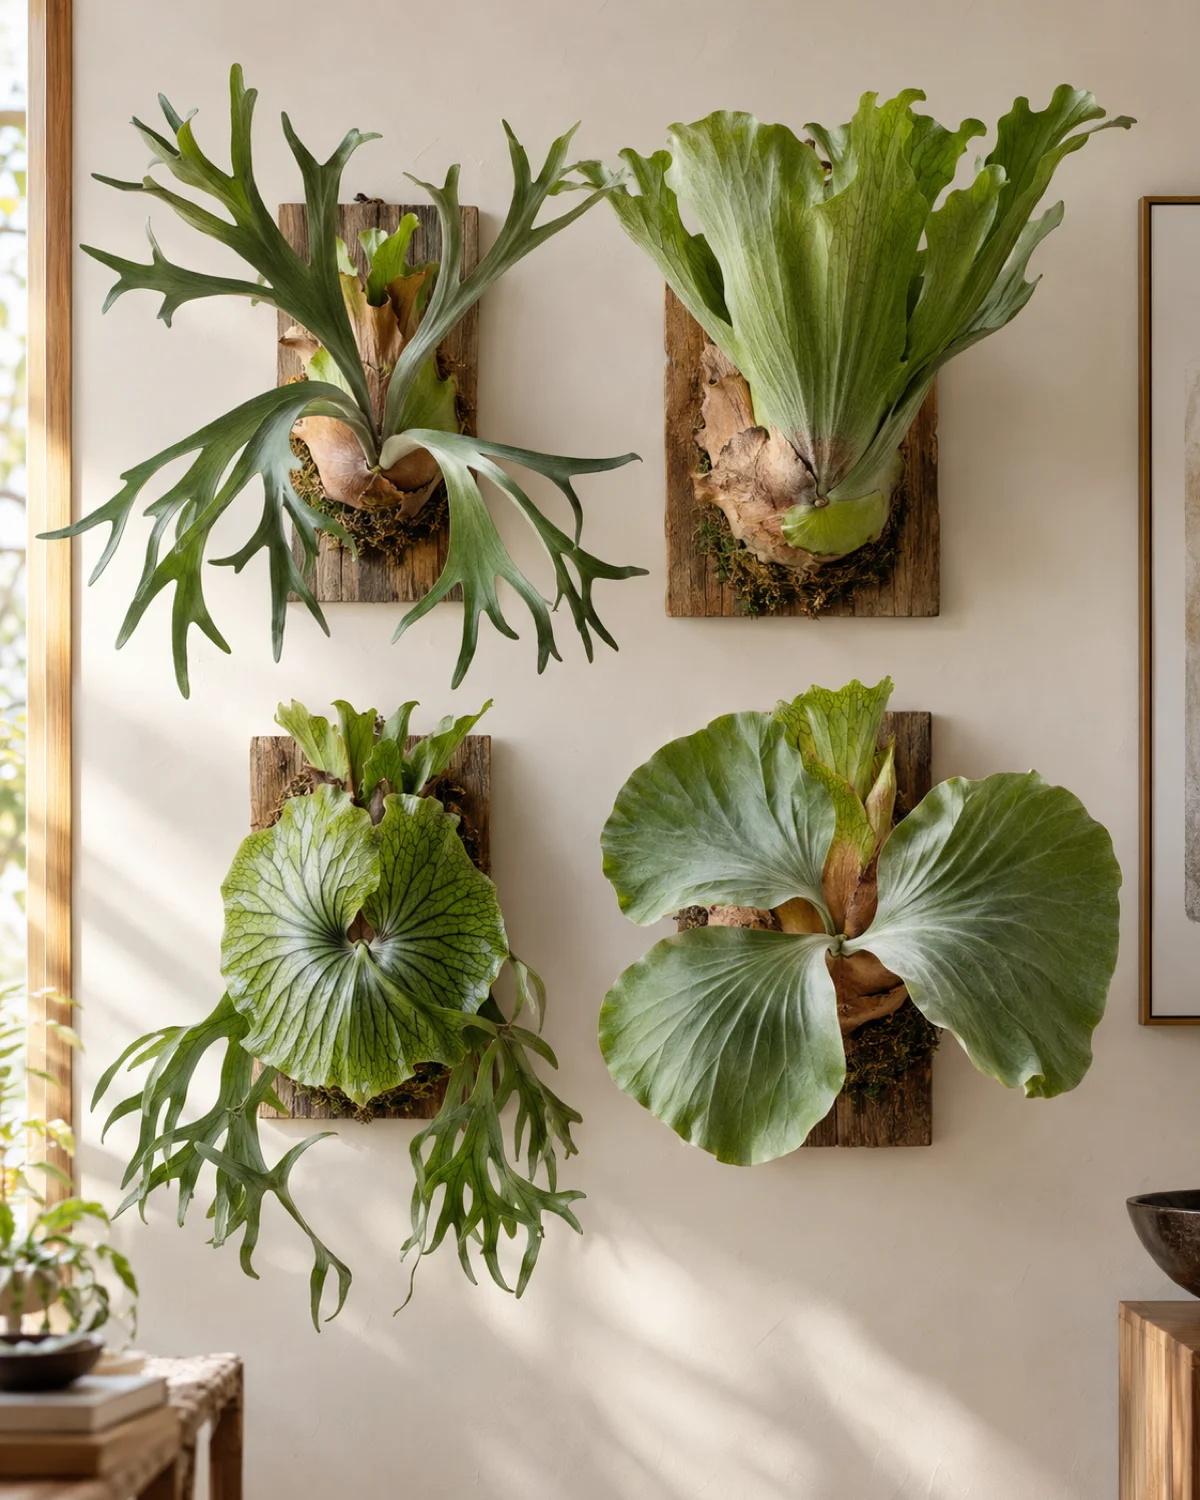
Platycerium bifurcatum is the species most commonly sold in garden centers and plant shops, and for good reason — it is the hardiest, the most forgiving, and the easiest to find. But there are eighteen recognized species in the genus, and several others are worth seeking out once you have experience with the common one.
Platycerium superbum (giant staghorn or elkhorn) is the most dramatic. Its antler fronds grow upright rather than drooping, and a mature specimen can span four feet across. It is also one of the few species that rarely produces pups, making propagation by spores the primary method.
- P. superbum (giant elkhorn): massive upright antler fronds, rarely produces pups, needs a very large mount or tree
- P. ridleyi: heavily veined shield fronds that form a distinctive ribbed pattern, considered one of the most beautiful species, requires higher humidity and more consistent conditions than bifurcatum
- P. elephantotis: broad, rounded antler fronds with no forking — the fronds look like elephant ears rather than antlers, easier to care for than ridleyi
- P. hillii: similar to bifurcatum but with wider, less deeply forked antler fronds, slightly more compact growth habit, equally easy to care for
Start with bifurcatum. Master the soak-and-dry cycle, the light requirements, and the hands-off approach to shield fronds. Then graduate to one of the rarer species if you want a challenge — and if you can find one. Ridleyi and superbum command premium prices from specialty growers precisely because they are slower growing and harder to propagate.
FAQ
Is staghorn fern toxic to cats and dogs?
No. Platycerium bifurcatum is not listed as toxic by the ASPCA. The fronds contain no known irritants or poisonous compounds.
- Safe for cats, dogs, and humans
- A cat batting at dangling antler fronds can damage the plant even if the plant cannot harm the cat
- Mount high enough to keep fronds out of reach of playful pets
How big do staghorn ferns get indoors?
A well-cared-for Platycerium bifurcatum can reach two to three feet across indoors over five to ten years. The antler fronds grow up to three feet long.
- Limiting factor: mount size — a plant that outgrows its board stops expanding until remounted
- Wild specimens: can reach enormous sizes over decades, but indoor plants rarely hit those proportions
Can I grow a staghorn fern in soil?
Technically yes, but it is not ideal. The roots need constant air access and will rot in standard potting soil.
- Use an extremely chunky mix: equal parts orchid bark, perlite, and sphagnum moss
- Choose a pot with excellent drainage — terracotta is better than plastic
- Most experienced growers recommend mounting or a wire basket as the better long-term option
How often should I water a staghorn fern in winter?
Every ten to fourteen days, depending on your indoor humidity and temperature. Growth slows dramatically in winter, so the plant uses less water.
- Check the moss with your fingers before soaking — if it still feels damp, wait another few days
- Soaking too frequently during dormancy is the most common cause of winter rot
- Err on the side of underwatering in winter — a slightly dry staghorn recovers faster than a rotting one

Mara Quinn edits Kultivy, where she shares houseplant care, propagation, beginner-friendly plant picks, and plant-styling ideas for anyone who wants their indoor plants to actually thrive. Every guide is image-led and reviewed for clarity, usefulness, image accuracy, and Pinterest-to-page alignment before it goes live. Visit the About page.